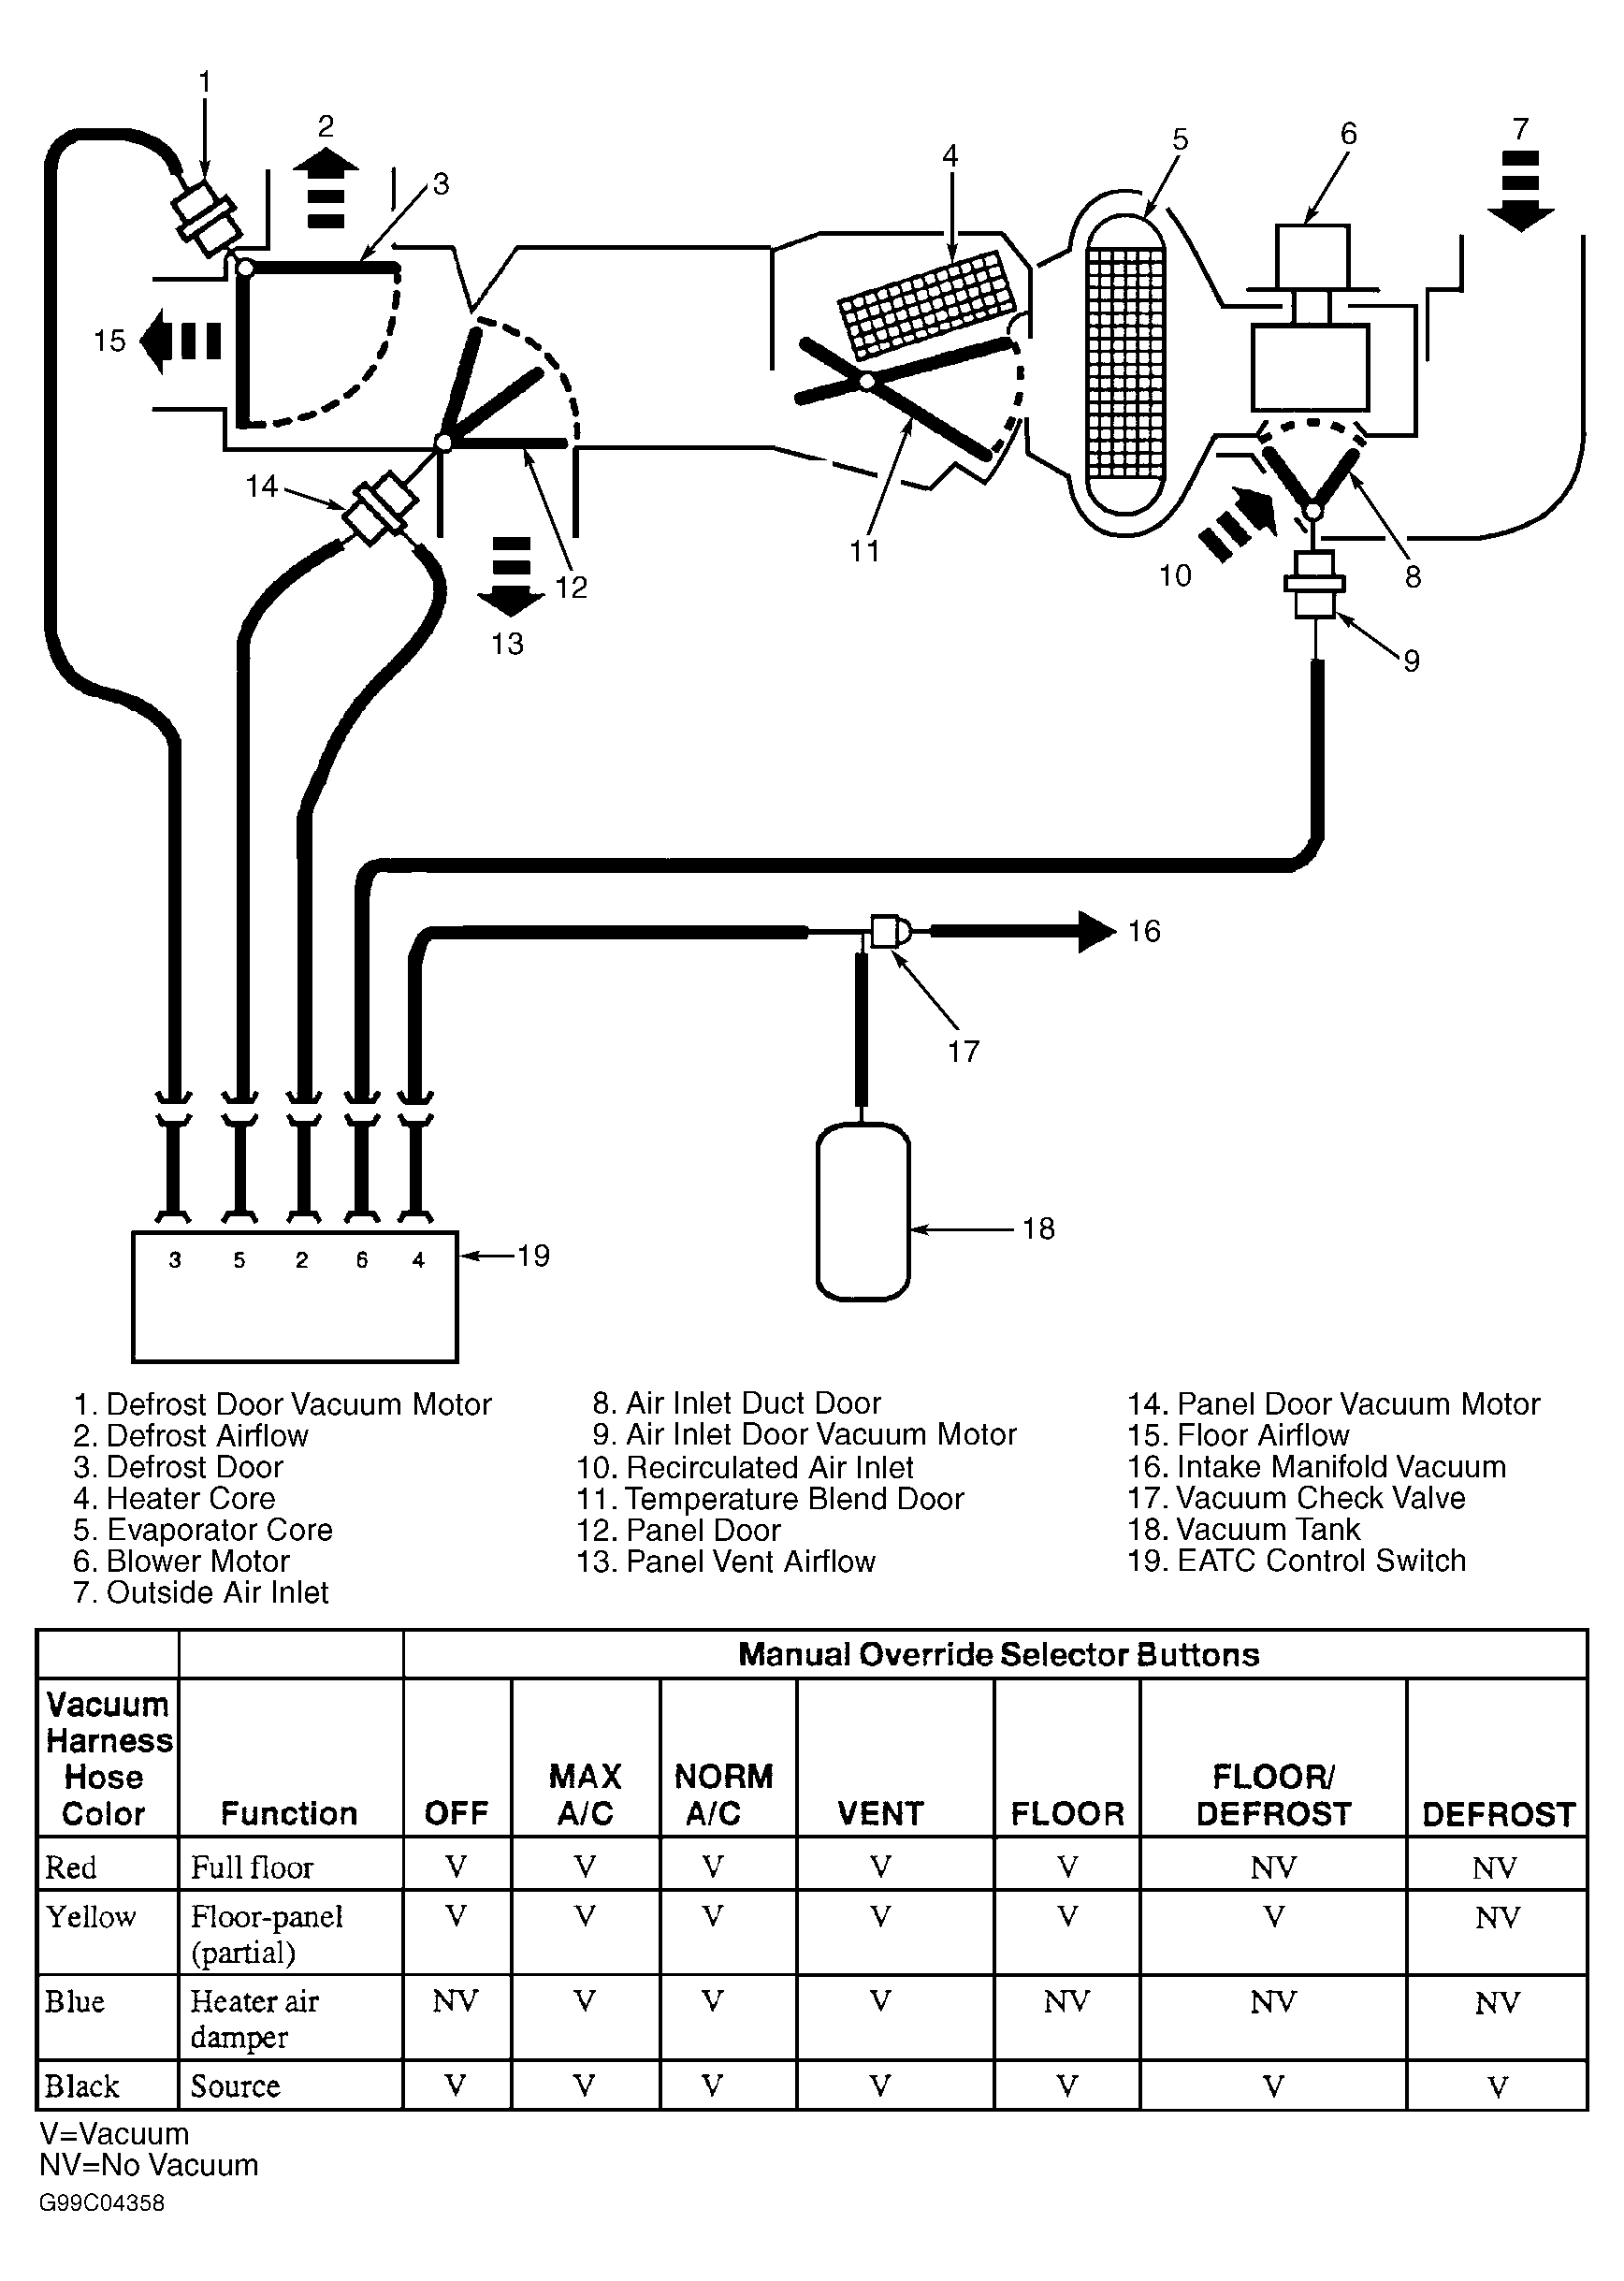
Test C: Improper/Erratic Airflow From Outlets
NOTE:
Air delivery system is designed to go to defrost when no vacuum is applied to any vacuum actuator. A leak in vacuum system sends all airflow to defrost outlets.
NOTE:
Never pinch hoses to stop vacuum as part of any test. Use wooden golf tees instead.
- Start engine and run at idle. Set blower to high speed. Press manual override (MAX A/C, VENT, PNL-FLR, FLOOR, FLR-DEF, and DEF) button for each airflow position and check airflow at outlets. If there is airflow only from defrost outlets at each switch position, go to next step. If airflow is from other than defrost outlets only, go to step 14.
- Check for disconnected vacuum supply hose between intake manifold, vacuum reservoir and A/C vacuum check valve. If hose is disconnected, reconnect hose. Recheck system operation. If hose is properly connected, go to next step.
- Disconnect intake manifold vacuum supply hose. Disconnect vacuum check valve. Plug intake manifold end of supply hose and leak test with vacuum pump attached to check valve end. If hose leaks, replace vacuum hose. Recheck system operation. If hose does not leak, go to next step.
- Reconnect intake manifold vacuum supply hose. Connect vacuum tester to vacuum check valve end of supply hose and try to pull vacuum. If vacuum tester can pull full or partial vacuum, hose is plugged or restricted. Replace vacuum hose. Recheck system operation. If vacuum tester cannot pull vacuum, go to next step.
- Reconnect vacuum check valve. Start engine and run at idle. Check for vacuum at check valve. Remove one hose at a time from reservoir port, then from control assembly port. If vacuum is available at both ports, reconnect hoses and go to next step. If vacuum is not available, replace vacuum check valve. Recheck system operation.
- Turn ignition off. Remove vacuum check valve. Using a "T" fitting, connect hoses from both vacuum check valve ports (not intake manifold port) to a vacuum tester. Apply 15 in. Hg of vacuum and observe vacuum tester gauge. If vacuum leak-down exceeds 1 in. Hg per minute, remove vacuum check valve from pump and plug vacuum hose. Apply vacuum with pump to ensure hose and pump are not leaking. If vacuum leak-down exceeds specification, replace vacuum check valve. Recheck system operation. If vacuum leak-down does not exceed specification, go to next step.
- Reconnect vacuum check valve. Disconnect hose from vacuum reservoir. Attach vacuum pump/tester to reservoir and apply vacuum. If vacuum reservoir leaks, replace vacuum reservoir and bracket. Recheck system operation. If vacuum reservoir does not leak, go to next step.
- Reconnect vacuum reservoir. Disconnect in-line vacuum harness. Plug vacuum harness at vacuum check valve. Apply vacuum to Black supply vacuum hose. If vacuum hose leaks, repair or replace vacuum harness. Recheck system operation. If vacuum hose does not leak, go to next step.
- Reconnect in-line vacuum harness. Remove A/C-heater control panel. Disconnect EATC module vacuum harness. Apply vacuum to Black supply vacuum hose. If vacuum hose leaks, repair or replace vacuum harness. Recheck system operation. If no leak is present, go to next step.
- Reconnect EATC module vacuum harness. Disconnect in-line vacuum harness connector. Start engine and idle. Connect vacuum pump/tester to Black vacuum hose and plug ports for other hoses. Press manual override (MAX A/C, VENT, PNL-FLR, FLOOR, FLR-DEF, and DEF) button for each airflow position. At each position, apply 15 in. Hg. of vacuum and check for vacuum leak. If leak-down is more than 1 in. Hg per minute, note function selector switch position where leak-down occurs and go to next step. If no leak-down is noted at any position, reconnect in-line vacuum harness connector and go to step 12.
- Turn ignition off. Disconnect EATC module vacuum harness. Connect vacuum pump to control supply port and plug position that indicated a leak in previous step. Apply 15 in. Hg of vacuum to selector switch. If vacuum leaks down, repair or replace vacuum harness. Recheck system operation. If vacuum does not leak, replace EATC module. Recheck system operation.
- Turn ignition off. Reconnect vacuum harness at check valve. Connect vacuum pump to Black hose in plenum vacuum harness and try to pull a vacuum. If vacuum can be pulled and held, hose is plugged. If a partial vacuum can be pulled, hose is restricted. If hose is plugged or restricted, repair or replace plenum vacuum harness. Recheck system operation. If hose is not plugged or restricted, go to next step.
- Reconnect in-line vacuum harness. Disconnect EATC module vacuum harness. Connect vacuum pump to Black supply hose and try to pull vacuum. If vacuum hose is plugged or restricted, repair or replace vacuum harness. Recheck system operation. If vacuum hose is not plugged or restricted, reconnect EATC vacuum harness and go to step 17.
- Re-evaluate system airflow for each function position as described under step 1. If airflow is now correct for each position, go to next step. If airflow is incorrect, go to step 21.
- Start and run engine. While pressing manual override (MAX A/C, VENT, PNL-FLR, FLOOR, FLR-DEF, and DEF) button for each airflow position, accelerate engine at each position. If airflow goes to defrost outlets during acceleration at each position, go to step 2. If airflow does not go to defrost outlets during acceleration at each position, go to next step.
- Start and run engine. While pressing manual override (MAX A/C, VENT, PNL-FLR, FLOOR, FLR-DEF, and DEF) button for each airflow position, accelerate engine at each position. If airflow is correct at each position, system is operating normally. If airflow is incorrect, go to step 21.
- Turn ignition off. If airflow system functioned properly prior to current complaint, go to step 20. If airflow system did not function properly in the past, go to next step.
- Compare vacuum hose color in vacuum harness with each connector on EATC vacuum connector. See Figure. If hose colors of vacuum harness and connector colors match, go to next step. If hose colors of vacuum harness do not match, replace vacuum harness. Recheck system operation.
- Disconnect suspect vacuum hose. Plug one end of suspect hose and connect vacuum pump to hose and try to pull vacuum. If vacuum hose leaks, repair or replace vacuum hose. Recheck system operation. If vacuum hose does not leak, go to next step.
- Check vacuum circuit for pinched or kinked vacuum hose(s). If any hose is pinched or kinked, reposition or replace hose. Recheck system operation. If hoses are okay, system is okay at this time.
- Turn ignition off. Check each vacuum hose to ensure it is properly attached at all connections. If any vacuum hose is disconnected, reconnect hose. Recheck system operation. If hoses are properly connected, go to next step.
- Disconnect in-line vacuum harness. If any hose was suspect of leaks in any prior checks, disconnect suspect hose, plug one end and attach vacuum pump to other end. Apply vacuum and check for leaks. If leak exists, go to next step. If hose is okay, go to step 24.
- Disconnect hose from vacuum control motor. Apply vacuum of 15 in. Hg of vacuum to hose leaking in previous step. If control motor holds a vacuum, replace vacuum plenum harness. Recheck system operation. If control motor does not hold vacuum, replace vacuum motor. Recheck system operation.
- Check attachment of vacuum control motor to damper door. If motor arm is properly attached to damper door, go to next step. If motor arm is not properly attached to damper door, connect motor arm. Recheck system operation.
- Disconnect vacuum control motor. Check travel and movement effort of damper door at function where problem was noted. If door moves smoothly through full travel, go to next step. If door does not move smoothly, repair damper door. Recheck system operation.
- Connect vacuum pump to each vacuum hose and try to pull vacuum. If hose can pull vacuum, or partial vacuum, hose is plugged or restricted. If hose is plugged or restricted, replace vacuum harness. Recheck system operation. If hose is okay, go to next step.
- Reconnect in-line vacuum harness. Connect vacuum pump to each vacuum hose and try to pull vacuum. If hose can pull vacuum, or partial vacuum, hose is plugged or restricted. If hose is plugged or restricted, replace vacuum harness. Recheck system operation. If hose is okay, go to next step.
- Reconnect vacuum motor and EATC vacuum harness. Disconnect in-line vacuum harness. Start engine and run at idle. Connect vacuum pump to Black supply hose and plug all other hoses. At each switch position, apply 15 in. Hg and check for leaks. If leakage exceeds 1 in. Hg per minute, note position of leak and go to next step. If no leaks are found, system is operating normally. Restore vehicle. Recheck system operation.
- Turn ignition off. Disconnect EATC vacuum harness. Plug one end of hose at position where leakage was noted in previous step. Apply 15 in. Hg to other end of hose. If vacuum leak is found, replace vacuum harness. Recheck system operation. If no leak is found, replace EATC module. Recheck system operation.