Headlamp - Moisture In Headlamp Assembly (03-19-3)
Publication date: 2003-09-29Reference number: 03-19-3
HEADLAMP - MOISTURE IN HEADLAMP ASSEMBLY
TECHNICAL SERVICE BULLETIN
Reference Number(s): 03-19-3, Date of Issue:
September 29, 2003
| FORD: | 1998-2003 CROWN VICTORIA; 2003 EXPEDITION |
| LINCOLN: | 2003 NAVIGATOR |
| MERCURY: | 1998-2002 GRAND MARQUIS |
DESCRIPTION
BODY - HEADLAMP - MOISTURE IN HEADLAMP ASSEMBLY
ELECTRICAL - HEADLAMP - MOISTURE IN HEADLAMP ASSEMBLY
ISSUE
Some Crown Victoria/Grand Marquis and Expedition/Navigator vehicles may exhibit excessive moisture in the headlamp assembly.
ACTION
To service, seal the lens and the housing of the affected headlamp assembly. Refer to the following Service Procedures. For Crown Victoria/Grand Marquis vehicles follow procedure "A". For Expedition/Navigator follow procedure "B".
SERVICE PROCEDURE
NOTE:
NOT FOLLOWING THE APPROPRIATE PROCEDURE ON EITHER VEHICLE LINE WILL RESULT IN AN UNSUCCESSFUL REPAIR.
NOTE:
DO NOT PERFORM EITHER PROCEDURE IF THERE IS STANDING WATER OR VISIBLE WATER STAINS ON THE HEADLAMP LENS, BEZEL, REFLECTORS OR TRACK THAT WILL NOT WIPE CLEAN. REPLACE THE HEADLAMP ASSEMBLY.
PROCEDURE "A" CROWN VICTORIA/GRAND MARQUIS
NOTE:
KEEP THE HEADLAMP LEVEL UNTIL IT IS DRY. TILTING THE HEADLAMP WHILE DROPS OF CONDENSATION ARE PRESENT MAY CAUSE STREAKING.
- Remove the headlamp assembly from the vehicle. Refer to Workshop Manual, Section 417-01.
- Remove bulb and bulb cap from the headlamp assembly.
- Using a fan, blow air into the headlamp housing through the bulb openings for 10 minutes to dry out any moisture that may be present. The headlamp lens must not be facing down or residue may remain on the lens surface after drying.NOTE: DO NOT USE HEAT GUN OR BLOW DRYER. EXCESS HEAT ABOVE 275° FAHRENHEIT (135° CELSIUS) WILL DAMAGE THE REFLECTOR AND PLASTIC COMPONENTS. DO NOT USE SHOP AIR. SHOP AIR CONTAINS MOISTURE AND OIL DROPLETS THAT MAY CONTAMINATE THE INSIDE SURFACE OF THE LENS.
- Reinstall bulb, bulb cover and bulb cover seal.
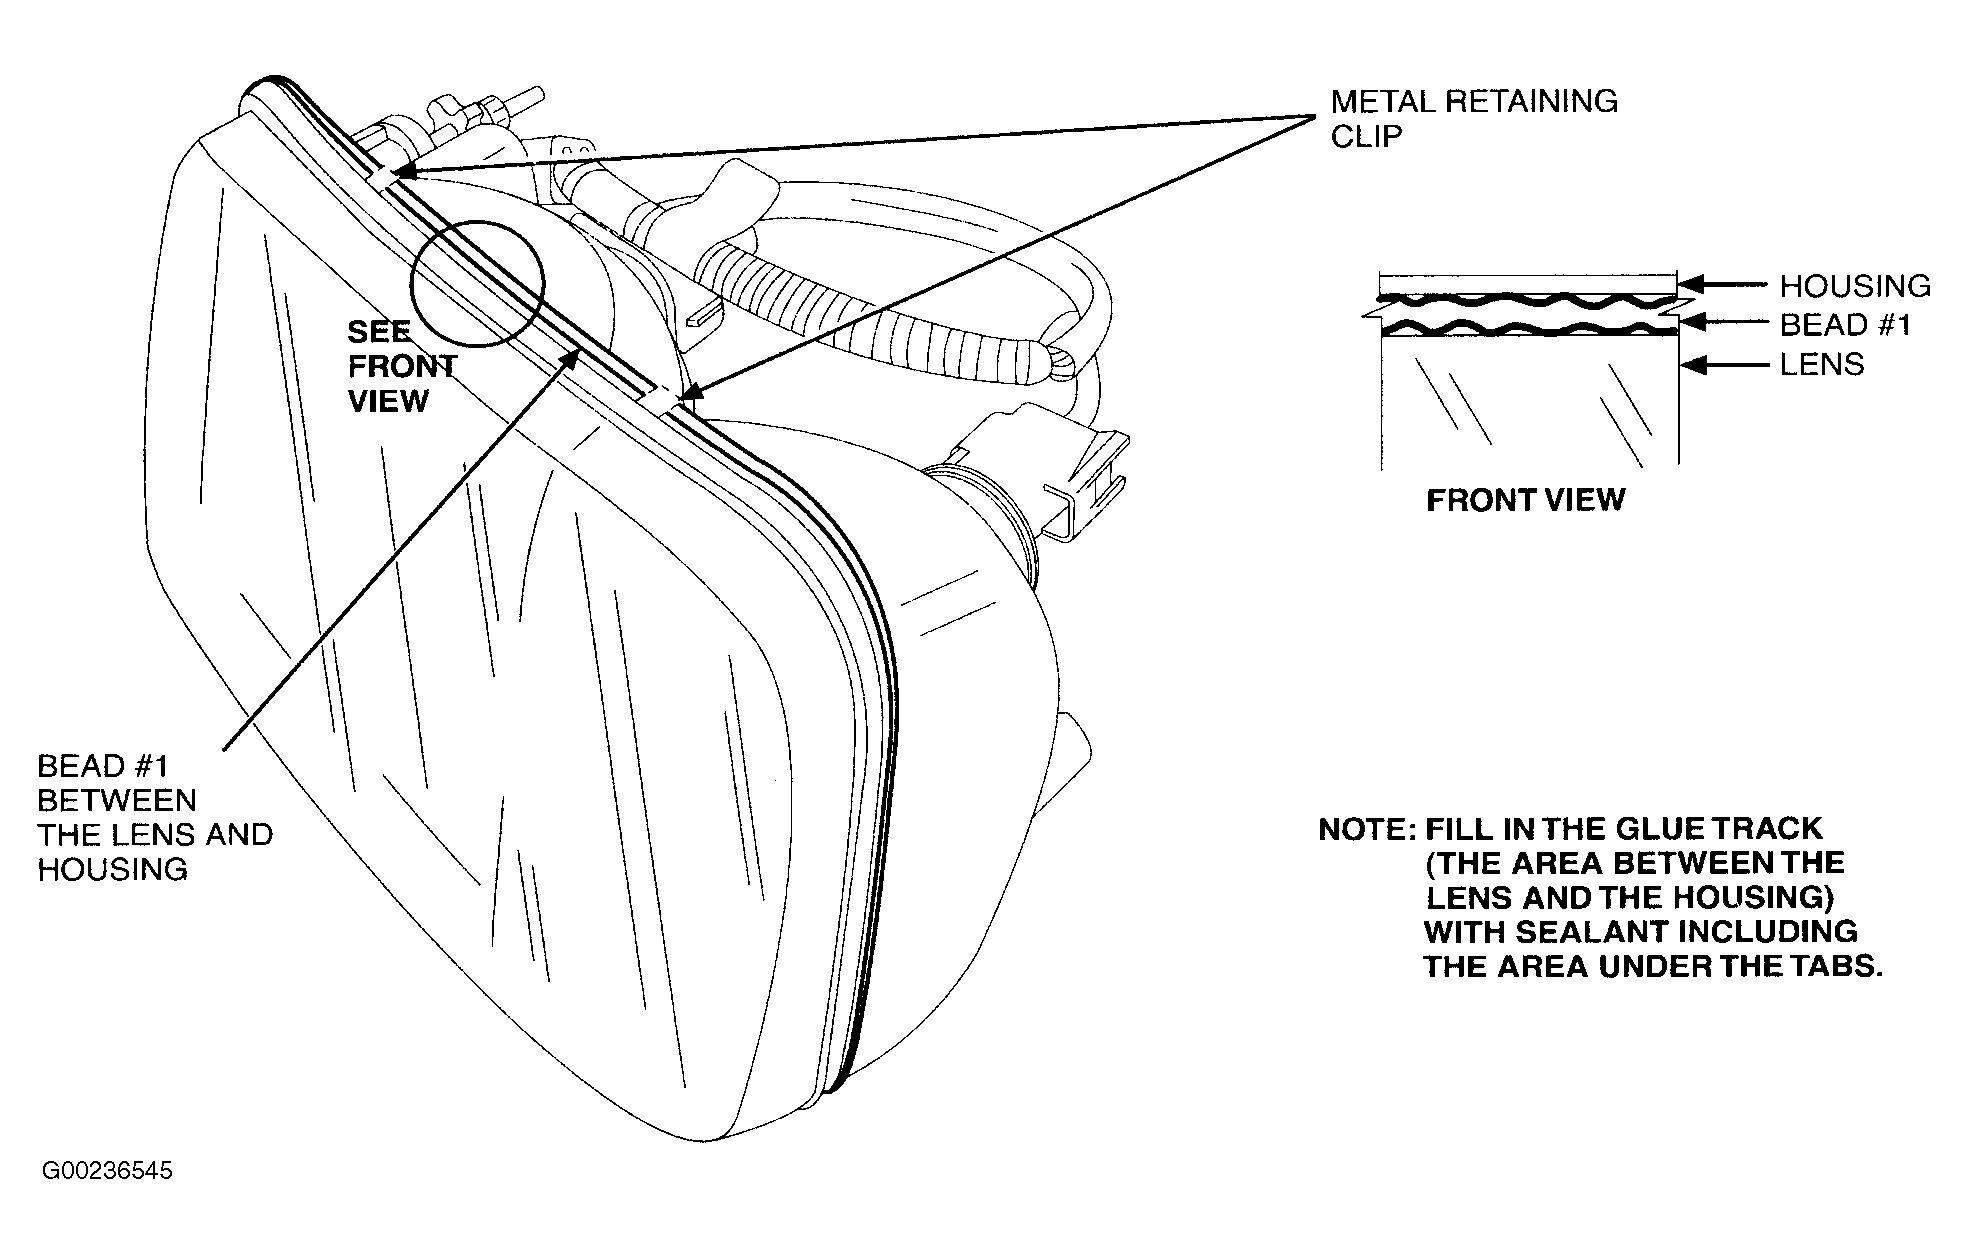
- Remove the four (4) metal retaining clips from headlamp assembly. Refer to (Fig 1 ).
- Using a dry, CLEAN shop towel, wipe clean the glue track area (area between the clear lens and black housing portion of the headlamp). Refer to (Fig 1
).NOTE: A WET, USED, AND/OR DIRTY SHOP TOWEL WILL CONTAMINATE THE SURFACE.NOTE: NOTE THE REMAINDER OF THE SERVICE PROCEDURE MUST BE PERFORMED AT ROOM TEMPERATURE 60° FAHRENHEIT (15° CELSIUS) MINIMUM.
- Working with the headlamp housing facing you and the lens facing away from you, scuff the entire headlamp assembly glue track area (top, sides and bottom of housing), using a Scotch-Brite pad (3M P/N 7447) or equivalent. Be sure to scuff the lens area at the glue track joint. Refer to (Fig 1 ).
- Wipe the scuffed areas with a clean, dry shop towel.
- Using Silicone Gasket And Sealant (F7AZ-19554-EA), place a 2mm bead into the entire headlamp assembly glue track area (top, sides and bottom of housing) Refer to (Fig 1
).NOTE: BE CAREFUL NOT TO GET SEALANT ON LENS SURFACE.
- Wearing gloves, smooth sealant around the headlamp glue track area. This will ensure the entire track has been filled with sealant and no voids or air pockets are present.
- Verify the entire headlamp assembly glue track area (top, sides and bottom of housing) is completely covered with sealant (touch up as necessary). Pay special attention to the two upper corners to make sure that they are well covered as they are the two places most prone to leak.
- Reinstall the four (4) metal retaining clips while sealant is still wet.
- Allow the headlamp assembly to dry for one (1) hour before installing into the vehicle to ensure that the sealant cures properly.
- Reinstall the headlamp assembly and verify bulb operation. Refer to Workshop Manual, Section 417-01 for installation instructions.
PROCEDURE "B" EXPEDITION/NAVIGATOR
NOTE:
DO NOT PERFORM EITHER PROCEDURE IF THERE IS STANDING WATER OR VISIBLE WATER STAINS ON THE HEADLAMP LENS, BEZEL, REFLECTORS OR TRACK THAT WILL NOT WIPE CLEAN. REPLACE THE HEADLAMP ASSEMBLY.
NOTE:
KEEP THE HEADLAMP LEVEL UNTIL IT IS DRY. TILTING THE HEADLAMP WHILE DROPS OF CONDENSATION ARE PRESENT MAY CAUSE STREAKING.
- Remove the headlamp assembly from the vehicle. Refer to Workshop Manual, Section 417-01.NOTE: IF ONLY ONE HEADLAMP ASSEMBLY IS AFFECTED, YOU WILL STILL NEED TO PLACE TAPE ON THE UNAFFECTED HEADLAMP ASSEMBLY IN STEP 15 TO ENSURE COSMETIC UNIFORMITY, SO IT IS BEST TO REMOVE BOTH ASSEMBLIES AT THIS TIME.NOTE: LEAVE THE HEADLAMP BULBS ATTACHED TO THE HEADLAMP ASSEMBLY.
- Remove two bulb covers from the affected headlamp assembly or assemblies.
- Using a fan, blow air into the lamp housing through the bulb cover openings for 10 minutes , to dry out any moisture that may be present. The headlamp lens must not be facing down or residue may remain on the lens surface after drying.NOTE: DO NOT USE HEAT GUN OR BLOW DRYER. EXCESS HEAT ABOVE 275° FAHRENHEIT (135° CELSIUS) WILL DAMAGE THE REFLECTOR AND PLASTIC COMPONENTS. DO NOT USE SHOP AIR. SHOP AIR CONTAINS MOISTURE AND OIL DROPLETS THAT MAY CONTAMINATE THE INSIDE SURFACE OF THE LENS.
- Reinstall bulb covers.
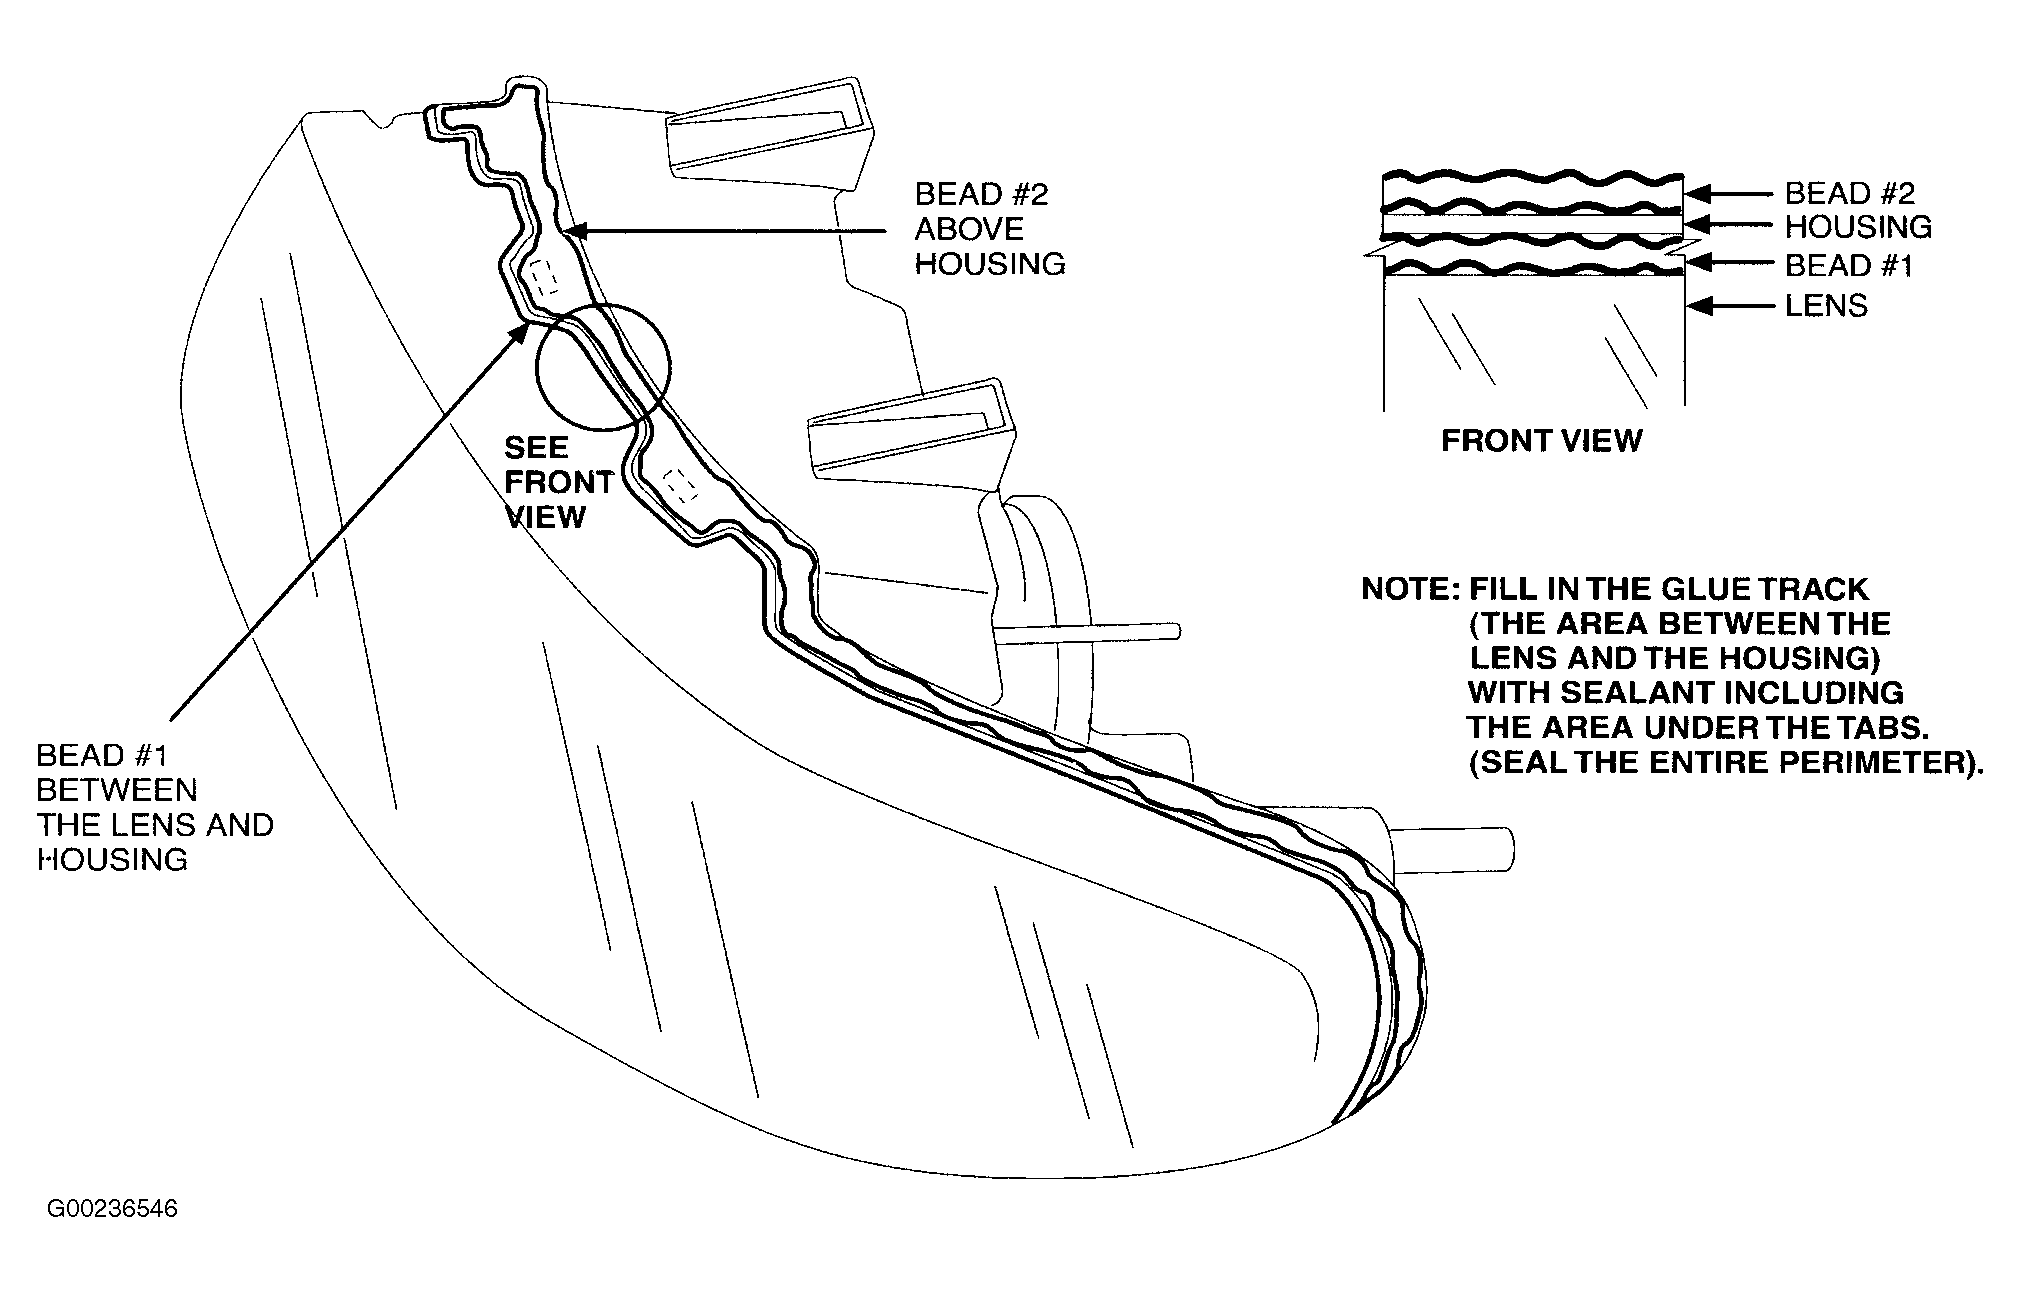
- Using a dry, CLEAN shop towel, wipe clean the glue track area (area between the clear lens and black housing portion of the headlamp). Refer to (Fig 2
).NOTE: THE REMAINDER OF THE SERVICE PROCEDURE MUST BE PERFORMED AT ROOM TEMPERATURE 60° FAHRENHEIT (15° CELSIUS) MINIMUM.
- Working with the headlamp housing facing you and the lens facing away from you, scuff the entire headlamp assembly glue track area (top, sides and bottom of housing), using a Scotch-Brite pad (3M P/N 7447) or equivalent. Be sure to scuff the lens area at the glue track joint. Refer to (Fig 2 ).
- Wipe the scuffed areas with a clean, dry shop towel.
- Wearing a glove, wipe the scuffed areas with 3M Adhesion Promoter (3M06396).NOTE: ADHESION PROMOTER MUST BE USED TO INSURE PROPER ADHESION OF THE POLYPROPYLENE COMPONENTS. DO NOT ALLOW THE ADHESION PROMOTER TO GET INTO THE LENS, AS THIS WILL DAMAGE THE SURFACE.
- Repeat Steps 6 through 8.NOTE: WAIT THREE (3) MINUTES TO ALLOW THE ADHESION PROMOTER TO DRY BEFORE CONTINUING WITH THE SERVICE PROCEDURE.
- Using Silicone Gasket And Sealant (F7AZ-19554-EA), run a 2mm bead into the entire glue track area (top, sides and bottom of housing, sealant placed between housing and lens). Refer to (Fig 2 ).
- Wearing gloves, smooth sealant around the lock tab areas using finger.NOTE: BE CAREFUL NOT TO GET SEALANT ON FACE OF LENS SURFACE.
- Using Silicone Gasket And Sealant (F7AZ-19554-EA), run a second 2mm bead over the top of the previous bead across the entire glue track area (top and sides of housing).
- Wearing gloves, smooth the entire sealant bead with finger.
- Be sure to lay two beads into the track and verify the entire track (top, sides and bottom of housing, sealant placed on flange of housing with tab opening) has been filled with sealant and no voids or air pockets are present. Touch up as necessary.
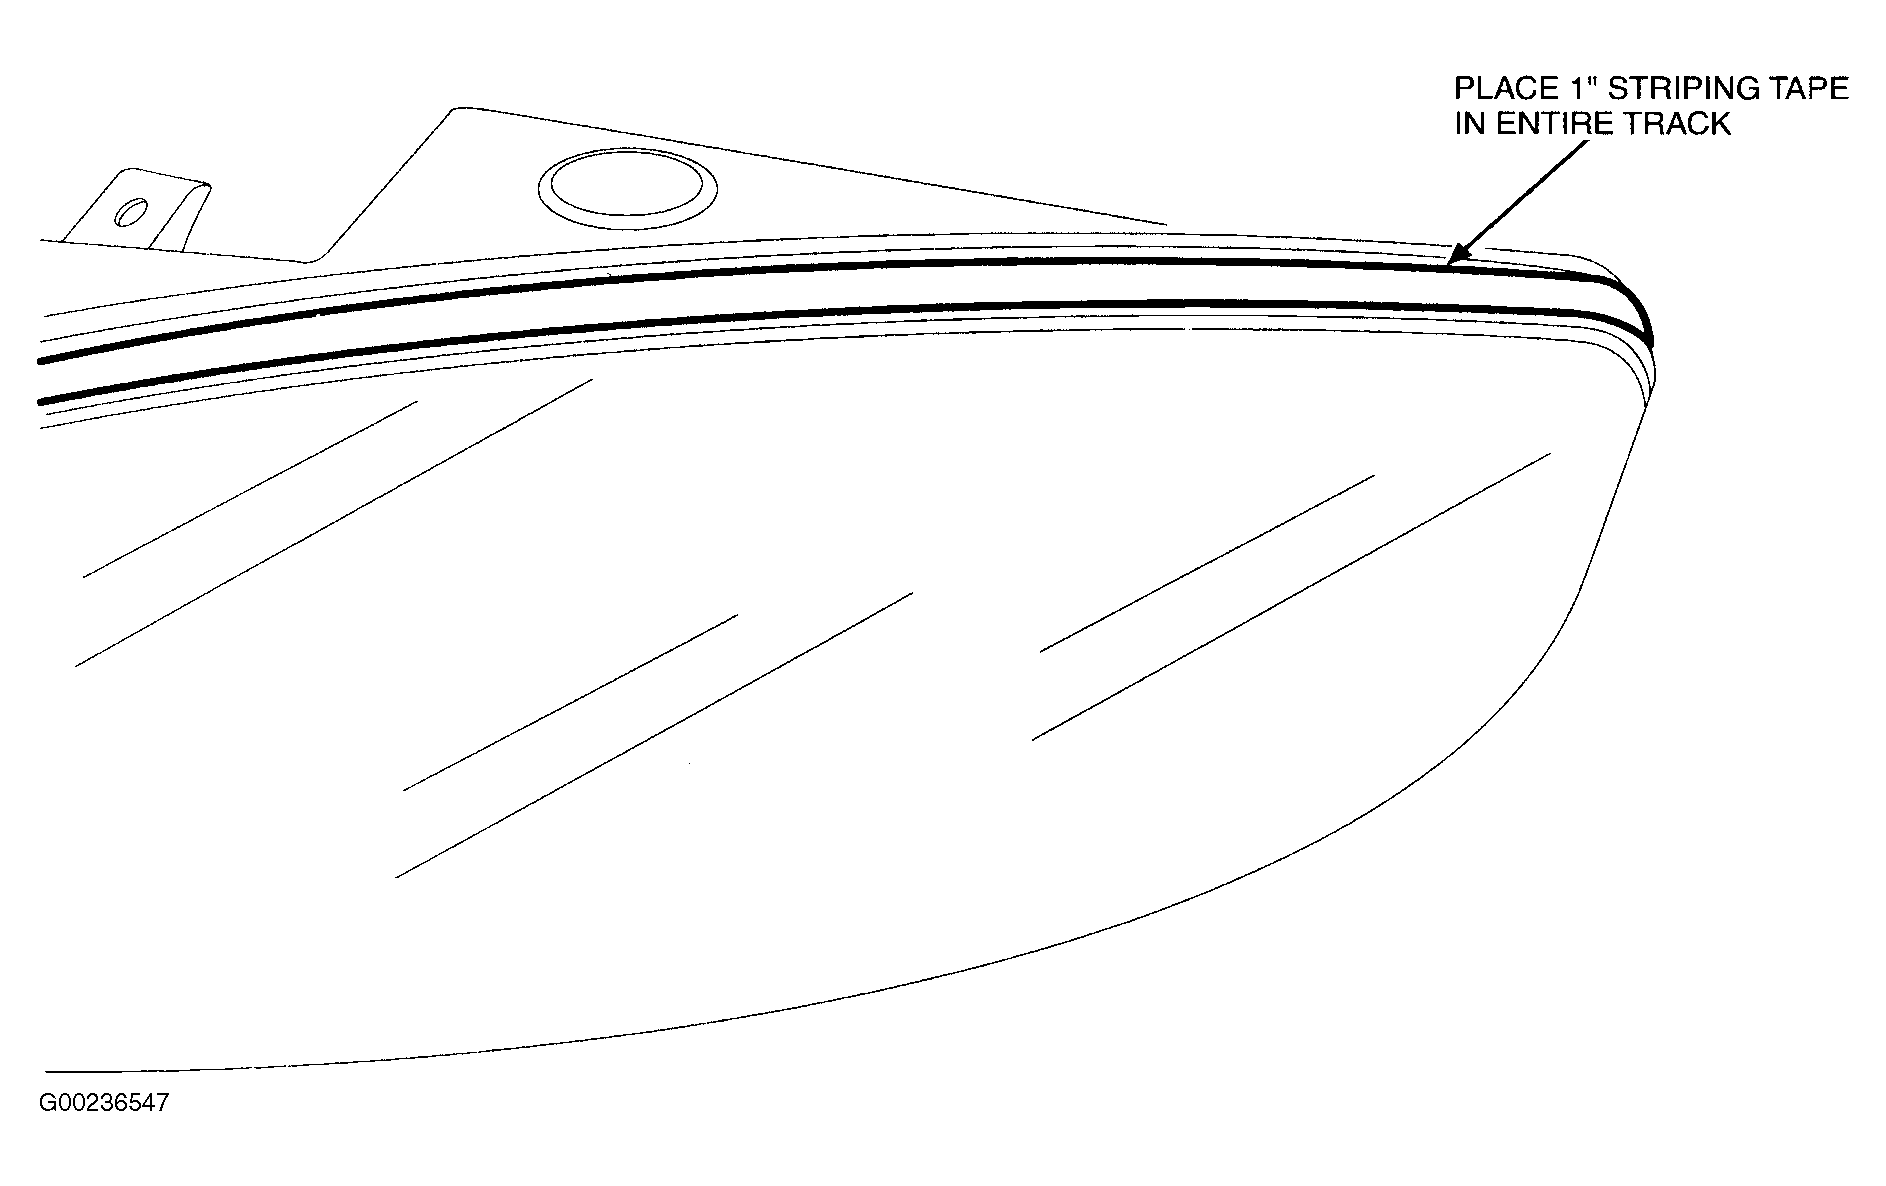
- Place 1" striping tape (remove release paper), on both headlamp assemblies, over the lens glued seam area. Start at top 1" outboard of 'S' shape and move from grill side of lamp to under side of lamp (recommend 3M79093, Scotchcal Striping Tape Low Gloss Black length 21.5"). See (Fig 3
). This is the part of the lamp seen when hood is open. Smooth out the tape starting at top outboard ends of lamp, moving to the inboard lower corner, keeping a straight line on lens.NOTE: PLACE TAPE ON BOTH HEADLAMPS TO ENABLE COSMETIC UNIFORMITY, EVEN IF YOU ONLY PLACED SEALANT TO ONE ASSEMBLY.
- Allow the headlamp assembly or assemblies to dry for one (1) hour to ensure the sealant cures properly.
- Reinstall the headlamp assembly and verify bulb operation. Refer to Workshop Manual, Section 417-01 for installation instructions.
PARTS INFORMATION
PARTS INFORMATION
| Part Number | Part Name |
|---|---|
| 3M P/N 7447 | Scotch-Brite Pad |
| F7AZ-19554-EA | Silicone Gasket And Sealant |
| 3M06396 | 3M Adhesion Promoter |
| 3M79093 | Scotchcal Striping Tape (Low Gloss Black) |
WARRANTY INFORMATION
WARRANTY STATUS: Eligible Under Provisions Of The New Vehicle Limited Warranty.
LABOR OPERATION CLAIMING CHART
| Operation | Description | Time |
|---|---|---|
| 031903A | Reseal One Headlamp (Includes Time To Remove And Install One Headlamp) - 1998-2003 Crown Victoria | 0.5 Hr. |
| 031903A | Reseal One Headlamp (Includes Time To Remove And Install One Headlamp) - 1998-2002 Grand Marquis | 0.5 Hr. |
| 031903B | Reseal Both Headlamps (Includes Time To Remove And Install Both Headlamps) - 1998-2003 Crown Victoria | 0.8 Hr. |
| 031903B | Reseal Both Headlamps (Includes Time To Remove And Install Both Headlamps) - 1998-2002 Grand Marquis | 0.8 Hr. |
| 031903C | Reseal One Headlamp Assembly (Includes Time To Remove And Install Both Headlamps) - 2003 Expedition, Navigator | 0.8 Hr. |
| 031903D | Reseal Both Headlamps (Includes Time To Remove And Install Both Headlamps) - 2003 Expedition, Navigator | 1.2 Hrs. |
DEALER CODING
| Basic Part No. | Condition Code |
|---|---|
| 13008 | 68 |