Whining/Buzzing - Comes Through Speakers Of Entertainment Or Two-Way Radio (02-16-4)
Publication date: 2002-08-19Reference number: 02-16-4
Supersedes refnos: 01-7-3
WHINING/BUZZING - COMES THROUGH SPEAKERS OF ENTERTAINMENT OR TWO-WAY RADIO
TECHNICAL SERVICE BULLETIN
| FORD: | 1990-1994 Tempo; 1990-1997 Escort, Probe, Thunderbird; 1990-1998 Mustang; 1990-1999 Taurus; 1990-2002 Crown Victoria; 1997-1999 Contour; 2001 Taurus; 1990 Bronco II; 1990-1996 Bronco; 1990-1997 Aerostar, F Super Duty, F-250 HD, F-350; 1990-1999 F-250 LD; 1990-2002 Econoline, F-150, Ranger; 1991-2002 Explorer; 1995-2002 Windstar; 1997-2003 Expedition; 1999-2002 Super Duty F Series; 2000-2002 Excursion, Explorer Sport Trac, Explorer Sport; 2001-2002 Escape |
| LINCOLN: | 1990-1992 Mark VII; 1990-1994 Continental; 1990-2002 Town Car; 1998-2003 Navigator; 2002 Blackwood |
| MERCURY: | 1990-1994 Topaz; 1990-1997 Cougar; 1990-1999 Sable; 1990-2002 Grand Marquis; 1991-1997 Tracer; 1997-1999 Mystique; 2001 Sable; 1993-2002 Villager; 1997-2002 Mountaineer |
TSB 01-7-3 is being republished in its entirety to update the model year coverage and vehicle line coverage.
DESCRIPTION
FUEL SYSTEM - FUEL PUMP "WHINING"/"BUZZING" NOISE COMES THROUGH ENTERTAINMENT OR TWO-WAY RADIO SPEAKER
RADIO - ENTERTAINMENT OR TWO-WAY COMMUNICATION - "WHINING"/"BUZZING" NOISE IN SPEAKERS CAUSED BY FUEL PUMP
NOISE - "WHINING"/"BUZZING" - COMES THROUGH SPEAKERS OF ENTERTAINMENT OR TWO-WAY RADIO
ISSUE
A "whining"/"buzzing" noise in the speakers of the entertainment radio or two-way radio on vehicles with an in-tank electric fuel pump may be caused by electrical noise from the fuel pump.
ACTION
Install an electronic noise Radio Frequency Interference (RFI) Filter (F1PZ-18B925-A) on the fuel pump inside the fuel tank. Refer to the following Test Procedure to confirm that the concern exists, then refer to the Service Procedure for repair details.
TEST PROCEDURE
Fuel pump radio noise is relatively constant and changes only slightly with vehicle speed. If the frequency of the noise varies or the noise comes and goes with the vehicle speed, then it is not the fuel pump and this fix will not be effective. The following procedure will help determine if the fuel pump is the cause of the radio noise:
- Turn on the radio before the key is turned on (assuming the radio will operate without the ignition key - you may need to put the ignition key in the Accessory position).
- Turn the ignition key to the Run position (do not start the engine).
- The fuel pump should run for about 1 second with the key in the Run position with the engine not running. Listen for noise in the radio. If noise is present while the pump is running and stops when the pump stops, then the noise is being generated by the pump and this procedure should help.
SERVICE PROCEDURE
- Remove the fuel pump sender assembly from the fuel tank. Refer to the appropriate model year Workshop Manual for removal procedure.
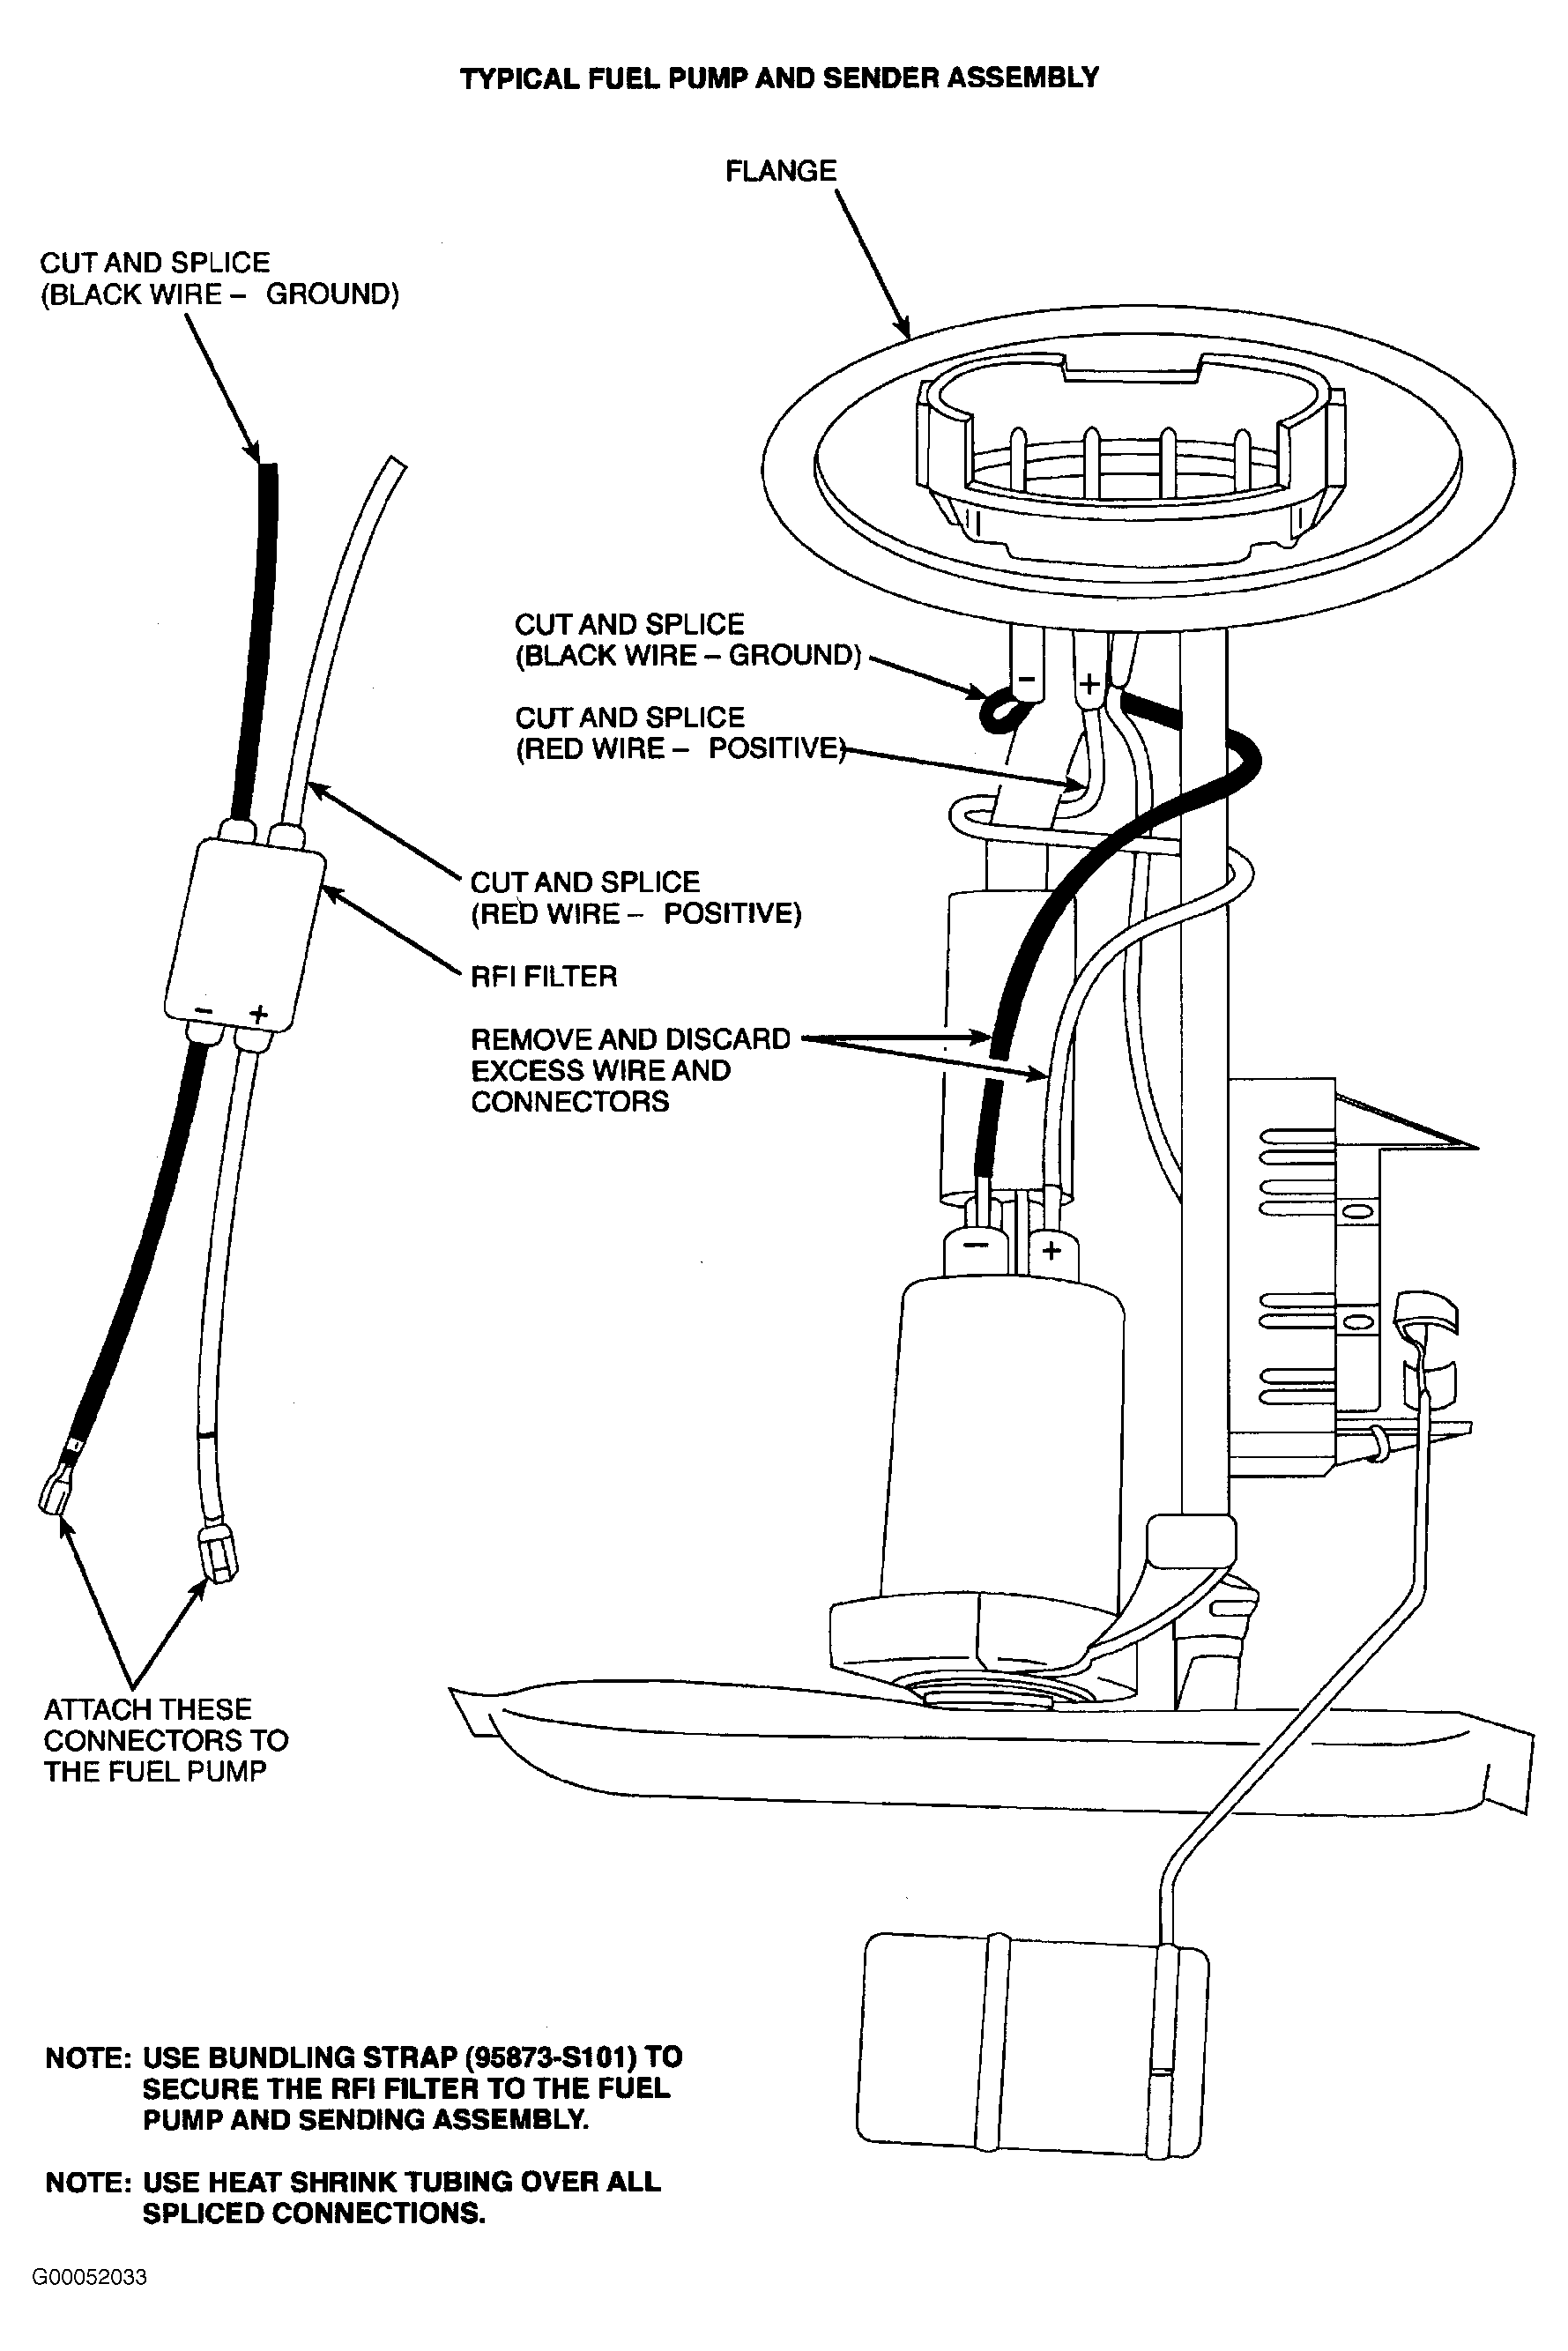
- On vehicles without a fuel delivery module, remove the negative and positive connectors from the fuel pump, Fig 1
.
- Cut the wires to the fuel pump 76mm (3") from the flange of the fuel pump and discard the wires.
- Connect the RFI filter connectors to the spade terminal on the fuel pump.
- Cut and solder both the red and black wires of the RFI filter to the red and black wires of the flange. Use Heat Shrink Tubing (F5AZ-14A099-AA) over the solder connections.
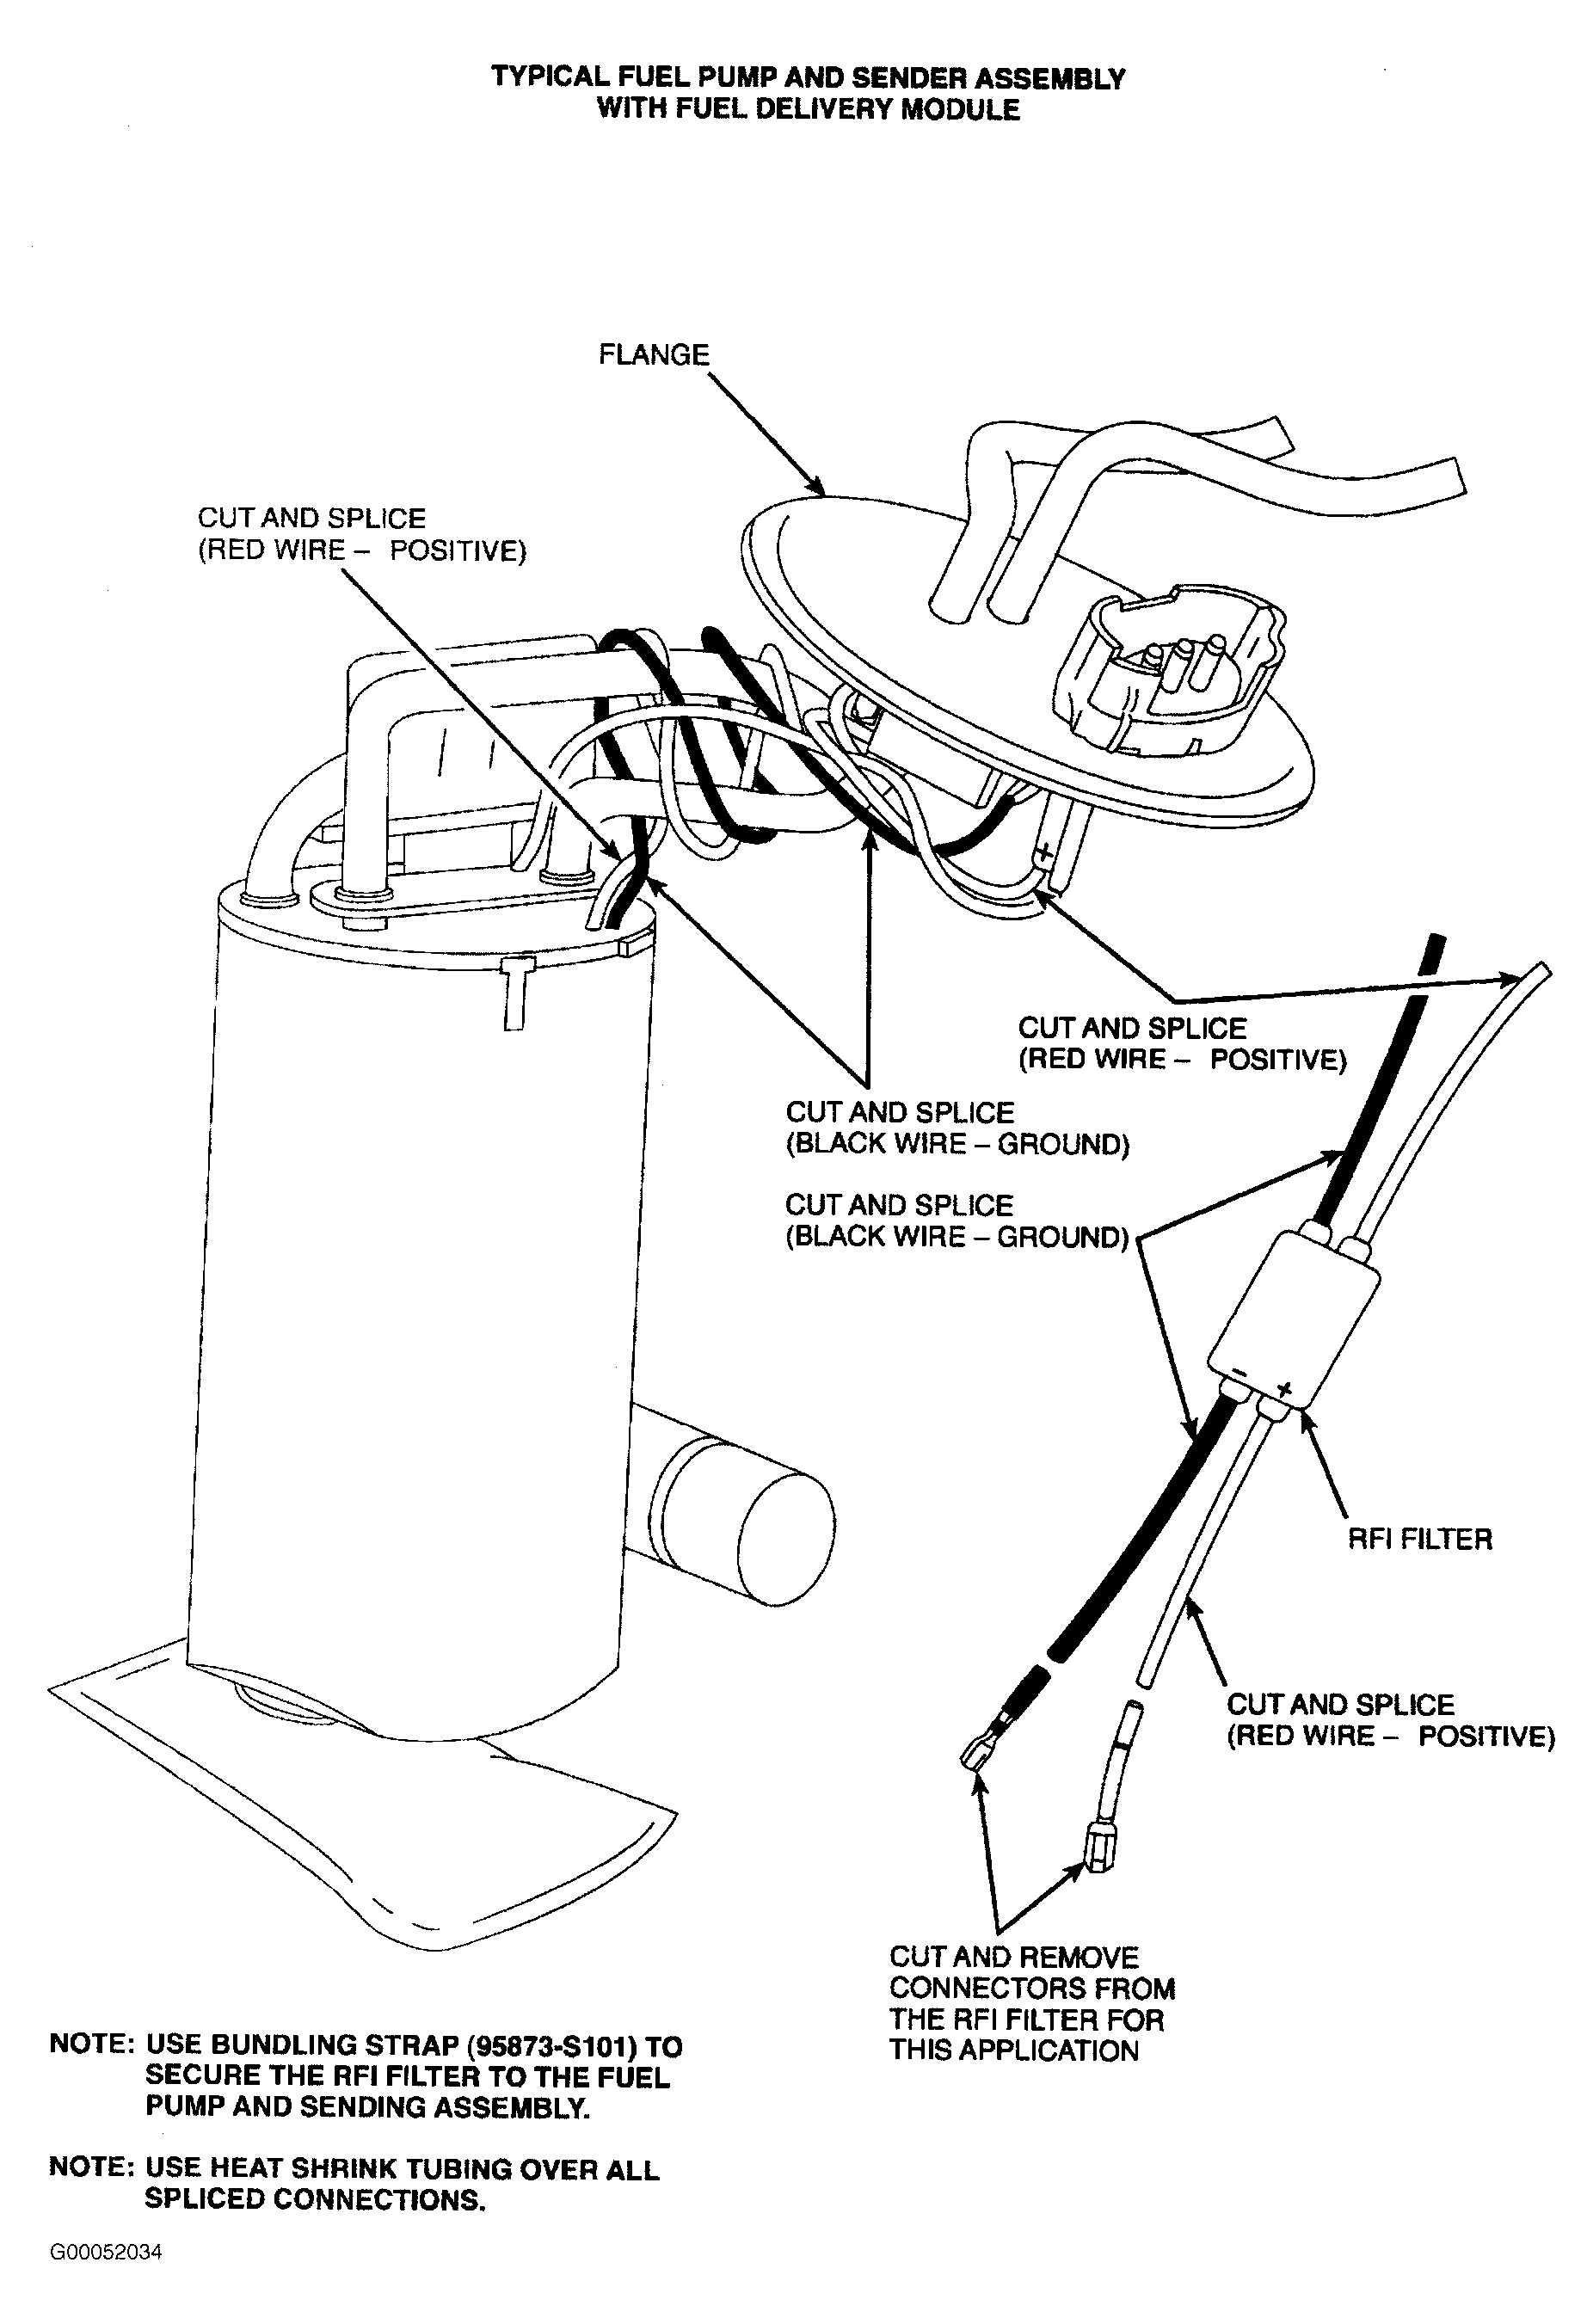
NOTE: HEAT SHRINK TUBING MUST BE USED OVER ALL SOLDERED CONNECTIONS MADE PER THIS TSB. USE SUFFICIENT TUBING (ABOUT 50mm (2")) OF THE SPECIFIED TYPE TO ENTIRELY COVER EACH SOLDERED CONNECTION AND SHRINK APPROPRIATELY TO PREVENT EXPOSURE OF THE CONNECTIONS.NOTE: FOR SOME VEHICLES WITH EXTREMELY LONG FUEL PUMP GROUND WIRE CIRCUITS, IT MAY BE NECESSARY TO SHORTEN THE GROUND WIRE TO A POINT CLOSE TO THE FUEL TANK. IF THE GROUND IS MOVED, BE SURE IT IS SECURE AND PROTECTED FROM CORROSION SINCE IT IS THE OPERATING GROUND FOR THE PUMP. CHECK SERVICE LITERATURE (EVTM, ETC.) FOR GROUND LOCATIONS.WARNING: ALL SOLDERING AND HEAT SHRINKING MUST BE COMPLETED AWAY FROM THE FUEL TANK AREA. USE A SOLDERING IRON ONLY FOR SOLDERING AND HEAT GUN ONLY FOR APPLYING SHRINK TUBING. - On light trucks and compact trucks with a fuel delivery module, cut the fuel pump wires to the fuel delivery module 50mm (2") from the flange and discard the wires, Fig 2
.
- Cut the connectors from the RFI filter and solder wires to the fuel delivery module (red to red and black to black). Use heat shrink tubing over solder connections.
- Solder wires from the RFI filter to the flange wires (red to red and black to black). Use heat shrink tubing over soldered connections.
NOTE: HEAT SHRINK TUBING MUST BE USED OVER ALL SOLDERED CONNECTIONS MADE PER THIS TSB. USE SUFFICIENT TUBING (ABOUT 50mm (2")) OF THE SPECIFIED TYPE TO ENTIRELY COVER EACH SOLDERED CONNECTION AND SHRINK APPROPRIATELY TO PREVENT EXPOSURE OF THE CONNECTIONS.NOTE: FOR SOME VEHICLES WITH EXTREMELY LONG FUEL PUMP GROUND WIRE CIRCUITS, IT MAY BE NECESSARY TO SHORTEN THE GROUND WIRE TO A POINT CLOSE TO THE FUEL TANK. IF THE GROUND IS MOVED, BE SURE IT IS SECURE AND PROTECTED FROM CORROSION SINCE IT IS THE OPERATING GROUND FOR THE PUMP. CHECK SERVICE LITERATURE (EVTM, ETC.) FOR GROUND LOCATIONS.WARNING: ALL SOLDERING AND HEAT SHRINKING MUST BE COMPLETED AWAY FROM THE FUEL TANK AREA. USE A SOLDERING IRON ONLY FOR SOLDERING AND HEAT GUN ONLY FOR APPLYING SHRINK TUBING. - Secure the RFI filter to the fuel pump and sender assembly with a Bundling Strap (95873-S101) to prevent rattling in the tank, Fig 1 and Fig 2 .
- Reinstall the fuel pump sender assembly into the fuel tank.CAUTION: INSTALL NEW GASKETS WHEN REINSTALLING SENDER TO PREVENT LEAKS. REFER TO THE PARTS CATALOG FOR PROPER APPLICATIONS.
- Check the appropriate Electrical and Vacuum Troubleshooting Manual (EVTM) (or other service literature) for the location of the fuel pump ground. If ground is more than 0.9m (3') from the tank, cut wire and ground fuel pump end within 0.9m (3') of the tank to prevent ground wire from acting as an antenna. Be sure ground is secure and protected from corrosion since it is the operating ground for the fuel pump.
- Install the fuel tank in the vehicle as outlined in the appropriate Service or Workshop Manual.
PARTS INFORMATION
| Part Number | Part Name |
|---|---|
| F1PZ-18B925-A | Radio Frequency Interference (RFI) Filter |
| 95873-S101 | Bundling Strap |
| F5AZ-14A099-AA | Heat Shrink Tubing |
WARRANTY INFORMATION
WARRANTY STATUS: Eligible Under The Provisions Of Bumper To Bumper Warranty Coverage:
| Operation | Description | Time |
|---|---|---|
| 021604AA | Diagnose And Install RFI Filter 1990-1997 Thunderbird/Cougar | 2.1 Hrs. |
| 021604BA | Diagnose And Install RFI Filter 1990-1999 And 2001 Taurus/Sable | 1.4 Hrs. |
| 021604CA | Diagnose And Install RFI Filter 1992-1997 Crown Victoria/Grand Marquis/Town Car | 1.2 Hrs. |
| 021604CB | Diagnose And Install RFI Filter 1990-1991 Crown Victoria/Grand Marquis/Town Car | 1.6 Hrs. |
| 021604CC | Diagnose And Install RFI Filter 1998-2002 Crown Victoria/Grand Marquis | 2.2 Hrs. |
| 021604DA | Diagnose And Install RFI Filter 1998-2002 Town Car | 1.9 Hrs. |
| 021604EA | Diagnose And Install RFI Filter 1990-1998 Mustang | 1.7 Hrs. |
| 021604FA | Diagnose And Install RFI Filter 1990-1998 Mustang | 1.6 Hrs. |
| 021604GA | Diagnose And Install RFI Filter 1990-1994 Continental | 1.5 Hrs. |
| 021604HA | Diagnose And Install RFI Filter 1990 Escort | 1.6 Hrs. |
| 021604IA | Diagnose And Install RFI Filter 1991-1996 Escort/Tracer | 0.8 Hr. |
| 0216041B | Diagnose And Install RFI Filter 1997 Escort/Tracer | 1.6 Hrs. |
| 021604JA | Diagnose And Install RFI Filter 1997 Contour/Mystique | 0.8 Hr. |
| 021604JB | Diagnose And Install RFI Filter 1998-1999 Contour/Mystique | 1.8 Hrs. |
| 021604KA | Diagnose And Install RFI Filter 1990-1992 Mark VII | 2.0 Hrs. |
| 021604LA | Diagnose And Install RFI Filter 1990-1992 Probe | 0.8 Hr. |
| 021604LB | Diagnose And Install RFI Filter 1993-1997 Probe | 1.8 Hrs. |
| 021604MA | Diagnose And Install RFI Filter 1990-2002 Econoline Single Fuel Tank | 1.6 Hrs. |
| 021604MB | Diagnose And Install RFI Filter 1990-1991 Econoline Both Fuel Tanks | 2.6 Hrs. |
| 021604NA | Diagnose And Install RFI Filter 1990-1996 Bronco | 2.0 Hrs. |
| 021604OA | Diagnose And Install RFI Filter 1991-1994 Explorer | 1.8 Hrs. |
| 021604OB | Diagnose And Install RFI Filter 1995-2002 Explorer | 1.5 Hrs. |
| 021604PA | Diagnose And Install RFI Filter 1997-2002 Mountaineer | 1.5 Hrs. |
| 021604QA | Diagnose And Install RFI Filter 1995-2002 Windstar | 1.4 Hrs. |
| 021604RA | Diagnose And Install RFI Filter 1993-2002 Villager | 1.9 Hrs. |
| 021604SA | Diagnose And Install RFI Filter 1997-2003 Expedition/Navigator | 1.7 Hrs. |
| 021604TA | Diagnose And Install RFI Filter 1990-1997 Ranger Standard Cab | 1.3 Hrs. |
| 021604TB | Diagnose And Install RFI Filter 1990-1997 Ranger Super Cab | 1.8 Hrs. |
| 021604TC | Diagnose And Install RFI Filter 1998-2002 Ranger 4X4 | 1.8 Hrs. |
| 021604TD | Diagnose And Install RFI Filter 1998-2002 Ranger 4X2 | 1.6 Hrs. |
| 021604UA | Diagnose And Install RFI Filter 1990-1997 Aerostar | 1.5 Hrs. |
| 021604VA | Diagnose And Install RFI Filter 1990 Bronco II | 1.9 Hrs. |
| 021604WA | Diagnose And Install RFI Filter 1990-1996 F-150/250/350/Super Duty And 1997 F-350/Superduty Rear | 1.4 Hrs. |
| 021604WB | Diagnose And Install RFI Filter 1990-1996 F-150/250/350/Super Duty And 1997 F-350/Superduty Front | 1.4 Hrs. |
| 021604WC | Diagnose And Install RFI Filter 1990-1996 F-150/250/350/Super Duty And 1997 F-350/Superduty Both Tanks | 2.1 Hrs. |
| 021604WD | Diagnose And Install RFI Filter 1998-2002 F-150 | 1.6 Hrs. |
| 021604XA | Diagnose And Install RFI Filter 2000-2002 Excursion | 1.6 Hrs. |
| 021604XB | Diagnose And Install RFI Filter 1999-2002 Super Duty F-Series: Front Tank | l.6 Hrs. |
| 021604XC | Diagnose And Install RFI Filter 1999-2002 Super Duty F-Series: Rear Tank | 1.5 Hrs. |
| 021604XD | Diagnose And Install RFI Filter 1999-2002 Super Duty F-Series: Both Tanks | 2.7 Hrs. |
| 021604YA | Diagnose And Install RFI Filter 2001-2002 Escape | 0.8 Hr. |
| 021604ZA | Diagnose And Install RFI Filter 2002 Blackwood | 1.9 Hrs. |
| Basic Part No. | Condition Code |
|---|---|
| 18B925 | 42 |
OASIS CODES: 205000, 207000, 404000, 702000, 702300