Wiper Motor - Mounting Bracket & Depressed Park Out Arm - Transfer (03-7-2)
Publication date: 2003-04-14Reference number: 03-7-2
Supersedes refnos: 02-10-7
WIPER MOTOR - MOUNTING BRACKET & DEPRESSED PARK OUT ARM - TRANSFER
TECHNICAL SERVICE BULLETIN
Reference Number(s): 03-7-2, Date of Issue:
April 14, 2003
Superceded Bulletin(s): 02-10-7, Date of Issue:
May 27, 2002
| FORD: | 1987-1995 Taurus; 1987-2002 Crown Victoria |
| LINCOLN: | 1987-1997 Town Car; 1988-1997 Continental; 1993-1998 Mark VIII |
| MERCURY: | 1987-1995 Sable; 1987-2002 Grand Marquis |
NOTE:
This bulletin supersedes Technical Service Bulletin 02-10-7 dated May 27, 2002. Article 02-10-7 is being republished in its entirety to update the Service Procedure.
DESCRIPTION
ELECTRICAL - FRONT WIPER MOTOR - MOUNTING BRACKET AND DEPRESSED PARK OUT ARM - TRANSFER SERVICE TIPS
ISSUE
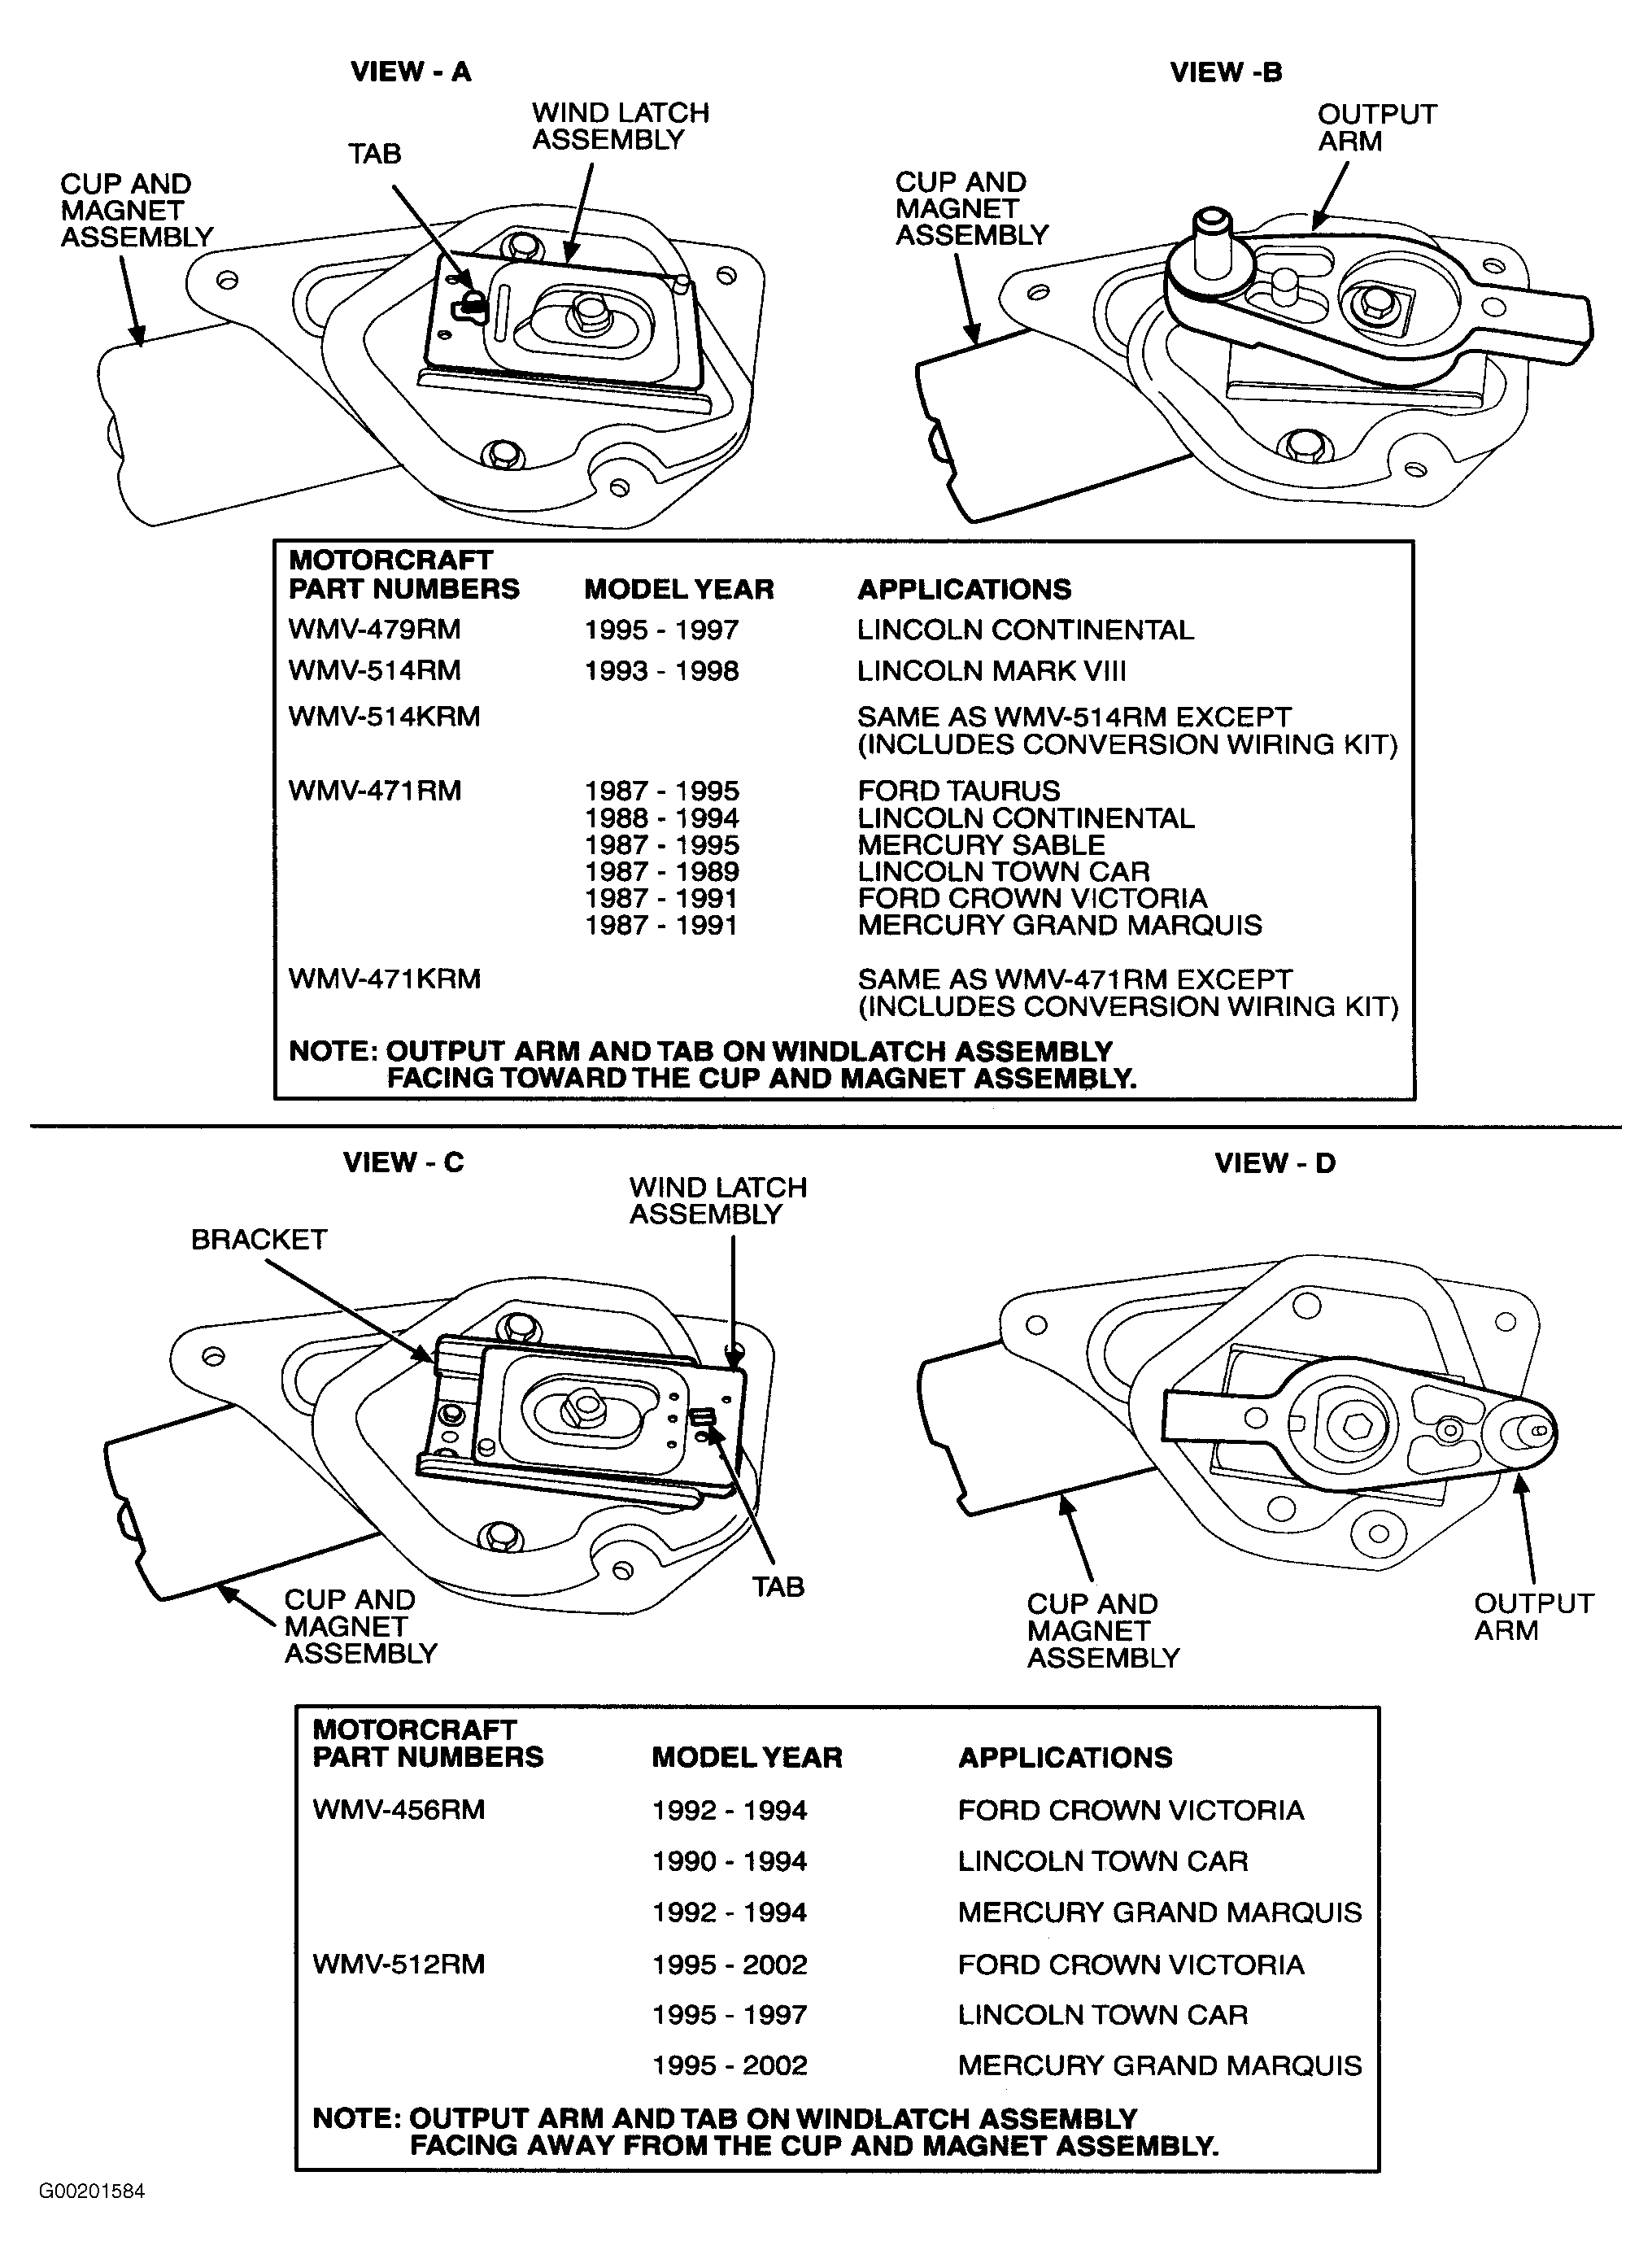
Motorcraft remanufactured front wiper motors do not include the mounting bracket or depressed park output arm. The mounting bracket and depressed park output arm must be transferred from the old wiper motor to the replacement wiper motor. Care must be taken to ensure proper orientation of the windlatch assembly and depressed park output arm.
ACTION
The front wiper motor mounting bracket and output arm must be removed from the old front wiper motor and installed on the remanufactured wiper motor if wiper motor replacement is required. Refer to the following service information for details.
SERVICE PROCEDURE
DISASSEMBLY
- Using a small flat bladed screwdriver, carefully remove the plastic output arm dust cover from the old wiper motor output arm to expose the output arm hold down bolt.NOTE: THE DUST COVER WILL BE REINSTALLED DURING ASSEMBLY.
- Remove the output arm attaching bolt.
- Using a small light hammer, gently tap the backside of the output arm to remove the output arm from the wiper motor output shaft. Carefully observe the orientation of the plastic windlatch slide.NOTE: TAKE CARE NOT TO DAMAGE THE PLASTIC WINDLATCH SLIDE OR BRACKET. IT IS NOT NECESSARY TO REMOVE THE PLASTIC WINDLATCH SLIDE OR METAL GUIDE FROM THE WIPER MOTOR MOUNTING BRACKET.
- Remove the three (3) 8mm wiper motor mounting bracket attaching bolts.
- Remove the wiper motor mounting bracket.
ASSEMBLY
- Position and align the old wiper motor mounting bracket onto the new wiper motor.
- Reinstall the three wiper motor mounting bracket bolts and torque to 108-156 in-lb. (13-17 N.m).
- Verify that the plastic windlatch slide is positioned so that it can move an equal distance beyond both ends of the depressed park windlatch guide bracket. Make sure the tab on the windlatch is oriented in the proper direction for the specific application (Fig 1 , views A and C).
- Apply a thin film of Silicone Brake Caliper Grease (Motorcraft Part XG-3-A) to the mating surfaces of the plastic windlatch slide and the output arm.
- Install the output arm onto the wiper motor output shaft according to the specific application (Fig 1
, views B and D).NOTE: THE OUTPUT SHAFT AND ARM ARE KEYED FOR PROPER ORIENTATION.
- Reinstall the output arm bolt and torque to 132-180 in-lb. (15-20 N.m).
- Reinstall the plastic output arm dust cover.
- Rotate the output arm slowly clockwise one full turn by hand, then turn the output arm by hand counter-clockwise to seat the detent in the output arm against the stop on the plastic windlatch slide.
- Position the vehicle wiper arm linkage so that the wiper blades are at the bottom of the windshield, just above the parked position.
- Install the wiper motor in the vehicle and connect the wiper arm linkage per the procedures outlined in Section 01-16 or Section 501-16, Wiper and Washer Systems - Removal and Installation, of the appropriate model year Workshop Manual.
TROUBLESHOOTING
- Symptom
Motor nuns but does not Park. - Possible Cause
- Bad Ground.
- Broken wire in harness or Connection at Plastic Wiper Cover.
- Correction
- Check ground strap.
- Check wiring and connector for damage.
- Symptom
Motor parks but wipers stop up on windshield. - Possible Cause
- Windlatch installed 180 degrees out of position.
- Windlatch tab worn or broken.
- Correction
- Reassemble with Windlatch rotated 180 degrees.
- Replace windlatch assembly.
- Symptom
Wiper motor runs but wipers only move 3-4 inches onto windshield and fluctuate 1/2" - Possible Cause
- Cam pin stuck in output arm.
- Spring for cam pin broken inside output arm.
- Correction
Replace output arm.
PARTS INFORMATION
PARTS INFORMATION
| Part Number | Part Name |
|---|---|
| XG-3-A | Silicone Brake Caliper Grease |
WARRANTY INFORMATION
WARRANTY STATUS: Information Only.
OASIS CODES: 202000, 290000