Test B: All Door Locks Inoperative
NOTE:
Perform all voltage and resistance tests using an Digital Volt-Ohm Meter (DVOM) with a minimum 10-megohm input impedance, unless stated otherwise in test procedure. Use ohmmeter to isolate wiring harness shorts or opens.
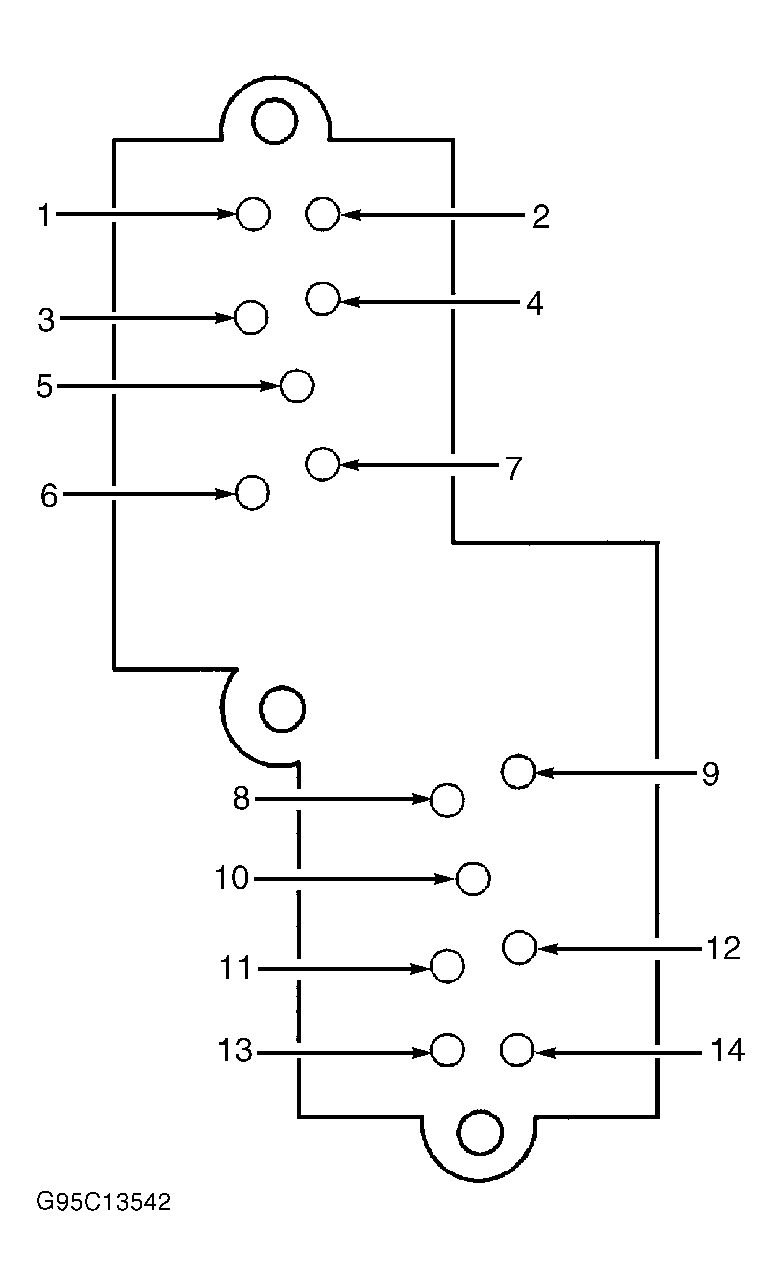
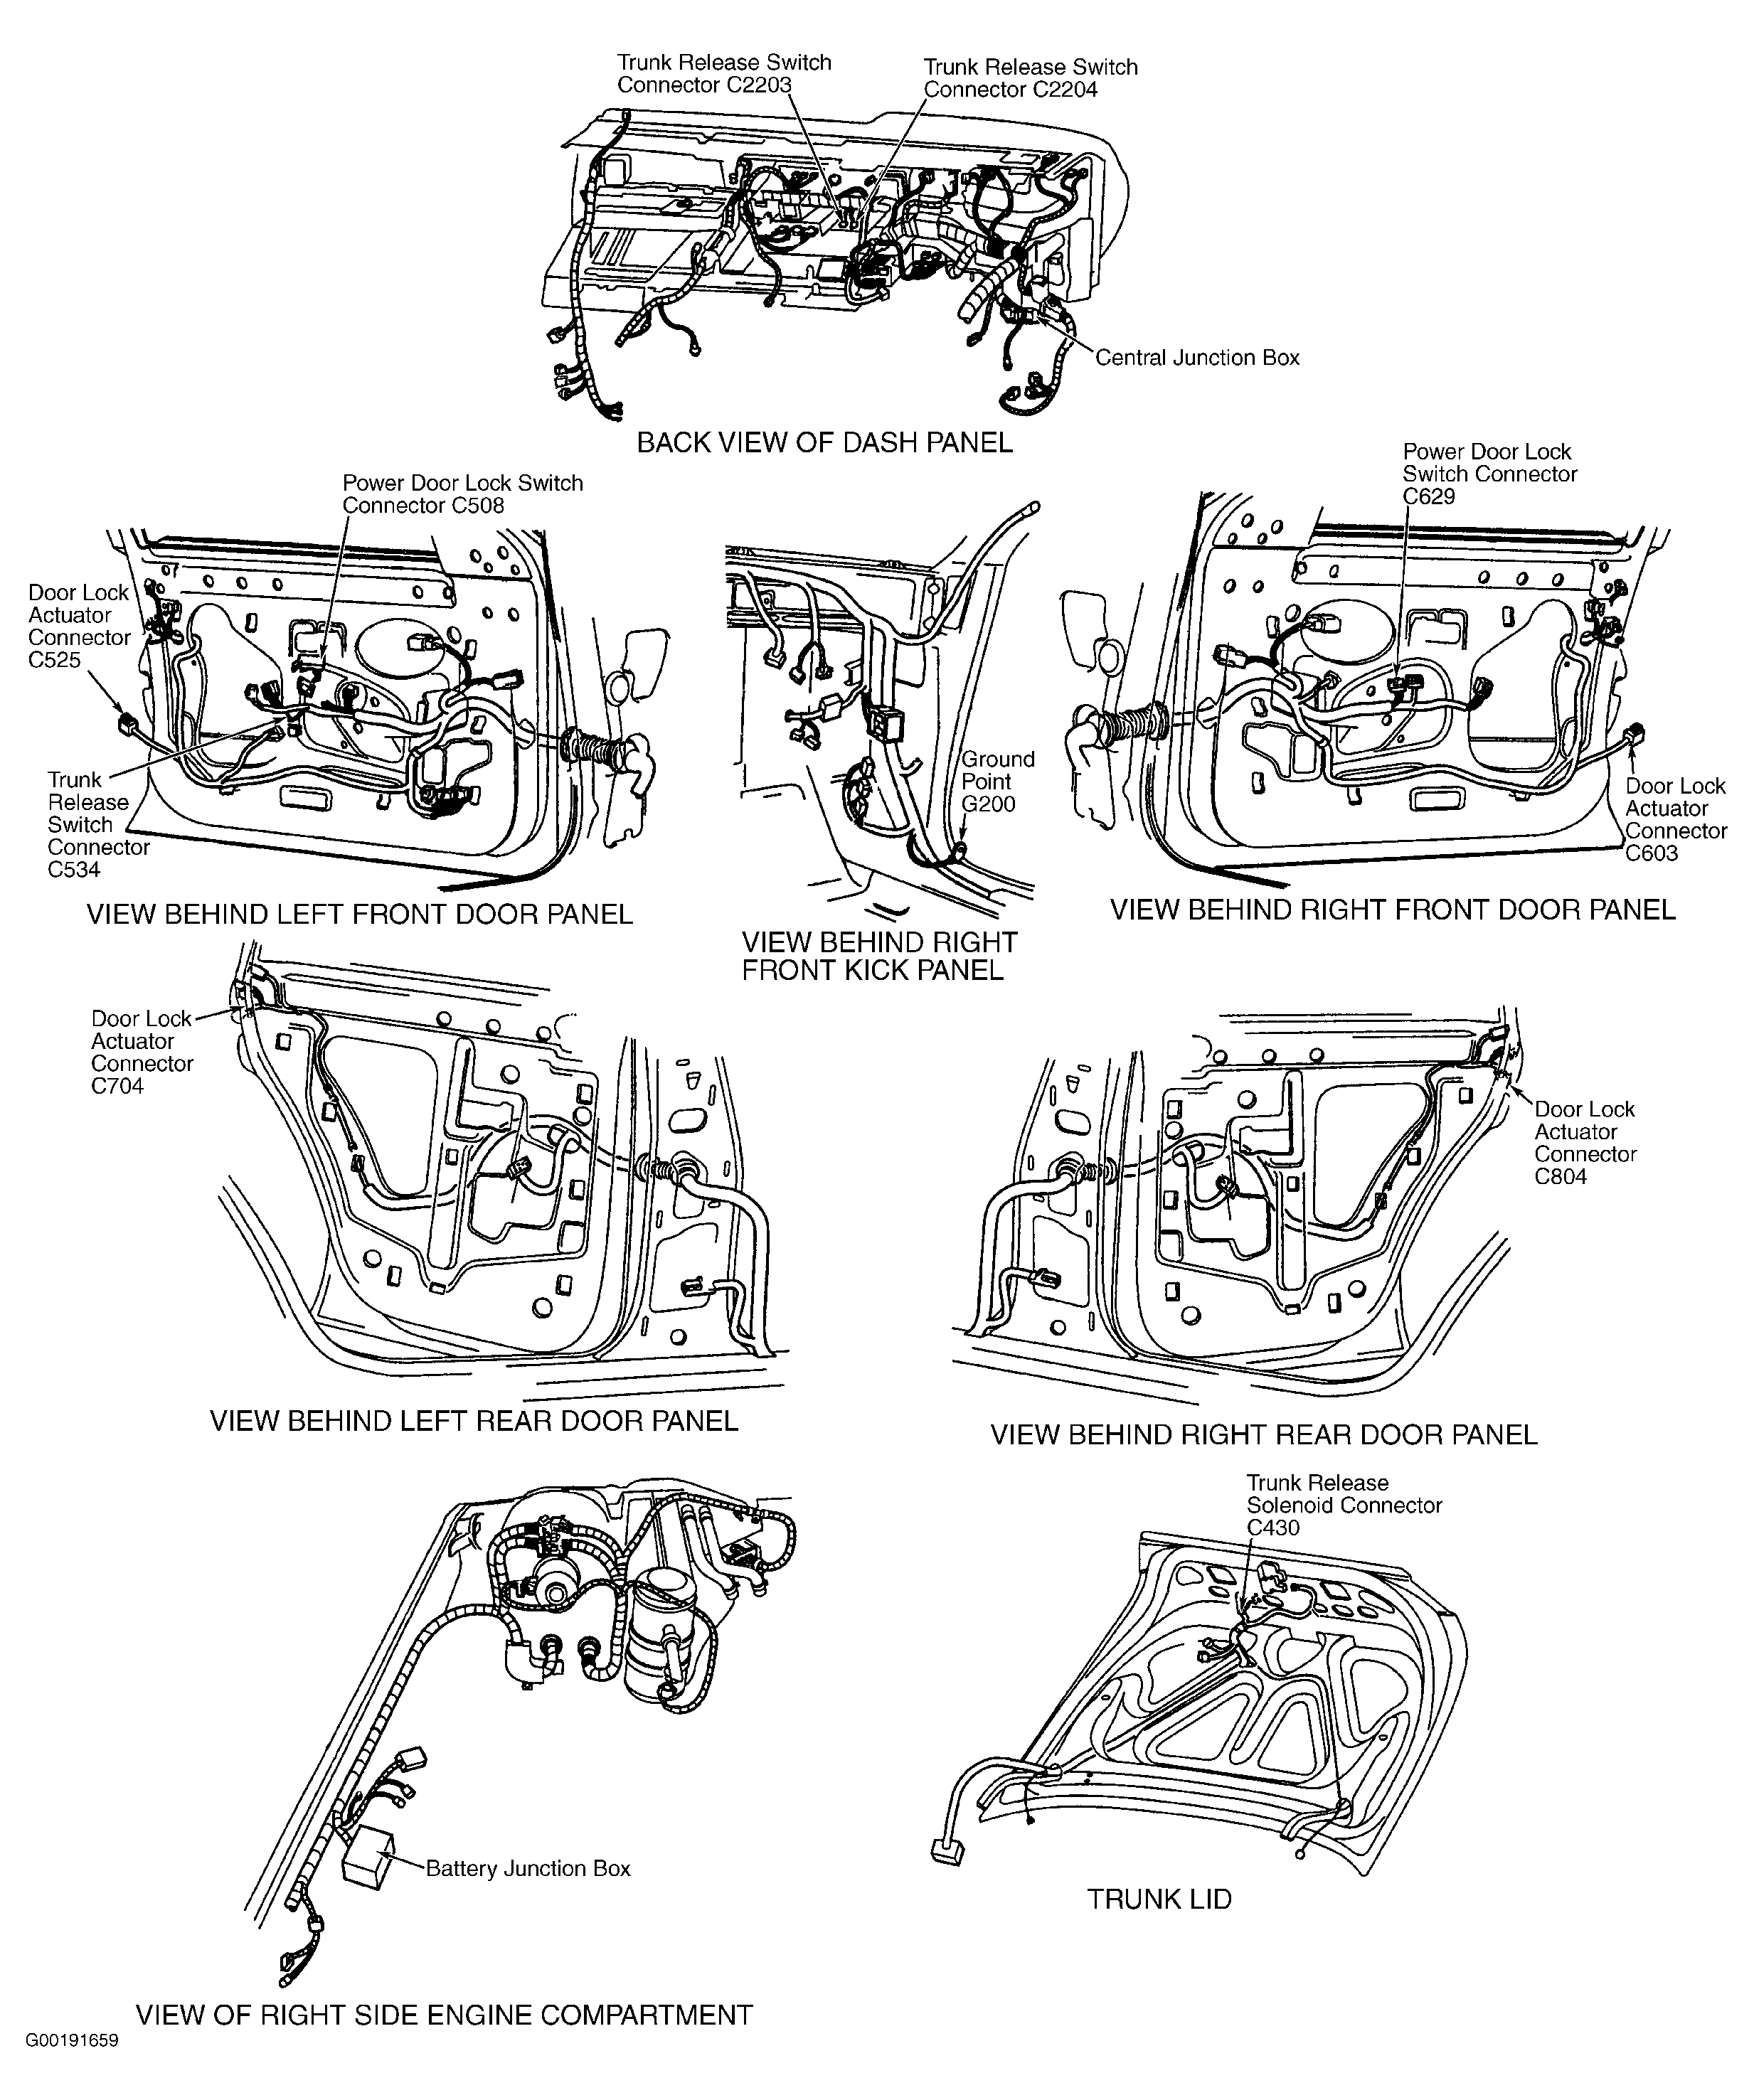
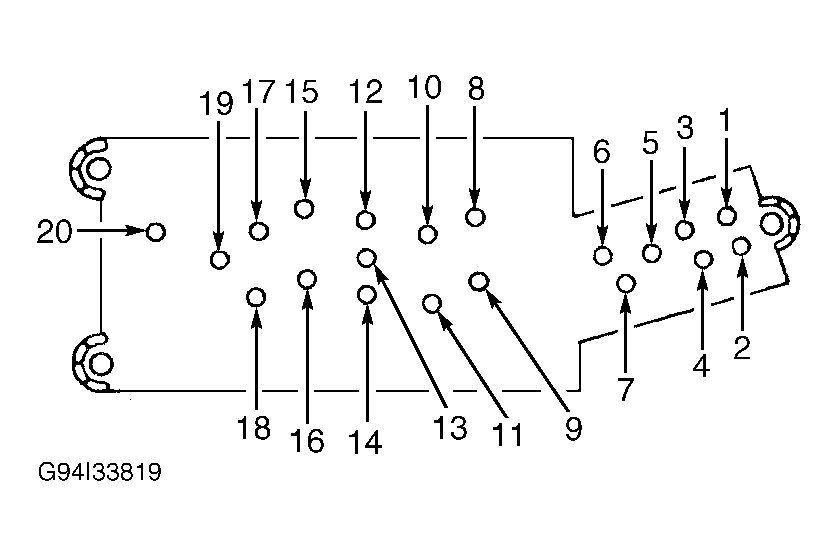
- Turn ignition switch to LOCK position. Remove driver's and passenger'sdoor trim panels. See DOOR TRIM PANEL under REMOVAL & INSTALLATION. Disconnect driver's and passenger's door lock switch harness connectors C508 and C629, located under door trim panel. See Figure. Measure voltage between ground and driver's door lock switch 20-pin harness connector C508 terminal No. 5 (Black/White wire). See Fig 1. Also measure voltage between ground and passenger's door lock switch 14-pin harness connector C629 terminal No. 5 (Black/White wire). See Fig 2. See WIRING DIAGRAMS .If voltage is 10 volts or less at either terminal, go to next step. If voltage is greater than 10 volts at either terminal, go to step 4.
- Remove circuit breaker No. 7 (20-amp) from Battery Junction Box (BJB), located at right front of engine compartment. See Figure. Measure resistance between output cavity of circuit breaker No. 7 and both door lock switch harness connectors terminal No. 5 (Black/White wire). See Fig 1 and Fig 2 . See WIRING DIAGRAMS .If both resistances are 5 ohms or less, go to next step. If either resistance is more than 5 ohms, repair open circuit in Black/White wire between appropriate door lock switch and BJB. After repair, test system for normal operation.
- Measure resistance between ground and both door lock switch harness connectors terminal No. 5 (Black/White wire). See Fig 1 and Fig 2 . See WIRING DIAGRAMS . If both resistances are 10 k/ohms or more, replace circuit breaker No. 7 at BJB. If either resistance is less than 10 k/ohms, repair short circuit in Black/White wire between appropriate door lock switch and BJB. After repair, test system for normal operation.
- Measure resistance between ground and driver's door lock switch harness connector C508 terminals No. 4 and 6 (Black wires). See Fig 1. See WIRING DIAGRAMS . If both resistances are 5 ohms or less, go to next step. If either resistance is more than 5 ohms, repair open circuit in appropriate Black wire between driver's door lock switch and ground point G200, located on right kick panel. See Figure. After repair, test system for normal operation.
- Reconnect driver's door lock switch harness connector. While pressing driver's door lock switch to lock, backprobe and measure voltage between ground and driver's door lock switch harness connector C508 terminal No. 3 (Pink/Yellow wire). See Fig 1. See WIRING DIAGRAMS . If voltage is greater than 10 volts, go to next step. If voltage is 10 volts or less, replace driver's door lock switch. See DOOR LOCK SWITCH under REMOVAL & INSTALLATION. After repair, test system for normal operation.
- While pressing driver's door lock switch to unlock, backprobe and measure voltage between ground and driver's door lock switch harness connector C508 terminal No. 7 (Pink/Light Green wire). See Fig 1. See WIRING DIAGRAMS . If voltage is greater than 10 volts, go to next step. If voltage is 10 volts or less, replace driver's door lock switch. See DOOR LOCK SWITCH under REMOVAL & INSTALLATION. After repair, test system for normal operation.
- Measure resistance between driver's door lock switch harness connector C508 terminal No. 3 and passenger's door lock switch harness connector C629 terminal No. 6 (Pink/Yellow wire). See Fig 1 and Fig 2 . See WIRING DIAGRAMS .If resistance is 5 ohms or less, go to next step. If resistance is more than 5 ohms, repair open circuit in Pink/Yellow wire between driver's door lock switch and passenger's door lock switch. After repair, test system for normal operation.
- Measure resistance between driver's door lock switch harness connector C508 terminal No. 7 and passenger's door lock switch harness connector terminal No. 4 (Pink/Light Green wire). See Fig 1 and Fig 2 . See WIRING DIAGRAMS .If resistance is 5 ohms or less, go to next step. If resistance is more than 5 ohms, repair open circuit in Pink/Light Green wire between driver's door lock switch and passenger's door lock switch. After repair, test system for normal operation.
- Perform passenger's door lock switch component test. See DOOR LOCK SWITCH under COMPONENT TESTS. If no problem is found, go to next step. If any problem is found, replace passenger's door lock switch. After repair, test system for normal operation.
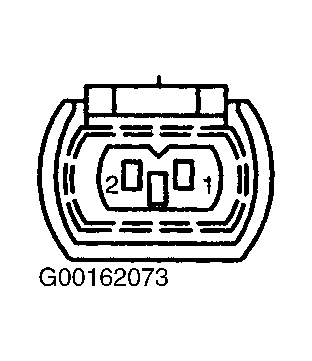
- Reconnect driver's and passenger's door lock switch harness connectors. Disconnect driver's door lock actuator 2-pin harness connector C525, located behind door trim panel. See Figure. While pressing door lock switch to lock, measure voltage between ground and driver's door lock actuator harness connector C525 terminal No. 2 (Pink/Black wire). See Figure. See WIRING DIAGRAMS .If voltage is greater than 10 volts, go to next step. If voltage is 10 volts or less, repair open circuit in Pink/Black wire between driver's door lock actuator and Lighting Control Module (LCM), located behind driver's door trim panel. See Figure. After repair, test system for normal operation.
- While pressing door lock switch to unlock, measure voltage between ground and driver's door lock actuator harness connector C525 terminal No. 1 (Pink/Orange wire). See Figure. See WIRING DIAGRAMS .If voltage is greater than 10 volts, test is complete. If voltage is 10 volts or less, repair open circuit in Pink/Orange wire between driver's door lock actuator and passenger's door lock switch. After repair, test system for normal operation.
 Courtesy of FORD MOTOR CO.