Camshaft: Service and Repair
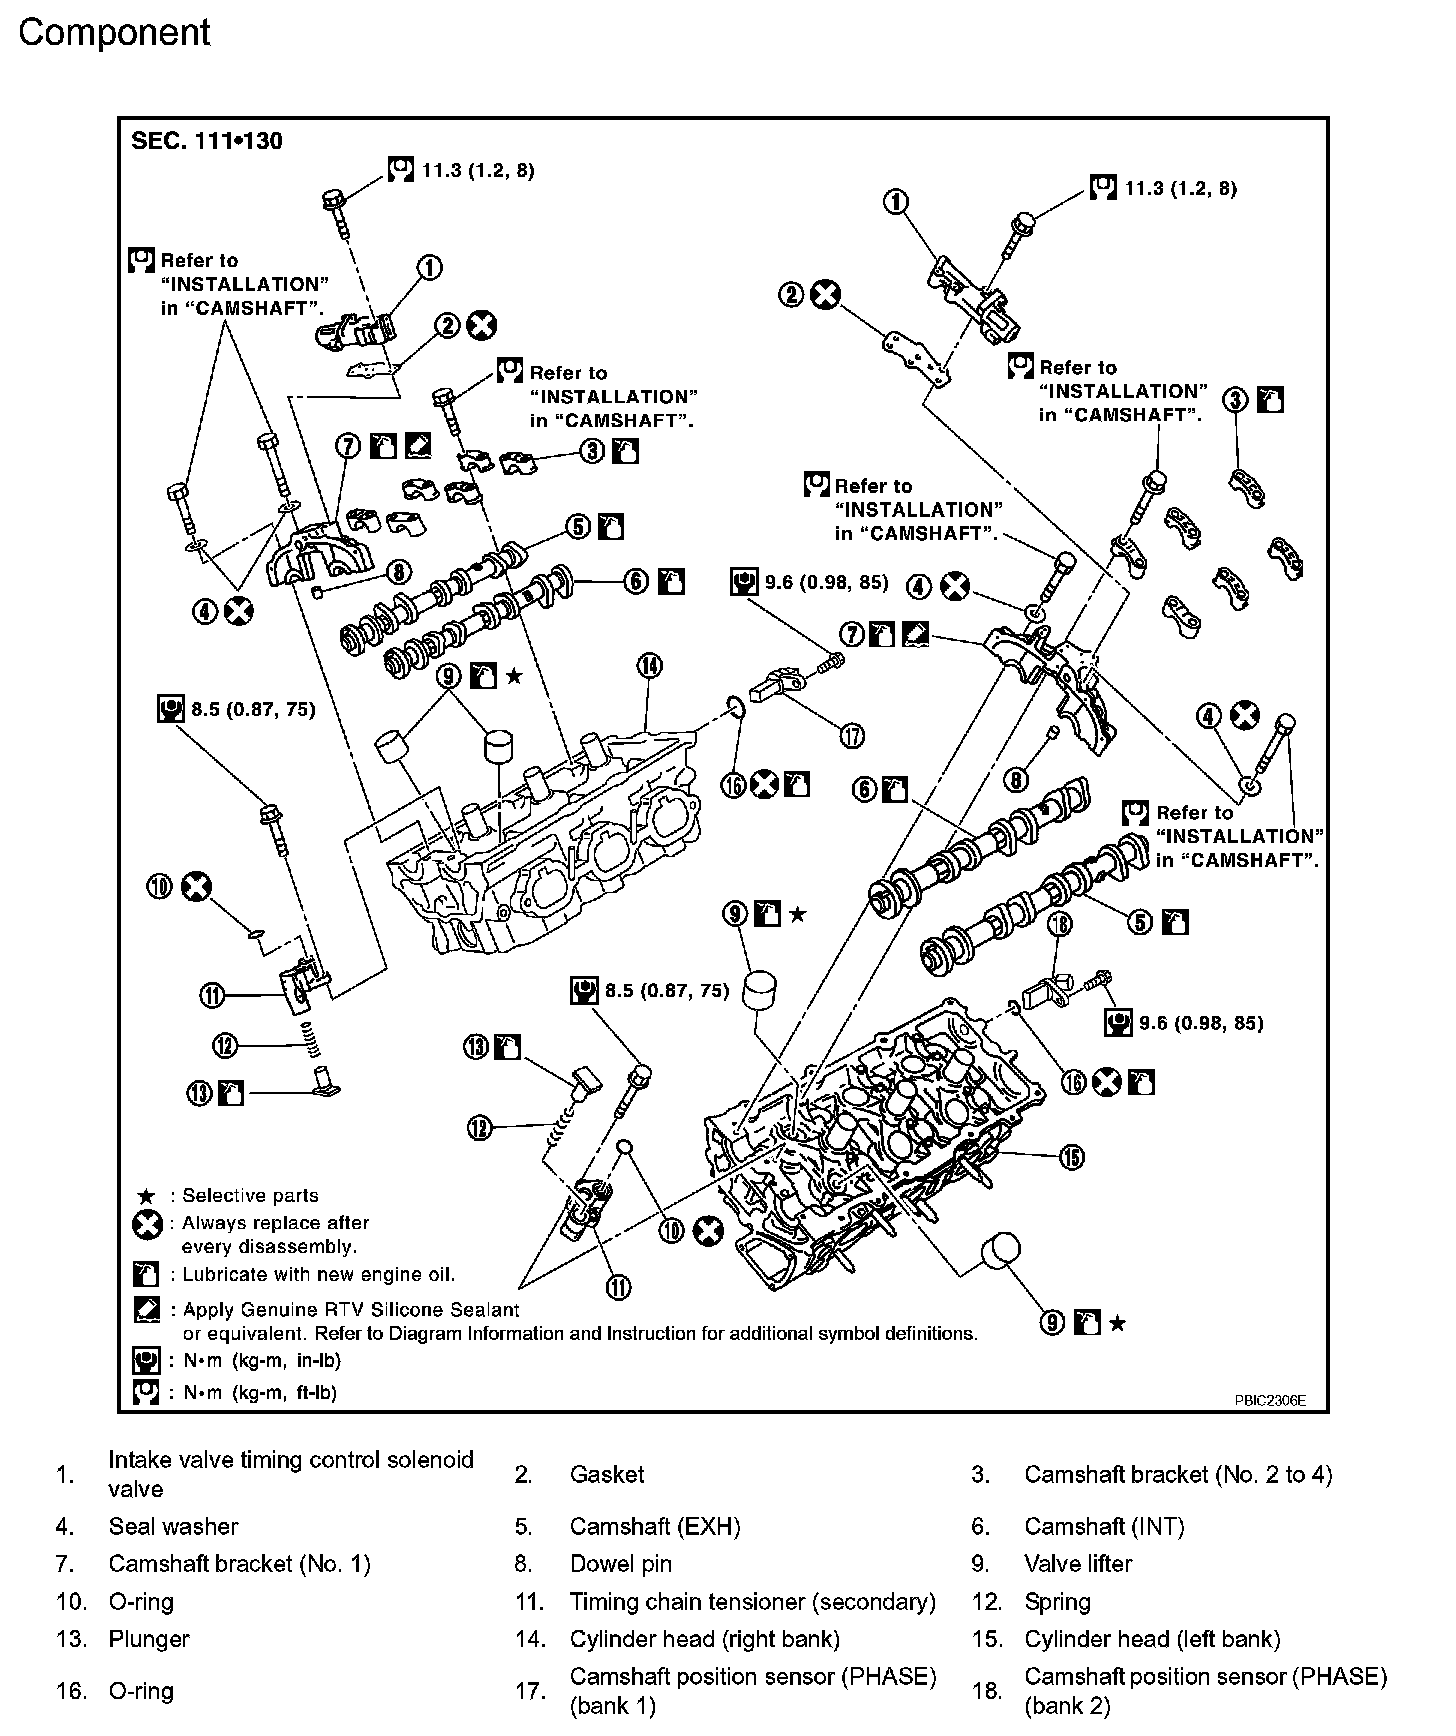
Removal and InstallationEM-83 Component:
REMOVAL
1. Remove front timing chain case, camshaft sprocket, timing chain and rear timing chain case.
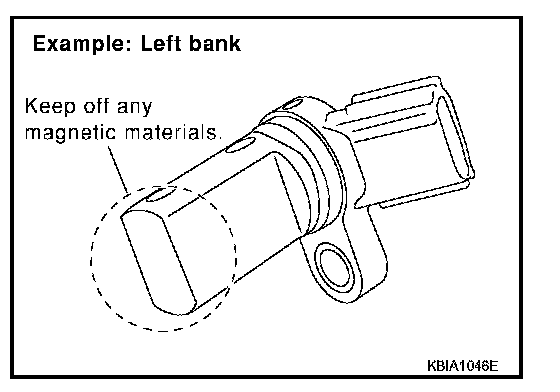
2. Remove camshaft position sensor (PHASE) (right bank and left bank) from cylinder head back side.
CAUTION:
^ Handle carefully to avoid dropping and shocks.
^ Never disassemble.
^ Never allow metal powder to adhere to magnetic part at sensor tip.
^ Never place sensors in a location where they are exposed to magnetism.
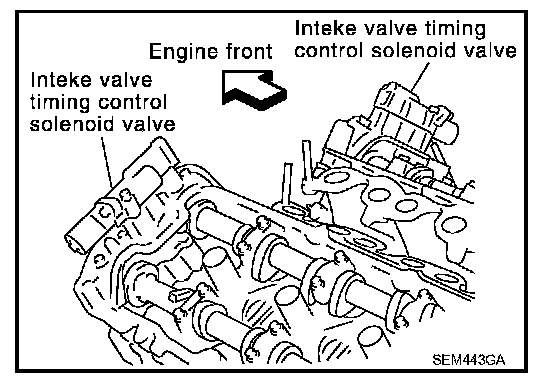
3. Remove intake valve timing control solenoid valves.
^ Discard intake valve timing control solenoid valve gaskets and use new gaskets for installation.
4. Remove camshaft brackets.
^ Mark camshafts, camshaft brackets and bolts so they are placed in the same position and direction for installation.
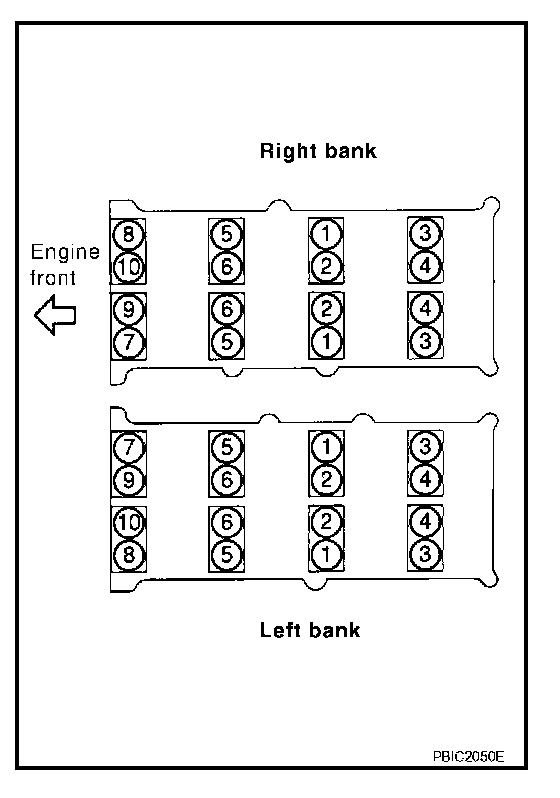
^ Equally loosen camshaft bracket bolts in several steps in reverse order as shown in the figure.
5. Remove camshaft.
6. Remove valve lifter.
^ Identify installation positions, and store them without mixing them up.
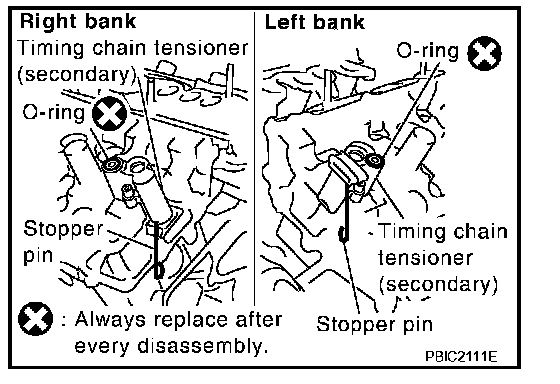
7. Remove timing chain tensioner (secondary) from cylinder head.
^ Remove timing chain tensioner (secondary) with its stopper pin attached.
NOTE: Stopper pin should be attached when timing chain (secondary) is removed.
INSPECTION AFTER REMOVAL
Camshaft Runout
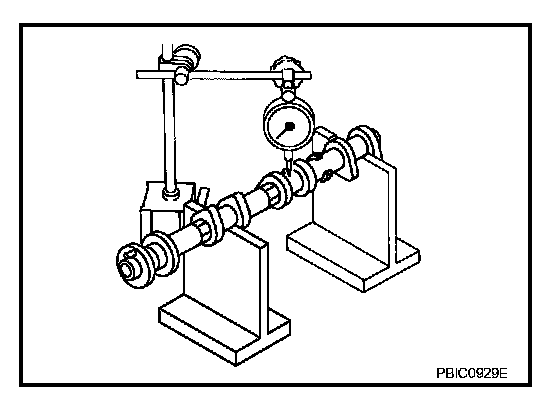
1. Put V-block on precise flat table, and support No. 2 and 4 journals of camshaft.
CAUTION: Never support No. 1 journal (on the side of camshaft sprocket) because it has a different diameter from the other three locations.
2. Set a dial indicator vertically to No. 3 journal.
3. Turn camshaft to one direction with hands, and measure the camshaft runout on a dial indicator. (Total indicator reading)
Standard: Less than 0.02 mm (0.0008 in)
Limit: 0.05 mm (0.0020 in)
4. If it exceeds the limit, replace camshaft.
Camshaft Cam Height
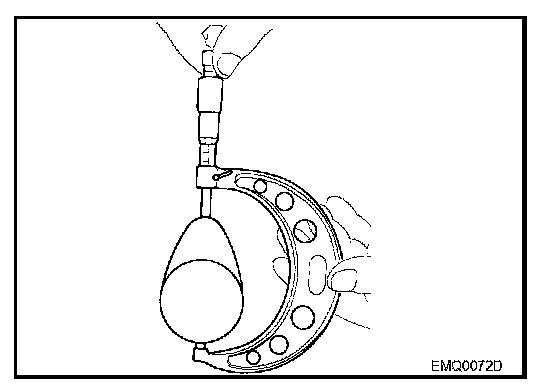
1. Measure the camshaft cam height with a micrometer.
Standard cam height (intake and exhaust): 44.865 - 45.055 mm (1.7663 - 1.7738 in)
Cam wear limit: 0.2 mm (0.008 in)
2. If wear exceeds the limit, replace camshaft.
Camshaft Journal Oil Clearance
CAMSHAFT JOURNAL DIAMETER
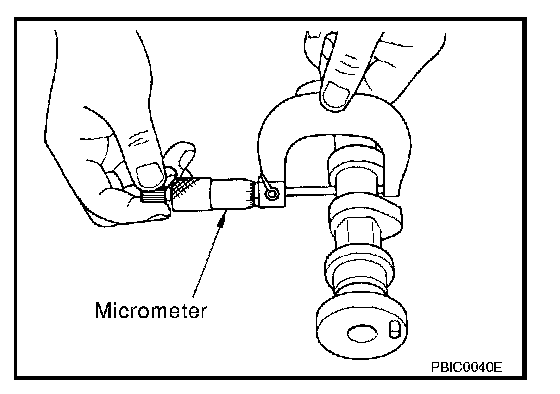
^ Measure the outer diameter of camshaft journal with a micrometer.
Standard:
No. 1: 25.935 - 25.955 mm (1.0211 - 1.0218 in)
No. 2, 3, 4: 23.445 - 23.465 mm (0.9230 - 0.9238 in)
CAMSHAFT BRACKET INNER DIAMETER
^ Tighten camshaft bracket bolt with the specified torque. Refer to "INSTALLATION" for the tightening procedure.
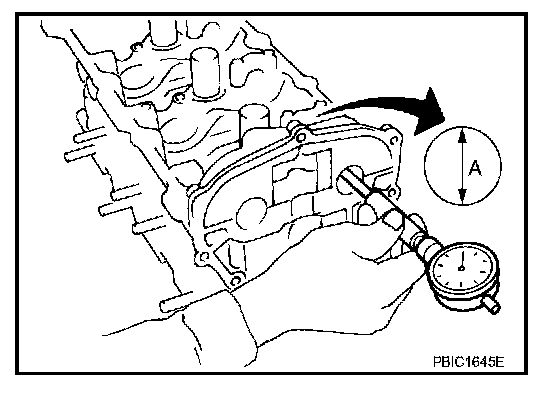
^ Measure inner diameter "A" of camshaft bracket with a bore gauge.
Standard:
No. 1: 26.000 - 26.021 mm (1.0236 - 1.0244 in)
No. 2, 3, 4: 23.500 - 23.521 mm (0.9252 - 0.9260 in)
CAMSHAFT JOURNAL OIL CLEARANCE
^ (Oil clearance) = (Camshaft bracket inner diameter) - (Camshaft journal diameter).
Standard:
No. 1: 0.045 - 0.086 mm (0.0018 - 0.0034 in)
No. 2, 3, 4: 0.035 - 0.076 mm (0.0014 - 0.0030 in)
Limit: 0.15 mm (0.0059 in)
^ If the calculated value exceeds the limit, replace either or both camshaft and cylinder head.
NOTE: Camshaft brackets cannot be replaced as single parts, because there are machined together with cylinder head. Replace whole cylinder head assembly.
Camshaft End Play
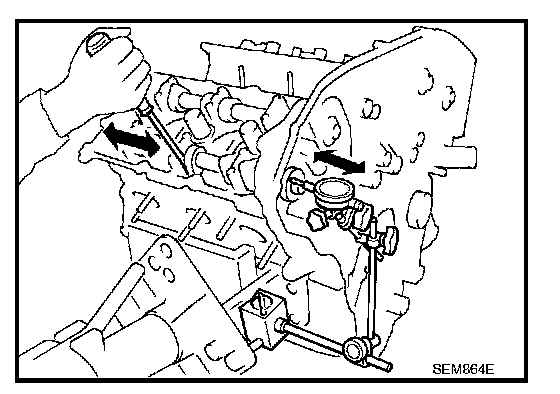
^ Install a dial indicator in thrust direction on front end of camshaft.
Measure the end play of a dial indicator when camshaft is moved forward/backward (in direction to axis).
Standard: 0.115 - 0.188 mm (0.0045 - 0.0074 in)
Limit: 0.24 mm (0.0094 in)
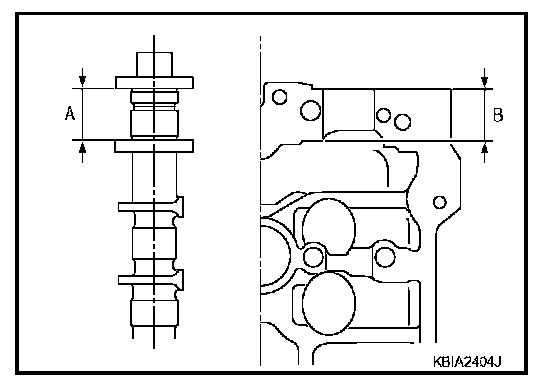
^ Measure the following parts if out of the limit.
- Dimension "A" for camshaft No. 1 journal
Standard: 27.500 - 27.548 mm (1.0827 - 1.0846 in)
- Dimension "B" for cylinder head No. 1 journal bearing
Standard: 27.360 - 27.385 mm (1.0772 - 1.0781 in)
^ Refer to the standards above, and then replace camshaft and/or cylinder head.
Camshaft Sprocket Runout
1. Put V-block on precise flat table, and support No. 2 and 4 journals of camshaft.
CAUTION: Never support No. 1 journal (on the side of camshaft sprocket) because it has a different diameter from the other three locations.
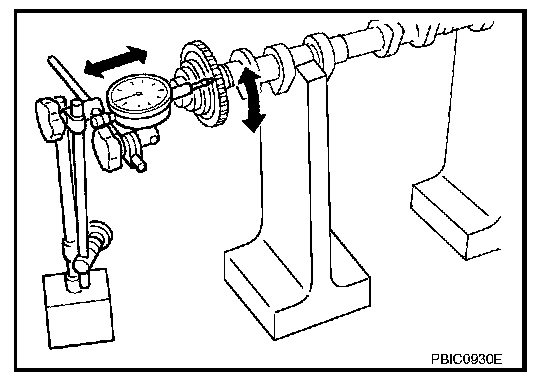
2. Measure the camshaft sprocket runout with a dial indicator.
(Total indicator reading)
Limit: 0.15 mm (0.0059 in)
^ If it exceeds the limit, replace camshaft sprocket.
Valve Lifter
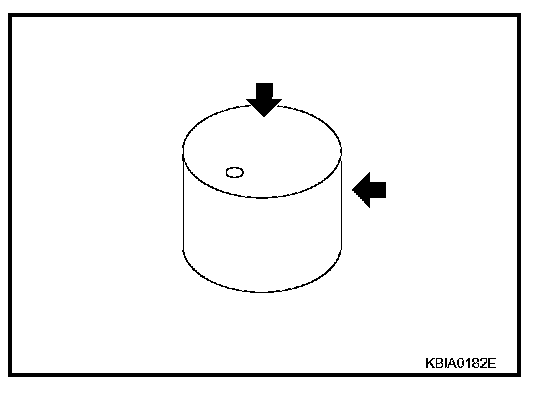
Check if surface of valve lifter has any wear or cracks.
^ If anything above is found, replace valve lifter.
Valve Lifter Clearance
VALVE LIFTER OUTER DIAMETER
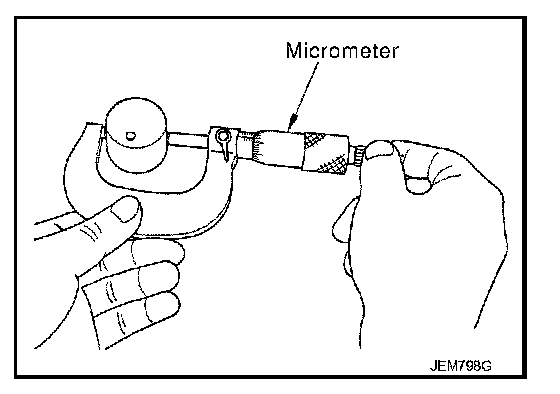
^ Measure the outer diameter at 1/2 height of valve lifter with a micrometer since valve lifter is in barrel shape.
Standard
Identification mark "U": 33.977 - 33.987 mm (1.3377 - 1.3381 in)
Identification mark "V": 33.980 - 33.990 mm (1.3378 - 1.3382 in)
VALVE LIFTER HOLE DIAMETER
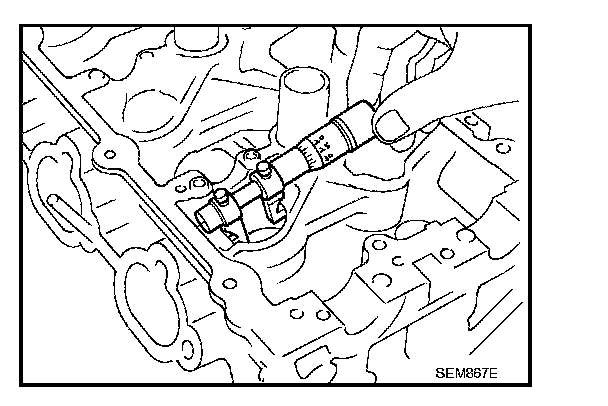
^ Measure the inner diameter of valve lifter hole of cylinder head with an inside micrometer.
Standard (Intake and exhaust): 34.000 - 34.016 mm (1.3386 - 1.3392 in)
VALVE LIFTER CLEARANCE
^ (Valve lifter clearance) = (Valve lifter hole diameter) - (Valve lifter outer diameter)
Standard
Identification mark "U": 0.013 - 0.039 mm (0.0005 - 0.0015 in)
Identification mark "V": 0.010 - 0.036 mm (0.0004 - 0.0014 in)
^ If the calculated value is out of the standard, referring to each standard of valve lifter outer diameter and valve lifter hole diameter, replace either or both valve lifter and cylinder head.
INSTALLATION
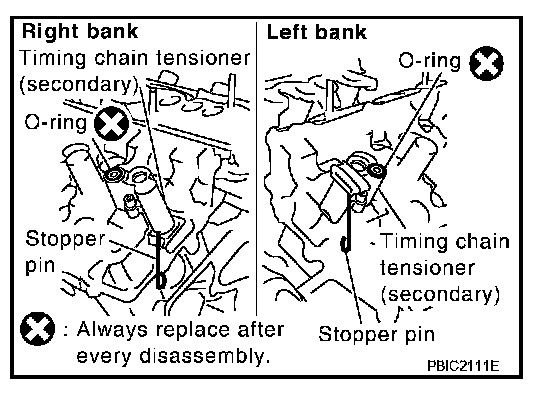
1. Install timing chain tensioners (secondary) on both sides of cylinder head.
^ Install timing chain tensioner with its stopper pin attached.
^ Install timing chain tensioner with sliding part facing downward on right-side cylinder head, and with sliding part facing upward on left-side cylinder head.
^ Install new O-ring as shown in the figure.
2. Install valve lifter.
^ Install it in the original position.
3. Install camshafts.
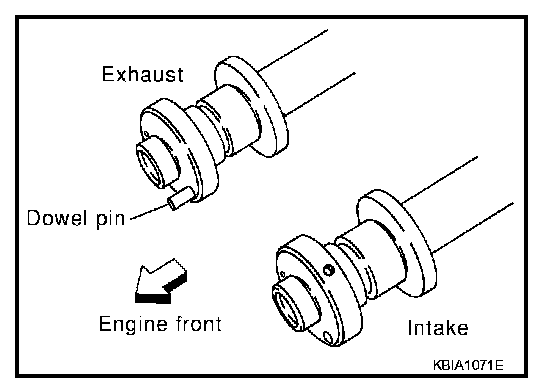
^ Install camshaft with dowel pin attached to its front end face on the exhaust side.
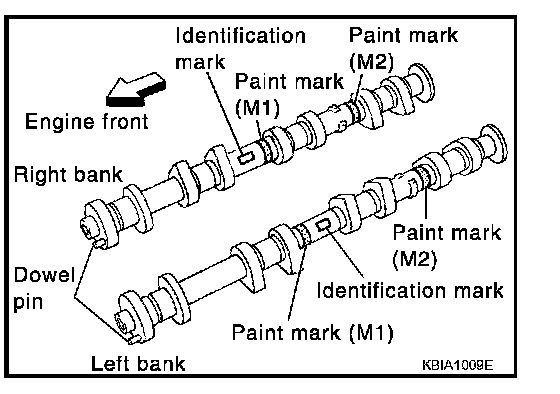
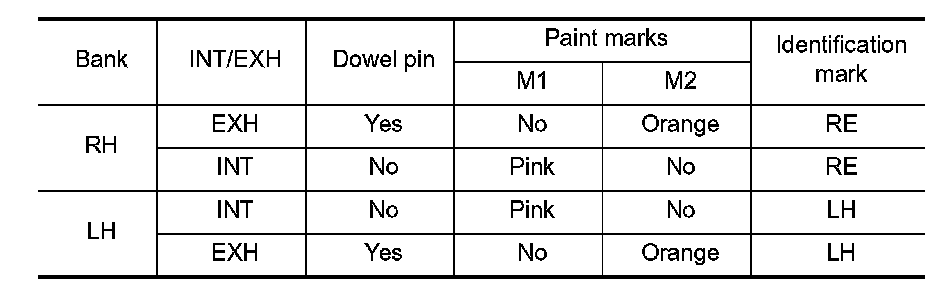
^ Follow your identification marks made during removal, or follow the identification marks that are present on new camshafts for proper placement and direction.
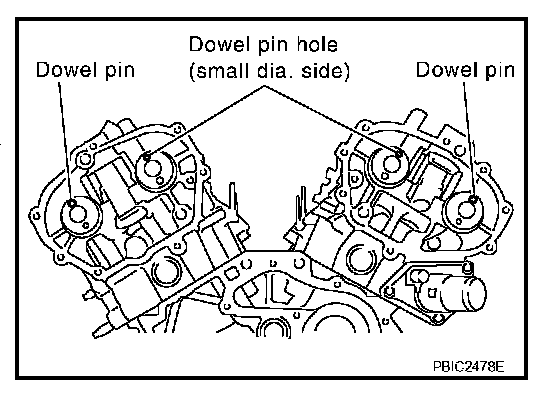
^ Install camshaft so that dowel pin hole and dowel pin on front end face are positioned as shown in the figure. (No. 1 cylinder TDC on its compression stroke)
NOTE:
^ Large and small pin holes are located on front end face of camshaft (INT), at intervals of 180 degrees. Face small dia. side pin hole upward (in cylinder head upper face direction).
^ Though camshaft does not stop at the portion as shown in the figure, for the placement of cam nose, it is generally accepted camshaft is placed for the same direction of the figure.
4. Install camshaft brackets.
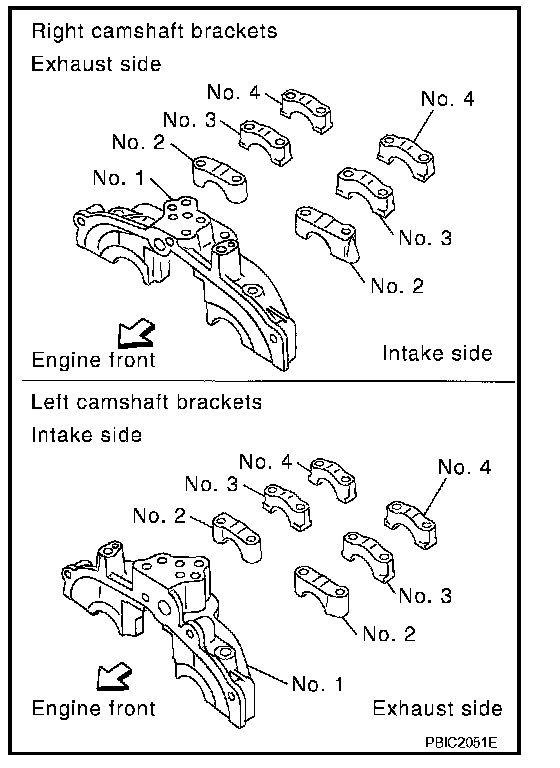
^ Remove foreign material completely from camshaft bracket backside and from cylinder head installation face.
^ Install camshaft bracket in original position and direction as shown in the figure.
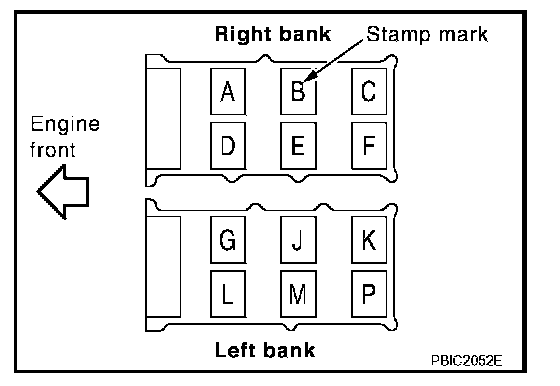
^ Install camshaft brackets (No. 2 to 4) aligning the stamp marks as shown in the figure.
NOTE: There are no identification marks indicating left and right for camshaft bracket (No. 1).
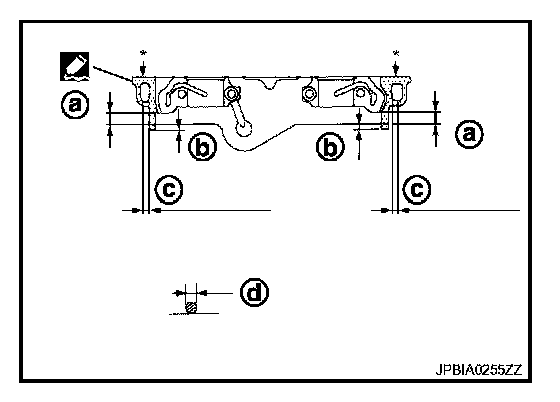
^ Apply liquid gasket to mating surface of camshaft bracket (No.1) as shown on both right bank and left bank.
a: 8.5 mm (0.335 in)
b: 2 mm (0.08 in)
c: Clearance 5 mm (0.20 in)
d: 2.0 - 3.0 mm (0.079 - 0.118 in)
*: Remove the protruding liquid gasket from front face. (Remove the hardened liquid gasket from surface only)
Use Genuine RTV Silicone Sealant or equivalent.
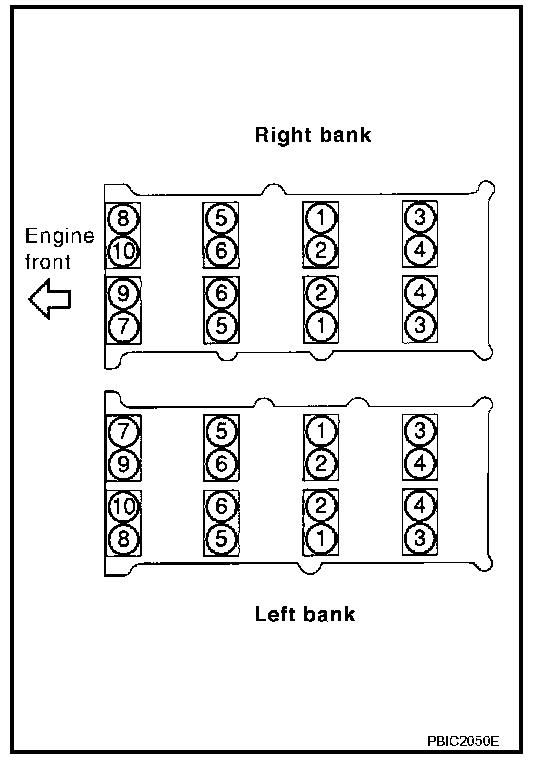
5. Tighten camshaft bracket bolts in the following steps, in numerical order as shown.
a. Tighten No. 7 to 10 in numerical order as shown.
Tightening torque: 1.96 Nm (0.20 kg-m, 1 ft-lb)
b. Tighten No. 1 to 6 in numerical order as shown.
Tightening torque: 1.96 Nm (0.20 kg-m, 1 ft-lb)
c. Tighten No. 1 to 10 in numerical order as shown.
Tightening torque: 5.88 Nm (0.60 kg-m, 4 ft-lb)
d. Tighten No. 1 to 10 in numerical order as shown.
Tightening torque: 10.4 Nm (1.1 kg-m, 8 ft-lb)
CAUTION:
After tightening mounting bolts of camshaft brackets (No. 1), be sure to wipe off excessive liquid gasket from the parts list below.
^ Mating surface of rocker cover
^ Mating surface of rear timing chain case
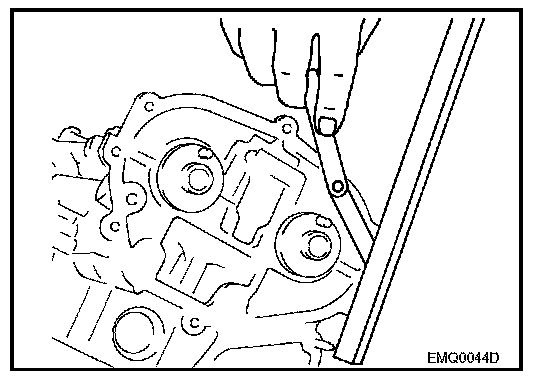
6. Measure difference in levels between front end faces of camshaft bracket (No. 1) and cylinder head.
Standard: -0.14 to 0.14 mm (-0.0055 to 0.0055 in)
^ Measure two positions (both intake and exhaust side) for a single bank.
^ If the measured value is out of the standard, re-install camshaft bracket (No. 1).
7. Inspect and adjust the valve clearance. Refer to, "Valve Clearance". Testing and Inspection
8. Install in the reverse order of removal after this step.
INSPECTION AFTER INSTALLATION
Inspection of Camshaft Sprocket (INT) Oil Groove
CAUTION:
^ Perform this inspection only when DTC P0011 or P0021 are detected in self-diagnostic results of CONSULT-III and it is directed according to inspection procedure. Refer to EC-116, "CONSULT-III Function (ENGINE)". CONSULT-III Function (Engine)
^ Check when engine ins cold so as to prevent burns from any splashing engine oil.
1. Check the engine oil level. Refer to. Testing and Inspection
2. Perform the following procedure so as to prevent the engine from being unintentionally started while checking.
a. Release fuel pressure.
b. Disconnect ignition coil and injector harness connectors.
3. Remove intake valve timing control solenoid valve.
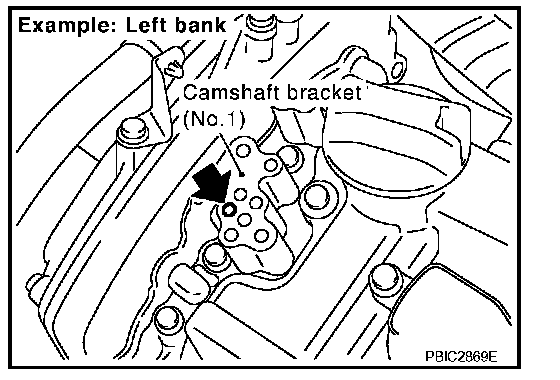
4. Crank the engine, and then check that engine oil comes out from camshaft bracket (No. 1) oil hole. End crank after checking.
WARNING: Be careful not to touch rotating parts (drive belts, idler pulley, and crankshaft pulley, etc.).
CAUTION:
Engine oil may squirt from intake valve timing control solenoid valve installation hole during cranking. Use a shop cloth to prevent the engine components and the vehicle.
Never allow engine oil to get on rubber components such as drive belt or engine mount insulators. Immediately wipe off any splashed engine oil.
^ Clean oil groove between oil strainer and intake valve timing control solenoid valve if engine oil does not come out from camshaft bracket (No. 1) oil hole.
5. Remove components between intake valve timing control solenoid valve and camshaft sprocket (INT), and then check each oil groove for clogging.
^ Clean oil groove if necessary.
6. After inspection, install removed parts.
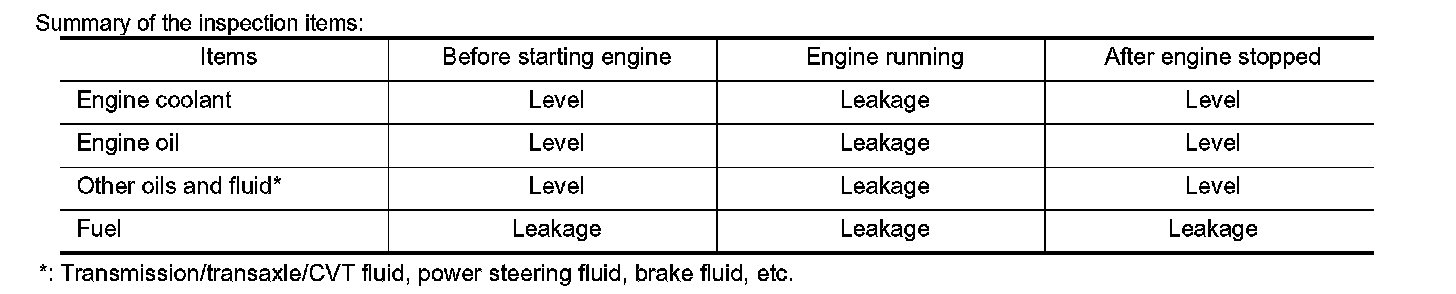
Inspection for Leaks
The following are procedures for checking fluids leak, lubricates leak.
^ Before starting engine, check oil/fluid levels including engine coolant and engine oil. If less than required quantity, fill to the specified level.
^ Use procedure below to check for fuel leakage.
- Turn ignition switch "ON" (with engine stopped). With fuel pressure applied to fuel piping, check for fuel leakage at connection points.
- Start engine. With engine speed increased, check again for fuel leakage at connection points.
^ Run engine to check for unusual noise and vibration.
NOTE: If hydraulic pressure inside timing chain tensioner drops after removal/installation, slack in the guide may generate a pounding noise during and just after engine start. However, this is normal. Noise will stop after hydraulic pressure rises.
^ Warm up engine thoroughly to check there is no leakage of fuel, or any oil/fluids including engine oil and engine coolant.
^ Bleed air from lines and hoses of applicable lines, such as in cooling system.
^ After cooling down engine, again check oil/fluid levels including engine oil and engine coolant. Refill to the specified level, if necessary.