Tailgate Will Not Open From The Outside Handle In Cold Weather (16-063)
WARNING: This page is about the CR-V EX, Eng CD K24V1, which is a different variant/trim than selected.
Publication date: 2018-01-25Reference number: 16-063
TAILGATE WILL NOT OPEN FROM THE OUTSIDE HANDLE IN COLD WEATHER
TECHNICAL SERVICE BULLETIN
Reference Number(s): 16-063 Version 2, Date of Issue:
January 25, 2018
Superceded Bulletin(s): 16-063, Date of Issue:
August 23, 2016
| HONDA: | 2012-2016 CR-V; 2011-2017 Odyssey |
NOTE:
Supersedes 16-063, Dated August 23.
AFFECTED VEHICLES
AFFECTED VEHICLES
| Year | Model | Trim | VIN range |
|---|---|---|---|
| 2012-2016 | CR-V | ALL | ALL |
| 2011-2017 | Odyssey | ALL | ALL |
REVISION SUMMARY
- The VIN range in AFFECTED VEHICLES has been updated.
- Model year and trim levels have been updated in PARTS INFORMATION.
- Model year and trim levels have been updated in WARRANTY CLAIMS INFORMATION.
SYMPTOM
The tailgate won't open from the outside handle in temperatures near freezing or colder, but will open in warmer temperatures.
POSSIBLE CAUSES
There is an internal failure of the tailgate outer handle switch.
CORRECTIVE ACTION
Replace the tailgate outer handle switch.
PARTS INFORMATION
PARTS INFORMATION
| Part Name | Part Number | Quantity |
|---|---|---|
| Tailgate Opener Switch w/o Keyless Access (CR-V) | 74810-T0A-A02 | 1 |
| Tailgate Opener Switch w/ Keyless Access (CR-V) | 74810-T1W-A01 | 1 |
| Tailgate Opener Switch (2011-12 Odyssey EX, LX) | 74810-TF0-003 | 1 |
| Tailgate and Camera Handle Switch (2011-12 Odyssey EX-L) | 74810-TK8-A00 | 1 |
| Tailgate and Camera Handle Switch (2013 Odyssey LX, EX, EX-L, EX-L RES) | 74810-TK8-A10 | 1 |
| Tailgate and Camera Handle Switch (2014-17 Odyssey EX-L Navi, Touring) | 74810-TK8-A20 | 1 |
| Tailgate and Camera Handle Switch (2014-17 Odyssey LX, EX, EX-L, EX-L RES, SE) | 74810-TK8-A30 | 1 |
WARRANTY CLAIM INFORMATION
CR-V
The normal warranty applies
WARRANTY CLAIM INFORMATION
| LON | Description | Flat Rate | Model/ Year | Trim | Replacement Part Number | Template ID | Failed Part Number |
|---|---|---|---|---|---|---|---|
| 8231A7 | Replace the tailgate outer handle switch. | 0.5 hr | 2012-16 | w/o Keyless Access | 74810-T0A-A02 | 16-063F | 74810-T0A-A02 |
| 2012-16 | w/ Keyless Access | 74810-T1W-A01 | 16-063G | 74810-T0A-A02 |
Odyssey
The normal warranty applies
WARRANTY CLAIM INFORMATION
| LON | Description | Flat Rate | Model/Year | Trim | Replacement Part Number | Template ID | Failed Part Number |
|---|---|---|---|---|---|---|---|
| 8231A8 | Replace the tailgate outer handle switch. | 0.5 hr | 2011-12 | LX / EX | 74810-TF0-003 | 16-063A | 74810-TK8-A00 |
| 2011-13 | EX-L / EX-L RES | 74810-TK8-A00 | 16-063B | 74810-TK8-A00 | |||
| 2013 | LX / EX | ||||||
| 2011-13 | EX-L (Navi)/ Touring | 74810-TK8-A10 | 16-063C | 74810-TK8-A00 | |||
| 2014-17 | EX-L (Navi)/ Touring | 74810-TK8-A20 | 16-063D | 74810-TK8-A00 | |||
| 2014-17 | LX / EX / EX-L / EX-L RES / SE | 74810-TK8-A30 | 16-063E | 74810-TK8-A00 |
Defect Code: 03214
Symptom Code: 03217
Skill Level: Repair Technician
REPAIR PROCEDURE - CR-V
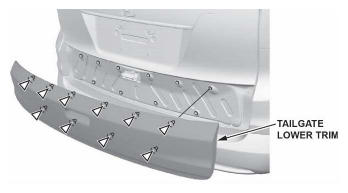
- Remove the tailgate lower trim.
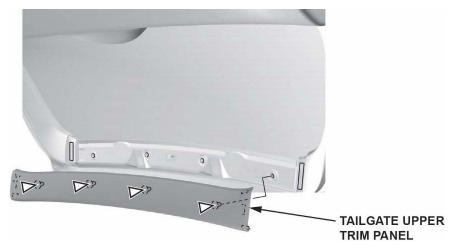
- Remove the tailgate upper trim panel.
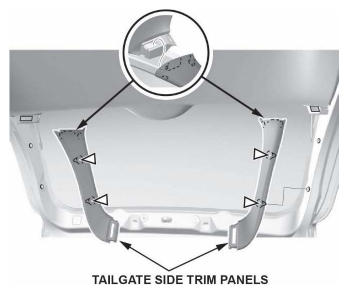
- Remove the tailgate side trim panels.
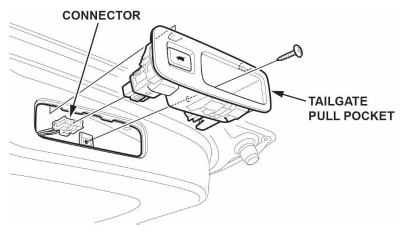
- Remove the tailgate pull pocket.
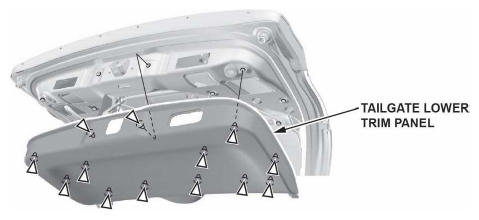
- Remove the tailgate lower trim panel.
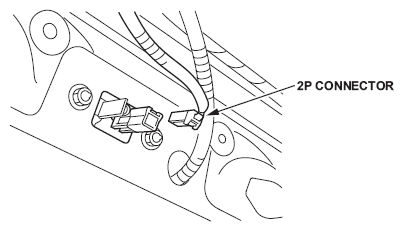
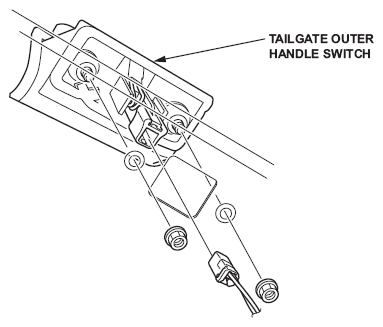
- Disconnect the 2P connector.
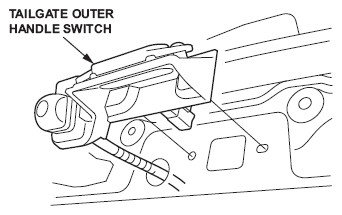
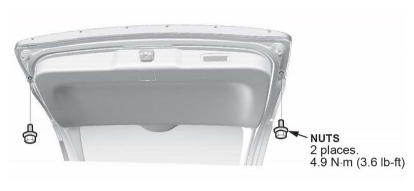
- Remove the two nuts, then remove the tailgate outer handle switch
- Install the new switch.
- Install all parts in the reverse order of removal.
END
REPAIR PROCEDURE - ODYSSEY
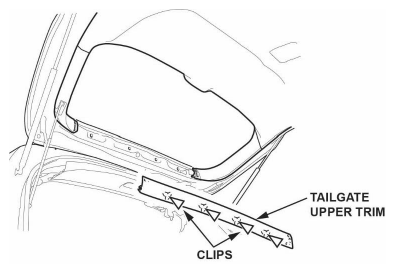
- Remove the tailgate upper trim.
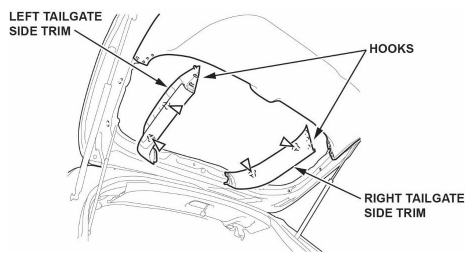
- Remove the left and right tailgate side trim.
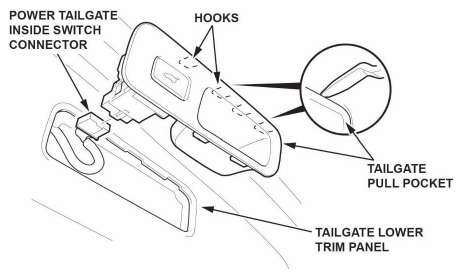
- Remove the tailgate pull pocket.
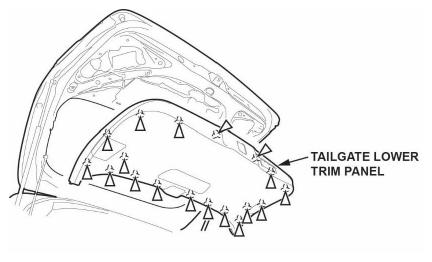
- Pull out the tailgate lower trim panel by hand to detach the clips, then remove it.
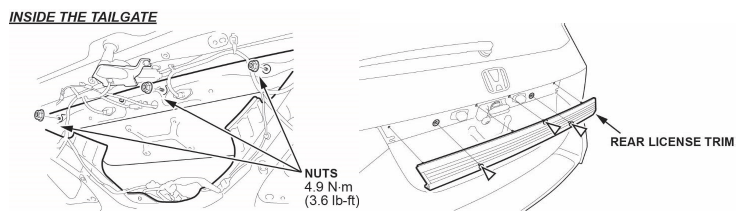
- From inside the tailgate, remove the nuts, then remove the rear license trim.
- Disconnect the 2P connector from the tailgate outer handle switch.
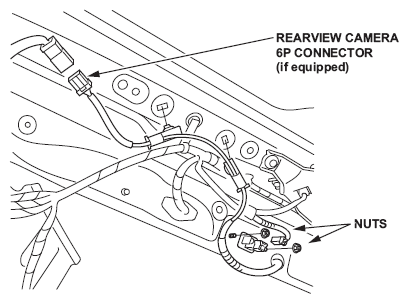
- Remove the two nuts.
- If equipped, disconnect the rearview camera 6P connector.
- Remove the tailgate outer handle switch.NOTE: The illustration shows with rearview camera.
- Install the new switch.
- Install all remaining parts in the reverse order of removal.
END