Test Procedure
NOTE: The motor and the clutch are built into the drive unit.
- 1. Left Quarter Pillar Trim Panel - Remove - Refer to: Interior Trim Removal and Installation - Pillar AreasInterior Trim Removal and Installation - Tailgate AreasInterior Trim Removal and Installation - Cargo AreasInterior Trim Removal and Installation - Rear Side AreaInterior Trim Removal and Installation - Door Areas
- 2. Power Tailgate Clutch - Test
1. Disconnect these connectors:
- Power tailgate drive unit connector A
- Power tailgate drive unit connector B
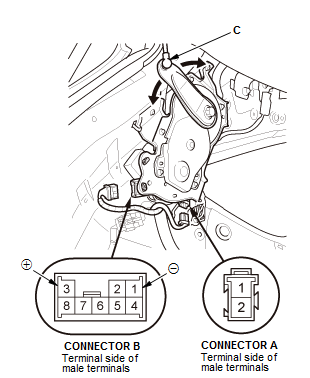
2. Check the moving arm (C) for moving smoothly by hand.
3. Connect power tailgate drive unit connector B terminal No. B3 to 12 volt battery power and terminal No. B1 to ground.
4. Check that arm does not move while applying voltage. If the arm moves, the clutch is faulty; replace the power tailgate drive unit .
NOTE: After testing, remove the applying voltage.
- 3. Power Tailgate Motor - Test
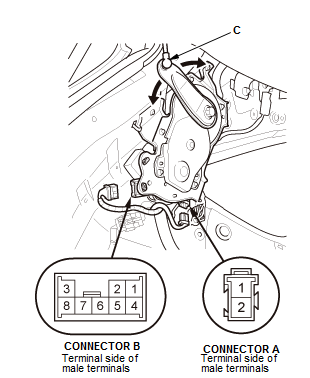
1. Set the arm (C) to the center of the operation range as shown.
2. Operate the power tailgate clutch by connecting power tailgate drive unit connector B terminal No. B3 to 12 volt battery power and terminal No. B1 to ground.
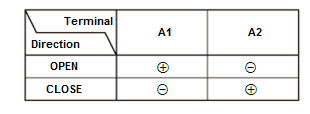
3. Test the power tailgate motor by connecting 12 volt power and ground according to the table. When the motor stops running, disconnect 12 volt battery power immediately.
NOTE: While testing the motor, apply voltage for less than 1 second.
4. Check the motor runs smoothly. If the motor does not run or fails to run smoothly, replace the power tailgate drive unit .
NOTE: After testing, remove the applying voltage.
- 4. All Removed Parts - Install - Install the parts in the reverse order of removal.