Fuel Or Engine-Type Smell While Driving Or At Idle (17-073)
WARNING: This page is about the CR-V EX, Eng CD K24V1, which is a different variant/trim than selected.
Publication date: 2017-08-31Reference number: 17-073
FUEL OR ENGINE-TYPE SMELL WHILE DRIVING OR AT IDLE
TECHNICAL SERVICE BULLETIN
Reference Number(s): 17-073 Version 2, Date of Issue:
August 31, 2017
| HONDA: | 2015-2016 CR-V |
AFFECTED VEHICLES
AFFECTED VEHICLES
| Year | Model | Trim | VIN Range |
|---|---|---|---|
| 2015-16 | CR-V | ALL | ALL |
SYMPTOM
A fuel or engine-type smell may come from the climate control unit while driving or at idle.
POSSIBLE CAUSES
The PCV hose may allow the smell to permeate the rubber.
CORRECTIVE ACTION
Visually check for oil or fluid leaks. Based on your results, do one of the following:
- If there are no leaks, replace the PCV hose.
- If there are any leaks visible, repair the leak, and clean up the fluid. If the smell persists, replace the PCV hose.
PARTS INFORMATION
PARTS INFORMATION
| Part Name | Part Number | Quantity |
|---|---|---|
| PCV Hose | 17131-5A2-305 | 1 |
| Exhaust Pipe Gasket | 18212-T2F-A01 | 1 |
| Pre-Chamber Gasket | 18393-SS0-J30 | 1 |
| Self-Lock Nut (10 mm) | 90212-SA5-003 | 6 |
| Self-Lock Nut (8 mm) | 90115-659-003 | 2 |
WARRANTY CLAIM INFORMATION
The normal warranty applies.
WARRANTY CLAIM INFORMATION
| Operation Number | Description | Flat Rate Time | Defect Code | Symptom Code | Template ID | Failed Part Number |
|---|---|---|---|---|---|---|
| 1211M7 | CR-V: Replace the PCV hose. | 0.9 hr | 03217 | 06005 | A17073B | 17131-5A2-A10 |
Skill Level: Repair Technician
REPAIR PROCEDURE
- Visually check that there are no oil or other fluid leaks.
- If there are no visible leaks, go to step 2.
- If there are any visible leaks, repair them first and clean up the fluid. If the smell persists, then go to step 2 to replace the PCV hose.
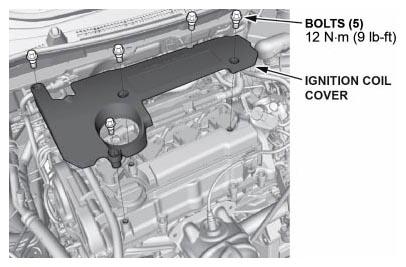
- Remove the ignition coil cover.
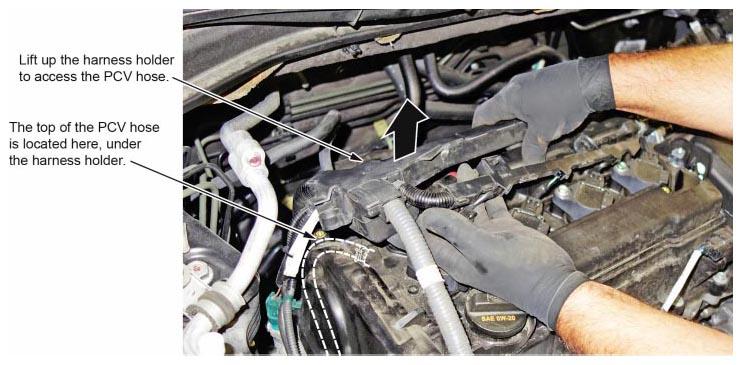
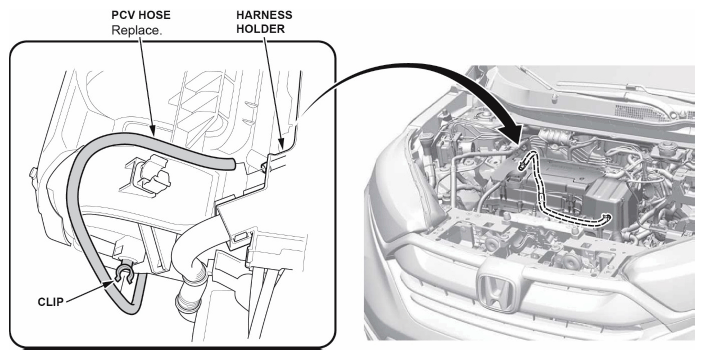
- Lift up the harness holder, and move it so you can disconnect the PCV hose.NOTE: You do not need to disconnect the harness or its connectors.
- Disconnect the upper part of the PCV hose, and remove the hose from the clip.
- Raise the vehicle, and remove the splash shield.
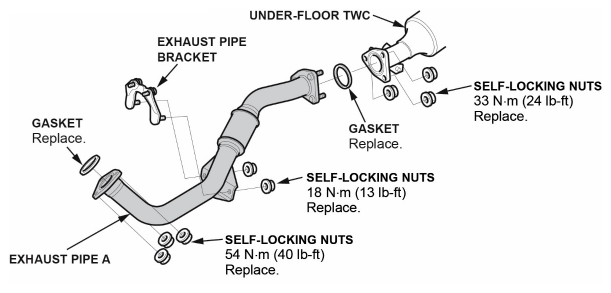
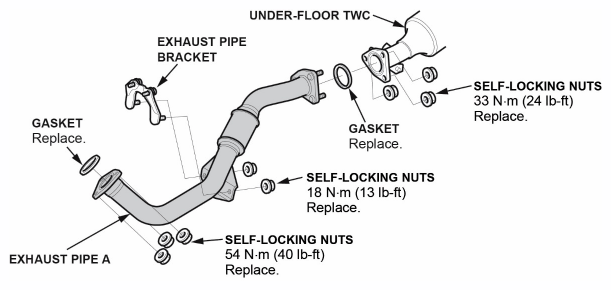
- Remove exhaust pipe A.
- Raise the vehicle, and remove the front wheel on the passenger's side.
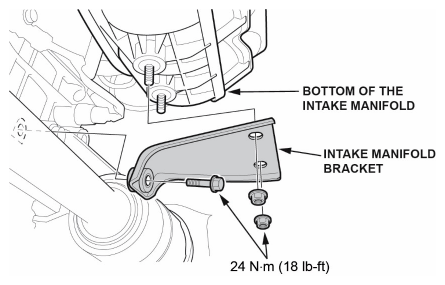
- Remove the intake manifold bracket.
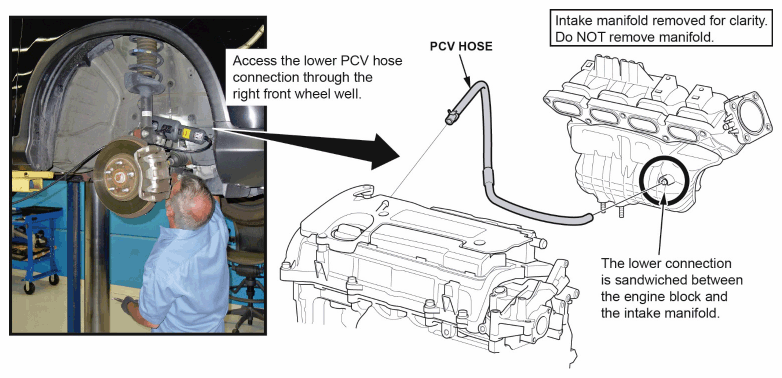
- Disconnect the lower part of the PCV hose by reaching through the right front wheel well.
- Carefully remove the PCV hose.
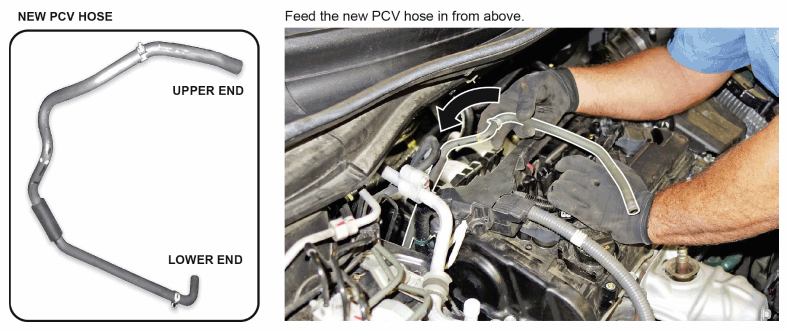
- Transfer the hose clamps from the original PCV hose to the new one.
- Install the PCV hose by inserting it through the top part of the engine and connecting the upper part of the hose to the engine.
- Install the hose into the clip.
- Raise the vehicle, and install the lower part of the hose onto the intake manifold.
- Install the intake manifold bracket. Torque the bolts to 24 N.m (18 lb-ft) .
- Install exhaust pipe A using new gaskets and lock nuts. Torque the self-locking nuts as shown.
- Install the splash shield.
- Install the harness holder, then reinstall the ignition coil cover. Torque the bolts to 12 N.m (9 lb-ft)
.
END