Excessive Steering Wheel Shimmy Or Chassis Vibration (JA02922)
Reference number: JA02922
EXCESSIVE STEERING WHEEL SHIMMY OR CHASSIS VIBRATION
TECHNICAL SERVICE BULLETIN
| HONDA: | All |
AFFECTED VEHICLES
General Information
INTRODUCTION
Do you have a vehicle with a steering wheel shimmy or chassis vibration that you feel at highway speeds and you know it is not a normal characteristic of the vehicle? Many things can cause this problem, for example:
- Out-of-balance tires, rims, front wheel hubs, or front brake discs
- Wrong tire pressures
- Tire(s) that are not fully seated on the rim(s)
- Excessive tire runout under load
- Damaged tires (cuts, missing rubber, etc.)
- Use of aftermarket parts (tires, rims, steering components, or suspension components)
- Damage
This job aid looks at the entire issue of steering wheel shimmy and chassis vibration and what it takes to fix the problem. It includes these topics:
- Test-Driving the Vehicle
- Interpreting the Vibration
- Understanding Phase Matching
- Balancing the Wheels
- Matching the Wheels to the Hubs
- Calibrating the Wheel Balancer
- Reading Tire/Rim Runout with a Hunter GSP9700 Wheel Balancer
TEST-DRIVING THE VEHICLE
Follow these steps and answer the questions in the order they are asked. If possible, have someone along to record your answers.
- Test-drive the vehicle exactly as described on your RO.
- Describe the vibration.NOTE: If the vibration is caused by something other than the wheels (transmission, engine, exhaust, etc.), end your test-drive right now. Check SIS for applicable service information.
- Where do you feel the vibration is coming from?
- Does the vibration go away after a few minutes of driving? Does it come and go?
- Does the steering wheel shimmy? (It feels like it is shaking left and right.)
- Slow down until the vibration goes away. Now, speed up in 5 mph increments, holding that speed for 15 seconds or more before speeding up again. At what speed do you start to feel the vibration again? As you continue speeding up, does the vibration get stronger, weaker, or does it just stay the same?
- Drive for about 2 miles
on straight and curved roads at the speed where you felt the vibration strongest in step 3.
- When driving straight ahead, is the vibration constant or does it come and go?
- When following a curve, is the vibration constant or does it come and go?
- Shift into Neutral. Does the vibration go away?
- Drive under the conditions that you feel the vibration the most. Speed up, applying different foot pressure to the accelerator pedal (gentle, medium, and hard). Does the vibration stay the same or is there a specific foot pressure where it changes?
- Climb a hill at a steady speed. Does the vibration stay the same or does it get stronger as you climb? Apply different pressures like you did in step 6. Does the vibration stay the same or does it get stronger when you apply a particular foot pressure?
- Test-drive a known-good vehicle that is the same model, year, and trim level as your customer's vehicle and is completely stock. Drive it exactly as you did in steps 2 thru 7. Now, compare your two test-drives.
- If your customer's vehicle is similar or better than the known-good vehicle, the vibration is a normal characteristic of the vehicle.
- If your customer's vehicle is noticeably worse than the known-good vehicle, you need to interpret the vibration before moving ahead.
INTERPRETING THE VIBRATION
Cold Start Vibrations
Temperature/Time-Related Flat Spots
When you park a vehicle overnight in cold temperatures or for a few days, weeks, or months, the tires can form what are commonly called flat spots. These flat spots can cause a noticeable vibration when traveling at low speeds and go away after just a few miles of driving.
Due to their construction and materials, many heavy-duty and high-performance tires may retain their shape in which they were last parked. Unfortunately, that can become a problem when the tires go through wide swings in ambient temperature or they have been sitting overnight in cold temperatures or for a very long time.
When a tire is suspended in the air (there is no load on it), each of the sidewall cords has the same tension. As the tire rolls on the ground, each of those sidewall cords goes from a relaxed state to a loaded state with every rotation. And this happens about 800 times every mile.
This constant deflection generates heat, which makes the tires more flexible. But once you park the vehicle and those tires start to cool, the spot that is touching the ground (the tire's footprint) flattens and the cords around that spot relax as the tire presses down from the vehicle's weight.
The cords at the top of the tire, however, are held at their maximum tension. If it is cold overnight or you do not drive the vehicle for a while, the tire will retain its position, forming a flat spot. After a cold start, the axle rises and falls in response to that flat spot, causing a noticeable vibration. But as the tire warms up, it softens and normally rounds out. With the axle now riding steady, the vibration goes away.
A flat spot can be just temporary , where the tire rounds out after it warms up. But sometimes it can also be permanent, in which that flat spot effectively destroys the tire's ride quality. A flat spot's severity often depends on the tire's size, its construction, the load it is under, the ambient temperature, and how long it has been sitting and at what temperature. If the tire has a temporary flat spot, do not replace the tire just because of it. Of course, if that flat spot is permanent, the only real cure is tire replacement.
Abrasion-Related Flat Spots
Tires can also develop flat spots if the brakes lock up, causing them to skid. This is more likely to happen in vehicles without ABS or VSA, or if you misuse the parking brake. Since these flat spots are obviously permanent, the only real cure is tire replacement.
Constant Vibrations
A badly mounted tire bead can cause vibrations that you can feel right through the seat, the floor, and the steering column while driving. The steering wheel can also shimmy. In rare cases, more than one tire can be the culprit.
If the tire looks new and you suspect a badly mounted bead, you need to measure the tire/rim runout if you have access to a Hunter GSP9700 wheel balancer. If you do not have access to one, you need to mount a known-good stock tire and rim and test-drive your customer's vehicle under the same conditions listed on your RO.
Intermittent Vibrations
Vibrations coming from tires, rims, hubs, and brakes happen when you are going 50 mph or faster. And they tend to get stronger when you reach about 70 mph .
Intermittent wheel vibration normally is not affected by these factors:
- Engine speed
- Gear selection (this includes Neutral)
- Engine load
- Hill climbing
- Acceleration
- Deceleration
But if it is affected by one of these factors, then stop right here. You may be dealing with a vibration from another source (exhaust, engine, A/C, etc.)
Often, the wheel vibration is intermittent because of phase matching.
Steering Wheel Shimmy
Steering wheel shimmy can be caused by static tire imbalance. Static balance is simply the wheel's weight distribution while it is at rest .
When one part of the wheel (the tire, rim, hub, or brake disc) is heavier by more than 7 grams , you can feel it as a shimmy. If one tire is out of balance, the shimmy will be constant. If two wheels are out of balance, it will be intermittent because of phase matching. You may notice that the vibration tends to come and go more often when driving on curved roads. This is a good indication of phase matching.
UNDERSTANDING PHASE MATCHING
The most critical speed for tire-induced vibration is from 55 to 65 mph . At those speeds, a tire spins at a rate of anywhere from 10 to 15 times per second .
When two out-of-balance tires are spinning so their heavy spots hit the road at different times , they are said to be out of phase and, at a certain point, their vibrations can actually cancel each other out. But if both tires are spinning so their heavy spots are now hitting the road at the same time , they are said to be in phase and their vibrations can actually add together.
When those vibrations cancel each other out, you get steering wheel shimmy. When they add together, you get chassis vibration (floorboard shake), although in some vehicles, the steering wheel can be more sensitive than the floor.
As the tires continually come into and out of phase, the steering wheel shimmy continually comes and goes. You feel it increase, reach a peak, then diminish over and over again.
And when you drive on a curved road or change lanes, that shimmy will happen even more often. For instance, when you turn to the left, the outside tire must travel farther than the inside tire, so it spins faster . This constant changing in spin rate while making turns results in more frequent vibration cancelling and adding action than you would get just cruising down a straight road.
One final note: The cause of each tire-induced vibration does not need to be the same for phase matching to happen. It is entirely possible to have one tire with a poorly seated bead while the other one has a heavy spot.
BALANCING THE WHEELS
- Before you start, drive the vehicle to heat up the tires. Then, raise the wheels on a lift within 10 minutes of completing your drive. You must do this to avoid temporary flat spots that could affect the wheel balance.
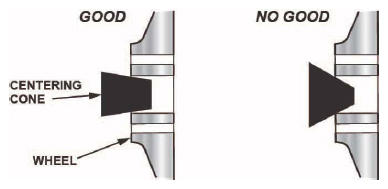
- Use the proper centering cone attachment for the wheel that you are balancing. The centering cone must have a low taper
and fit inside the hub bore.
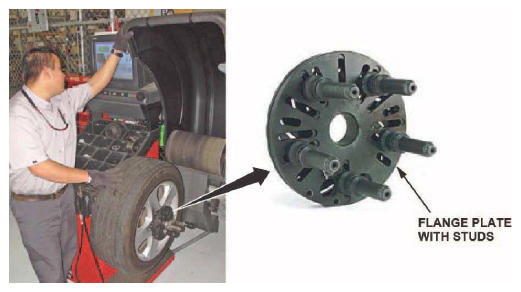
- Mount the wheel onto the wheel balancer shaft and secure it in place using the proper attachments. If the wheel has a lot of flat surface around its hub bore, a rubber cup attachment works well. But if it has a lot of uneven surfaces (some wheels do because of their elaborate design), you must use a flange plate with studs like the one shown here to ensure accurate center mounting.
- Make sure the wheel balancer is calibrated. If it needs calibration, go to CALIBRATING THE WHEEL BALANCER .
- Set the wheel balancer to dynamic balance .
- Turn off the measurement rounding feature (you want the measurements to read in 1-gram increments ).
- Balance the wheel until its total imbalance reads less than 5 grams on each side.
- Set the wheel balancer to static balance .
- Turn off the measurement rounding feature (you want the measurements to read in 1-gram increments ).
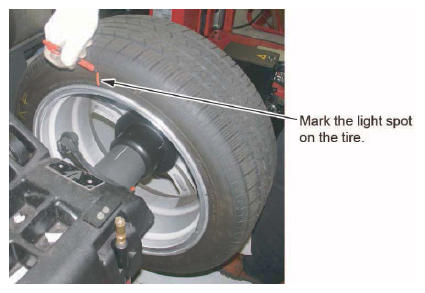
- Measure the imbalance of the wheel, but do not
add any weight. Use chalk for the tire and a permanent marker for the inner rim flange to mark where the weight should go. This is the lightest
spot of the wheel. The light spot should be less than 5 grams
. When you are done, go to MATCHING THE WHEELS TO THE HUBS .
MATCHING THE WHEELS TO THE HUBS
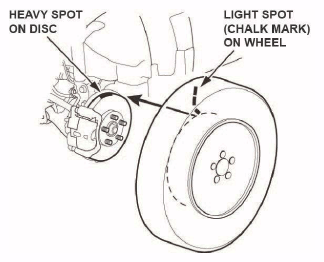
- Match the light
spot on the wheel to the heavy
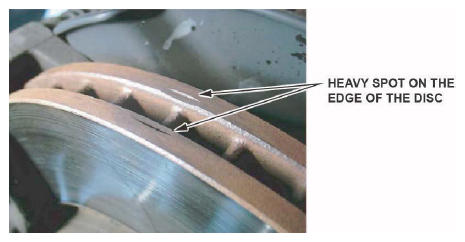
spot on the front brake disc and hub assembly. The heavy spot is that ground-off area on the edge of the disc, although not all vehicles have these markings.
- Turn the brake disc by hand so the heavy spot is facing straight up.
- Mount the wheel to the hub with the light spot (chalk mark) facing straight up. You want to get the heavy spot on the disc and the light spot on the wheel to line up as closely as possible. The wheel studs may keep you from getting a perfect match, but that is OK. Then, test-drive the vehicle. If the vibration goes away, you are done with this repair. If it is still there, you may need to measure the tire/rim runout with a Hunter GSP9700 wheel balancer and do tire/rim matching.
- If you cannot find the heavy spot on the disc, mount the wheel and test-drive the vehicle. If you notice there is still too much vibration, remove the wheel, mark one of the studs with a felt-tip pen for reference, then remount the wheel onto the next stud to the right of your reference. Test-drive the vehicle. If the vibration goes away, you are done with this repair; otherwise, repeat this process until you find the ideal mounting location. If the vibration still will not go away, you may need to measure the tire/rim runout with a Hunter GSP9700 wheel balancer and do tire/rim matching.
CALIBRATING THE WHEEL BALANCER
Do this procedure when you are balancing a wheel type or size that you have never balanced before, when you suspect there is a problem with your wheel balancer, or after you have done about 100 wheel balances.
- Turn off the measurement rounding feature (you want the measurements to read in 1-gram increments) .
- Balance a damage-free alloy wheel and tire assembly until both the inner and outer rims read zero imbalance.
- Loosen the wing nut attachment, turn the wheel half a turn (180°
), retighten the wing nut, and recheck the balance.
- If the imbalance reads 5 grams or less , the zero calibration is OK. Rebalance the wheel to read zero, then go to step 5 to check the static balance.
- If the imbalance reads more than 5 grams , go to step 4.
- Loosen the wing nut attachment, turn the wheel a quarter turn (90°
), retighten the wing nut, and recheck the balance.
- If the imbalance now reads 5 grams or less, the wheel is not centered on the wheel balancer. Make sure you are using the proper centering cone, cup, and wing nut for the wheel you are balancing. If you are not sure, check out the operator's manual or ask the manufacturer what attachments you need. When you have the proper attachments, go back to step 1.
- If the imbalance still reads more than 5 grams, the wheel balancer needs calibrating, repair, or both. Call the manufacturer for the nearest repair representative.
- Mount a 5-gram weight to the outer
rim and recheck the balance. The wheel balancer should read 5 ± 2 grams
of imbalance that is 170° to 190°
from that 5-gram weight.
- If 5 ± 2 grams of imbalance was read, the static balance calibration is OK. Go to step 6 to check the dynamic balance.
- If 5 ± 2 grams of imbalance was not read, the wheel balancer needs calibrating. Call the manufacturer for the nearest repair representative.
- At 180°
from the weight you added to the outer rim, mount a 5-gram weight to the inner
rim and recheck the balance. The wheel balancer should read 5 ±
2 grams of imbalance 170° to 190°
from both of the weights you mounted.
- If 5 ± 2 grams of imbalance was read, the dynamic balance calibration is OK and the wheel balancer is ready to use.
- If 5 ± 2 grams of imbalance was not read, the wheel balancer needs calibrating. Call the manufacturer for the nearest repair representative.
Most steering wheel shimmy or chassis vibration problems can be fixed by balancing the wheels and matching them to the hubs. But if that does not work, you may need to measure the tire/rim runout. Excessive runout under load can cause vibration that wheel balancing will simply not fix.
READING TIRE/RIM RUNOUT WITH A HUNTER GSP9700 WHEEL BALANCER
To reduce the effect of runout, you must find the radial force variation (RFV) of each tire and rim, then match the tires to the rims by indexing their peak RFV areas. Matching tires to rims this way helps cut down on wheel vibration.
To accurately read tire/rim runout, you need equipment that can simulate road force on a wheel and show you the peak RFV area on the tire and on the rim. The Hunter GSP9700 wheel balancer, besides being a wheel balancer, can accurately calculate peak RFV readings on tires and rims. If your shop does not have a GSP9700, visit Hunter's GSP9700 website at www.GSP9700.com or find another shop in your area that does.
- If you need to replace tires, always use OEM tires. For replacement tires, call The Tire Rack at 877-327-8473 .
- Make sure this repair procedure is followed to the letter , whether it is done in your shop or by an outside vendor.
- RFV consists of four parts: total indicated runout (TIR), 1st harmonic radial force variation (RFV-1), 2nd harmonic radial force variation (RFV-2) , and 3rd harmonic radial force variation (RFV-3) . All tire/rim matching done in this repair procedure is based on RFV-1.
- The rest of this repair procedure refers to RFV as road force measurement (RFM) ; it is Hunter's trade name.
- To check wheel balancing calibration, see CALIBRATING THE WHEEL BALANCER or refer to the operator's manual.
- To check RFM calibration (you need to do this about once a week), use the calibration tools that came with the wheel balancer and follow the on-screen instructions.
- To ensure you are getting the right tire/rim runout readings, raise the vehicle so all four wheels are off the ground within 10 minutes of completing your test-drive. You must do this to avoid temporary flat spots that could affect the wheel balance.
- Make sure all four tire pressures read exactly as listed on the driver's doorjamb label.
- Mark each tire's position (L/F, R/F, L/R, and R/R).
- Remove all wheel weights and clean off any mud from the rims. Wheel weights will keep you from reading RFM and any extra weight will cause wheel imbalance.
- Clean out any pebbles, mud, or other debris trapped between the tire treads. Anything causing a bump on the tires will throw off RFM and balancer readings.
- Inspect the wheels for damage. Tire or rim damage can cause high RFM readings and wheel imbalance.
- Make sure the arbor and baseplate threads on the wheel balancer are clean.
- Make sure all mating surfaces between the wheel and the wheel balancer are clean, then mount the wheel.NOTE: Use the GSP9700 centering check feature (it is on software version 2.1 or higher) to check for a possible centering error between the rim and the wheel balancer.
- Use the wheel balancer to find the initial RFM readings (pounds and peak locations) of the tire, the rim, and the tire/rim combination. For more information, see the operator's manual. If the RFM is higher than 10 pounds, do the match mounting procedure in the manual. If the RFM is still higher than 10 pounds after doing that, replace the tire.
- After you have found the problem wheel, remount the tire.
- Fully deflate the tire and break the bead seal from the rim.
- Clean off any dirt, tar, or rocks from the rim and inspect the tire bead area for any debris that could keep the bead from properly sealing on the rim.
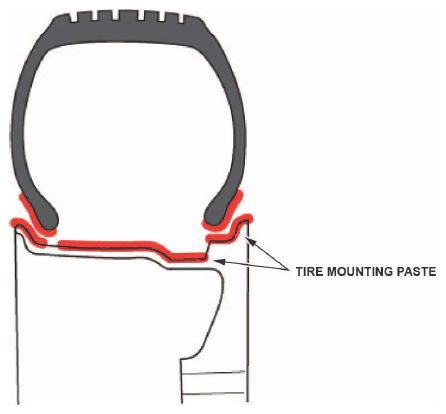
- Use tire mounting paste to coat all of the areas where the tire touches the rim (inner and outer tire beads, rim flange, middle of the rim). Never
use soap and water or a silicone spray. If your shop does not have tire mounting paste, there are a number of brands commercially available. If the vehicle has direct TPMS, be careful not to get any of that paste on the tire pressure sensor.
- Seal the tire beads on the rim by fully inflating the tire to the max pressure shown on the sidewall.
- Fully deflate the tire, then inflate it to the recommended cold inflation pressure listed on the driver's doorjamb label.
- Mount the wheel on the vehicle and go for a test-drive. If the vibration is gone, you are done with this repair. If it is still there, then look for other possible causes.