Warranty Extension: Customer Support Program For Driver's Airbag Inflator For 2015-16 Cr-V (Expires June 30, 2030) (18-058)
Reference number: 18-058
WARRANTY EXTENSION: CUSTOMER SUPPORT PROGRAM FOR DRIVER'S AIRBAG INFLATOR FOR 2015-16 CR-V (EXPIRES JUNE 30, 2030)
SERVICE CAMPAIGN BULLETIN
| HONDA: | 2015-16 CR-V |
AFFECTED VEHICLES
| Year | Model | Trim | VIN Range |
|---|---|---|---|
| 2015-16 | CR-V | ALL | Check the iN VIN status for eligibility. |
BACKGROUND
This bulletin is a notification of a class action settlement relating to airbag inflators. American Honda is offering a Customer Support Program (Warranty Extension) to cover any manufacturing defects in the replacement driver's airbag inflator only.
The warranty extension does not cover the following:
- Airbag deployment
- Aftermarket airbag inflator or aftermarket airbag assemblies (modules)
- Any vehicle that has ever been declared a total loss or sold for salvage by a financial institution or insurer
- Any vehicle that has a branded or similar title under any state's law
The Customer Support Program expires for this group of vehicles on June 30, 2030.
Do the inspection procedure to determine if an inflator defect is the cause of the problem. If it is, replace the airbag module under this Customer Support Program.
- Any inspection is customer pay unless the inflator is found defective. If the inflator is defective, troubleshooting is also covered by the Customer Support Program. If you have questions or concerns whether an inflator is defective, contact your DPSM for assistance.
CUSTOMER NOTIFICATION
Owners of affected vehicles have been sent a notification from the class action administrator.
Do an iN VIN status inquiry to make sure the vehicle is shown as eligible.
CORRECTIVE ACTION
Follow the INSPECTION PROCEDURE to determine if the failure is caused by a defective inflator. If it is, the Customer Support Program applies; replace the airbag module. Do not replace only the inflator.
- Replace the airbag module under the Customer Support Program only if directed by this bulletin.
- Make sure to check for aftermarket airbag assemblies or counterfeit inflators, which are not covered under the Customer Support Program.
REQUIRED TOOLS
| Tool Name | Tool Number | Quantity |
|---|---|---|
| SRS Inflator Simulator | 07SAZ-TB4011A | 1 |
| SRS Simulator Lead J | 070AZ-SNAA100 | 1 |
INSPECTION PROCEDURE
- Check the SRS indicator.
- If the SRS indicator is not on, this bulletin does not apply. Continue with normal troubleshooting.
- If the SRS indicator is on, go to step 2.
- Check the vehicle history to see if the vehicle ever has been declared a total loss or sold for salvage by a financial institution or insurer, or has a branded or similar title under any state's law.
- If the vehicle has been declared a total loss, sold for salvage by a financial institution or insurer, or has a branded or similar title under any state's law, this bulletin does not apply.
- If the vehicle has a clear history, go to step 3.
- Check if the airbag deployed.
- If the airbag deployed, this bulletin does not apply.
- If the airbag has not deployed, go to step 4.
- Check for any of the following SRS DTCs using the i-HDS:
- 11-1x (open in the driver's first inflator)
- 11-2x (increased resistance in the driver's airbag first inflator)
- 11-3x (short to another wire or decreased resistance in the driver's airbag first inflator)
- 11-4x (open in the driver's airbag second inflator)
- 11-5x (increased resistance in the driver's airbag second inflator)
- 11-6x (short to another wire or decreased resistance in the driver's airbag second inflator)
- 11-8x (short to power in the driver's airbag first inflator)
- 11-9x (short to ground in the driver's airbag first inflator)
- 11-Ax (short to power in the driver's airbag second inflator)
- 11-Bx (short to ground in the driver's airbag second inflator)NOTE:
- The "x" in the DTC number is a wildcard placeholder. Make sure you write down and submit the entire DTC code on your claim or it may be debited.
- There may be some variations in the DTC description.
- You must use the i-HDS and an acceptable interface (MVCI or DST-i). DTCs found in ODS do not apply.
- If there are additional SRS DTCs that are stored, but not on this list, contact your DPSM for assistance. Those DTCs may pose a danger to the customer or the technician.
- B0001-11 (short to ground in the driver's airbag first inflator)
- B0001-12 (short to power in the driver's airbag first inflator)
- B0001-13 (open or increased resistance in the driver's airbag first inflator)
- B0001-1A (decreased resistance in the driver's airbag first inflator)
- B0001-2B (short to another wire harness in the driver's airbag first inflator)
- B0002-11 (short to ground in the driver's airbag second inflator)
- B0002-12 (short to power in the driver's airbag second inflator)
- B0002-13 (open or increased resistance in the driver's airbag second inflator)
- B0002-1A (decreased resistance in the driver's airbag second inflator)
- B0002-2B (short to another wire harness in the driver's airbag second inflator)NOTE:
- There may be some variations in the DTC description.
- You must use the i-HDS and an acceptable interface (MVCI or DST-i). DTCs found in ODS do not apply.
- If there are SRS DTCs that are stored, but not on this list, contact your DPSM for assistance. Those DTCs may pose a danger to the customer or the technician.
- If any of the listed SRS DTCs are stored, go to step 5.
- If no SRS DTCs are stored, this bulletin does not apply.
- Clear the DTC(s).
- Turn the ignition OFF.
- Turn the ignition to ON, not ACC, then wait 10 seconds.
- Check to see if any of the listed SRS DTCs returned.
- If any one of the listed DTCs returned, write down the DTC(s) and go to step 9.
- If none of the listed DTCs returned, the Customer Support Program does not apply.
- Turn the ignition to OFF.
- Disconnect the negative cable from the battery, and wait at least 3 minutes.
- Remove the access panel from the steering wheel, and disconnect the cable reel 4P connector from the driver's airbag 4P connector.
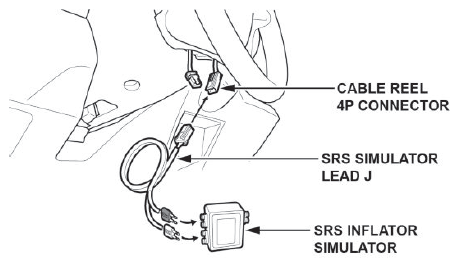
- Connect the terminals of SRS simulator lead J to the SRS inflator simulator (2 O connectors), then connect SRS simulator lead J to the cable reel 4P connector as shown.
- Reconnect the negative battery cable.
- Turn the ignition to ON, not ACC, and wait 10 seconds.
- Check if the SRS DTC listed in step 8 returns.
- If the same SRS DTC returned, the inflator is OK. The Customer Support Program does not apply. Continue with normal troubleshooting.
- If the same SRS DTC did not return, go to the REPAIR PROCEDURE .
PARTS INFORMATION
| Part Name | Part Number |
|---|---|
| Refer to the parts catalog using the VIN to ensure the correct airbag module and ancillary parts are ordered. | Refer to the parts catalog. |
- Make sure the airbag inflator is removed from the original airbag module. See REMOVE THE INFLATOR FROM THE ORIGINAL AIRBAG MODULE section of this bulletin.
- The new airbag module box must be used to return the old airbag module without the inflator to American Honda (if requested). Be careful not to damage the airbag module box.
- To return the inflator, follow the shipping instuctions outlined in the parts information bulletin A15-0002, Inflator Kit Return Process.
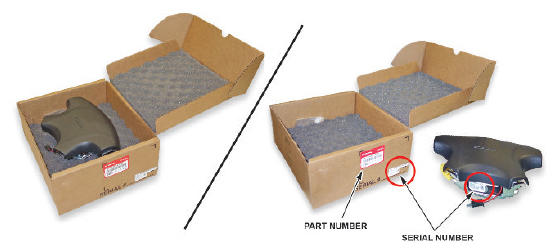
- Parts staff can scan the part number and serial number from the outside of the box into the warranty claim by using the Controlled Part Serial No. screen and scanning the applicable information. Refer to the Job Aid Ordering and Managing Replacement Inflators for more information.
WARRANTY CLAIM INFORMATION
- To avoid non-payment of warranty claims, the new airbag module part number and serial number must be included in each claim. For more information, refer to step 6 of REPAIR PROCEDURE .
- To avoid a warranty claim being charged back to your dealership, follow the normal warranty part retention rules. American Honda may call in the original airbag module.
- The serial number is encoded into the bar code label attached to the outside of the box. If your dealership uses a scanner, you can scan the serial number into the claim.
- The part number is encoded into a barcode attached to the outside of the box. If your dealership uses a scanner, you can scan the part number into the claim.
- If you confuse the serial number and part number when entering the claim information , your claim will automatically be rejected.
- You must enter a DTC in the DTC field of the warranty claim.
- The FRT includes time for the inspection and replacement of the airbag module.
| Operation Number | Description | Flat Rate Time | Defect Code | Symptom Code | Failed Part Number |
|---|---|---|---|---|---|
| 7521M8 | 2015-16 CR-V | 0.5 hr | 6X200 | X1M00 | 77810-T1W-A80ZA |
Skill Level: Repair Technician
REPAIR PROCEDURE
- If the VIN status inquiry indicates that the vehicle is subject to any open safety recalls, make sure to also complete those recall repairs before returning the vehicle to the customer. If you are unable to complete any open recall, have the service advisor notify the customer of the recall status and when the recall could be completed.
- Make sure you have reviewed the SRS Precautions and Procedures in the service information before doing the repair.
- Be careful not to damage any parts when replacing the module, and follow the procedure exactly.
- Make sure you have the anti-theft code for the audio and navigation system (if applicable), then write down the frequencies for the audio unit's preset buttons.
- If, before removing the airbag, you suspect that it may be the incorrect airbag for the vehicle or a counterfeit, do not remove the airbag . Contact your DPSM for assistance.
- Do not open the new module box until you have confirmed the vehicle's module is not counterfeit because if you have to return the new module, the kit must be unopened.
- Make sure you have reviewed the SRS Precautions and Procedures in the service information before doing the REPAIR PROCEDURE.
- Do this REPAIR PROCEDURE only if you were directed here from the INSPECTION PROCEDURE.
- Disconnect the battery negative cable, and wait at least 3 minutes before continuing.
- Remove the driver's airbag module. Refer to the applicable service information.
- Place the airbag module, face down, on a clean shop towel.
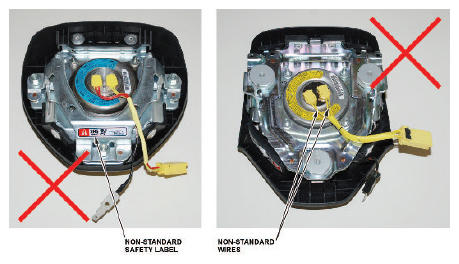
- Visually inspect the airbag module and the inflator for any unusual writing or markings. Click BELOW
to watch a video to help identify counterfeit airbags.multimedia:A supplement to the article is available.
- If there is nothing unusual about the airbag module or the inflator, continue with the airbag module replacement procedure. Refer to the service information.
- If there are any unusual markings, like an incorrect label or a model year written in marker, the airbag module and inflator may not be the correct airbag module and/or inflator for the vehicle or it may be a counterfeit part. For more information about counterfeit airbags, you can refer to safercar.gov , enter keywords MANAGING COUNTERFEIT , and select Recommended Dealer Guidance for Managing Counterfeit Air Bags from the list. If you suspect that the airbag module or inflator is counterfeit, do not continue this procedure. Contact your DPSM for assistance.
- Write the serial number and part number from the outside of the airbag module box on the RO.
- Install the new driver's airbag module using new Torx bolts, and torque them to 9.8 N.m (7.2 lb-ft) . Refer to the service information.
- Reconnect the battery negative cable.
- Start the vehicle and check that the SRS indicator comes on for about 6 seconds, then goes off.
- Give your warranty clerk the RO that includes the replacement airbag module serial number and replacement part number. For the warranty claim to be paid, the replacement part number must be included in the warranty claim.
- Go to REMOVE THE INFLATOR FROM THE ORIGINAL AIRBAG MODULE to remove the inflator from the original airbag module, and return the inflator and airbag module (if requested).
REMOVE THE INFLATOR FROM THE ORIGINAL AIRBAG MODULE
- Order a new inflator box from XPO to return the original airbag module inflator. Use the contact information below:
Primary Contact: Tel#: 1-210-250-5079
Email: SCFieldAction.14305@xpo.com
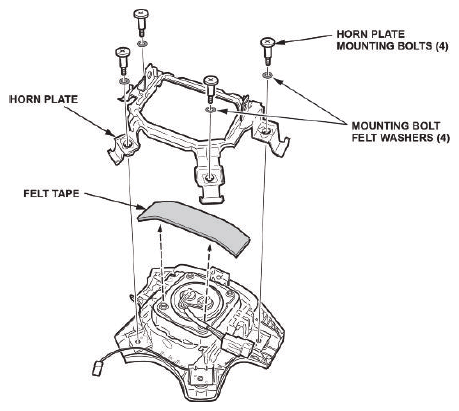
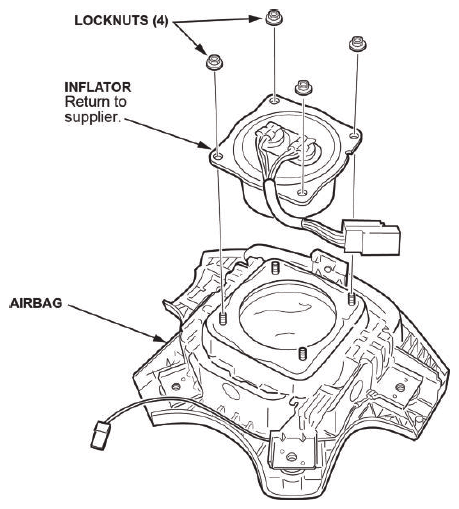
- If the driver's airbag module has a bracket preventing you from accessing the locknuts and removing the inflator
, remove the bracket and any felt tape covering the locknuts.NOTE: The airbag module shown below is an example, other modules are similar.
- Using needle-nose vise grips or a 3/8 in. 6-point socket, remove the four locknuts from the inflator, then remove it.
- Put the original inflator into the new inflator box acquired from XPO. Make sure there is no other hardware in the box because if the package rattles, it will not be accepted by the courier.
- Follow the shipping instructions outlined in PIB A15-0002 to return the undeployed inflator.
- Place the original airbag module (without the inflator) in the airbag module box that the replacement came in. Properly fill out and attach a warranty claim tag to it. The original airbag module may be called in by AHM.
END