Test Procedure
- 1. HDS - Connect
- 2. Vehicle - Lift
- 3. Rear Differential Fluid Pressure Sensor - Remove
- 4. Rear Differential Fluid Pressure Sensor - Test
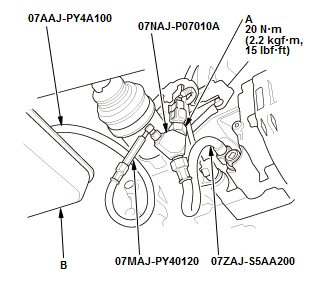 Courtesy of HONDA, U.S.A., INC.
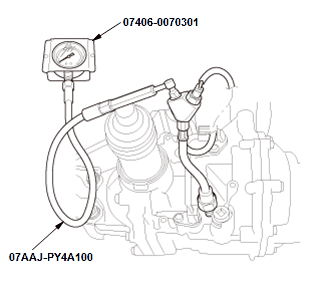
1. Attach the A/T pressure test hose, the A/T pressure adapter, the pressure gauge adapter, and the oil pressure hose as shown, then Install the rear differential fluid pressure sensor (A) to the pressure gauge adapter
2. Place the end for the A/T pressure test hose into a drain pan (B)
3. Start the engine, the AWD pump will do a brief low pressure purge of the system, this will cause air and fluid to flow out of the A/T pressure test hose
4. Turn the vehicle to the OFF (LOCK) mode
5. Repeat step 3 again to assure the A/T pressure test hose is full of fluid without air bubbles.
6. Attach the A/T low pressure gauge w/panel onto the end of the A/T pressure test hose 7. Turn the vehicle to the ON mode
8. Select the ADJUSTMENT in the REAL TIME AWD SYSTEM with the HDS
9. Select the AIR BLEEDING in the ADJUSTMENT with the HDS.
NOTE: See the HDS Help menu for specific instructions
10. Turn the vehicle to the OFF (LOCK) mode.
- 11.Check the differential fluid pressure value of the oil pressure gauge.
- If the fluid pressure is higher than 0-50 kPa (0.0-0.5 kgf/cm2, 0-7 psi), rear differential fluid pressure sensor is OK, check the rear differential assembly.
- If the fluid pressure is within the range of 0-50 kPa (0.0-0.5 kgf/cm2, 0-7 psi), go to step 12.
- 12.Turn the vehicle to the ON mode.
- 13.Select the DATA LIST in the REAL TIME AWD SYSTEM with the HDS.
- 14.Check the ACTUAL OIL PRESSURE OF THE OIL PRESSURE SENSOR FOR REAR DIFFERENTIAL in the DATA LIST with the HDS.
- If the fluid pressure is higher than 0-50 kPa (0.0-0.5 kgf/cm2, 0-7 psi), replace the rear differential fluid pressure sensor.
- If the fluid pressure is within the range of 0-50 kPa (0.0-0.5 kgf/cm2, 0-7 psi), go to step 15.
- 15.Select the FUNCTIONAL TEST in the REAL TIME AWD SYSTEM with the HDS.
- 16.Select the SOLENOID TEST in the FUNCTIONAL TEST with the HDS.
- 17.Do LEVEL 7 of the SOLENOID TEST with the HDS.
- 18.Check the differential fluid pressure value of the oil pressure gauge.
- If the fluid pressure is not within the range of 280-560 kPa (2.86-5.71 kgf/cm2, 40.6-81.2 psi), rear differential fluid pressure sensor is OK, check the rear differential assembly.
- If the fluid pressure is within the range of 280-560 kPa (2.86-5.71 kgf/cm2, 40.6-81.2 psi), go to step 19.
- 19.Check the differential fluid pressure value in the LEVEL 7 of the SOLENOID TEST with the HDS.
- If the fluid pressure is not within the range of 280-560 kPa (2.86-5.71 kgf/cm2, 40.6-81.2 psi), replace the rear differential fluid pressure sensor.
- If the fluid pressure is within the range of 280-560 kPa (2.86-5.71 kgf/cm2, 40.6-81.2 psi), rear differential fluid pressure sensor is OK, and the test is complete.
- 18.Check the differential fluid pressure value of the oil pressure gauge.
- 14.Check the ACTUAL OIL PRESSURE OF THE OIL PRESSURE SENSOR FOR REAR DIFFERENTIAL in the DATA LIST with the HDS.
- 11.Check the differential fluid pressure value of the oil pressure gauge.
- 5. Rear Differential Fluid Pressure Sensor - Install
- 6. Rear Differential Fluid - Check - Refer to: Rear Differential Fluid Inspection and Replacement (4WD) Rear Differential Fluid Inspection and Replacement (AWD)
NOTE: Check that the real time AWD system indicator does not come on. If it does, check for real time AWD system DTC's .