Steering Rack Guide Adjustment: Adjustment
- 1. Vehicle - Lift
- 2. Front Floor Undercover - Remove - Refer to: Middle Floor Undercover Removal and InstallationRear Floor Undercover Removal and InstallationFront Floor Undercover Removal and Installation
- 3. Steering Rack Guide - Adjust
1. Set the front wheels in the straight ahead position
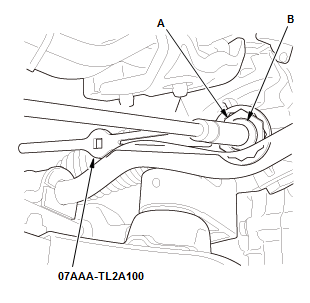
2. Loosen the locknut (A) with the locknut wrench
3. Remove the rack guide screw (B).
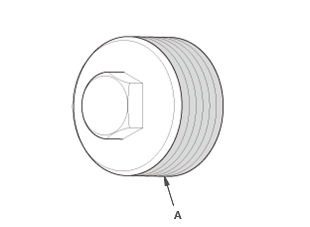
4. Remove the old sealant from the rack guide screw 5. Apply new sealant (Three Bond 1215 or Loctite 5699) to the middle of the threads (A).NOTE: If the rack guide screw is not installed within 5 minutes of applying the sealant, remove the sealant and residue, and reapply new sealant
6. Loosely install the rack guide on the steering gearbox.
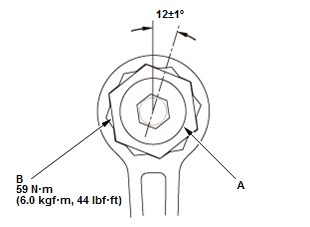
7. Tighten the rack guide screw (A) to 25 N.m (2.5 kgf.m, 18 lbf.ft), then loosen it 8. Retighten the rack guide to 3.9 N.m (0.40 kgf.m, 2.9 lbf.ft), then back it off to the specified angle.
Specified return angle: 12±1 ° 9. Hold the rack guide screw stationary with a wrench, and tighten the locknut (B) by hand until it's fully seated.
10.Install the locknut wrench on the locknut, and hold the rack guide stationary with a wrench. Tighten the locknut to the specified torque.
NOTE: This special tool increases the torque applied by the torque wrench. Refer to Torque Specifications Service Precautions for details on how to recalculate the torque wrench setting.
11.Check for unusual steering effort through the complete turning range.
- 4. Front Floor Undercover - Install - Refer to: Middle Floor Undercover Removal and InstallationRear Floor Undercover Removal and InstallationFront Floor Undercover Removal and Installation
- 5. Steering Wheel Rotation Play - Check
- 6. Power Assist - Check