Removal & Installation
- 1. Vehicle - Lift
- 2. Rear Wheels - Remove
- 3. Stabilizer Link - Disconnect
1. Disconnect both sides of the stabilizer link from the stabilizer bar.
- 4. Stabilizer Bar - Remove
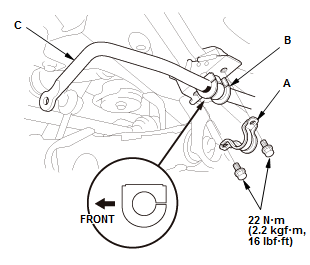
2WD/4WD
1. Remove the bushing holder (A)
2. Remove the bushing (B) on both sides
3. Remove the stabilizer bar (C).
NOTE: During installation, align the band clamps on the stabilizer bar with the side of the bushings.
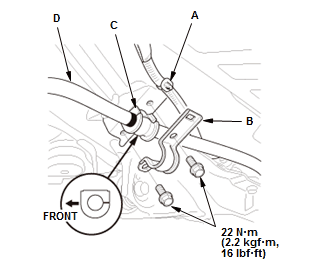
AWD
1. Remove the harness clip (A) from the left side bushing holder (B)
2. Remove the bushing (C) on both sides
3. Remove the stabilizer bar (D).
NOTE: During installation, align the band clamps on the stabilizer bar with the side of the bushings.
- 5. All Removed Parts - Install the stabilizer bar in the reverse order of removal, and note these items:
NOTE:
- Note the right and left direction of the stabilizer bar.
- Note the direction of installation for the bushing.
- Do not set the bushings on the bent or curved part of the stabilizer bar.
- 6. Test Drive - Check
1. Test-drive the vehicle.
7. After 5 minutes of driving, tighten the self-locking nut again to the specified torque.