Rear Brake Pad Removal & Installation: Removal

Frequent inhalation of brake pad dust, regardless of material composition, could be hazardous to your health.
- Avoid breathing dust particles.
- Never use an air hose or brush to clean brake assemblies. Use an OSHA-approved vacuum cleaner.
- 1. Brake Fluid - Remove
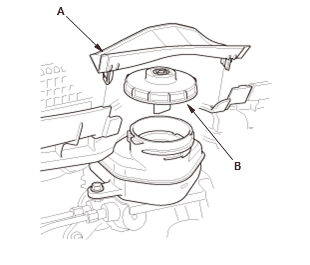
1. Pull out the hood rear seal, then remove the master cylinder maintenance lid (A)
2. Remove the reservoir cap (B)
3. Remove the brake fluid from the master cylinder reservoir with a syringe.
- 2. Vehicle - Lift
- 3. Rear Wheels - Remove
- 4. Caliper Body - Remove
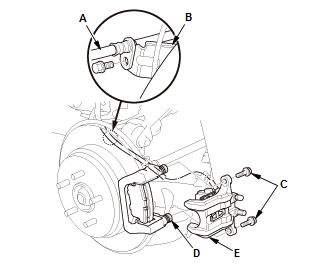
1. Remove the brake hose (A) from the brake hose bracket (B)
2. Remove the flange bolts (C) while holding the caliper pin (D) with a wrench.
NOTE: Be careful not to damage the pin boot
3. Remove the caliper body (E).
NOTE: Do not twist the brake hose to prevent damage.
- 5. Brake Pad - Remove
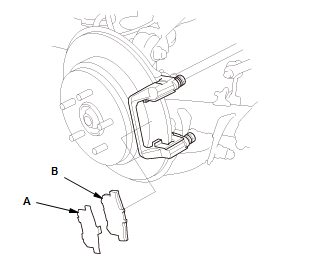
1. Remove the outer pad shim (A) and the outer brake pad (B).
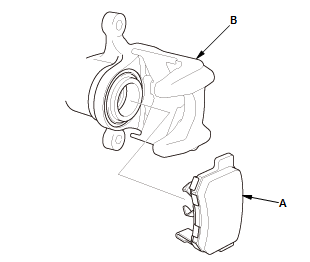
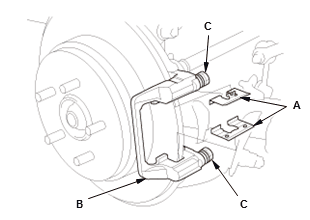
2. Remove the inner pad (A) from the caliper body (B). 3. Remove the pad retainers (A) 4. Clean the caliper bracket (B) thoroughly; remove any rust, and check for grooves and cracks
5. Verify that the caliper pins (C) move in and out smoothly. Clean and lube if needed.
- 6. Brake Disc - Inspect.
1. Inspect the rear brake disc for runout, thickness, and parallelism