Front Brake Caliper Overhaul: Reassembly

Frequent inhalation of brake pad dust, regardless of material composition, could be hazardous to your health.
- Avoid breathing dust particles.
- Never use an air hose or brush to clean brake assemblies. Use an OSHA-approved vacuum cleaner.

Do not spill brake fluid on the vehicle; it may damage the paint. If brake fluid does contact the paint, wash it off immediately with water.
NOTE:
- Clean all parts with brake cleaner and air dry; blow out all passages with compressed air.
- Before reassembling, check that all parts are free of dirt and other foreign particles.
- Make sure no dirt or other foreign matter gets in the brake fluid.
- Make sure no grease or oil gets on the brake discs or pads.
- Do not reuse the drained brake fluid. Use only clean genuine Honda DOT 3 Brake Fluid from an unopened container. Using a non-Honda brake fluid can cause corrosion and shorten the life of the system.
- Coat the piston, the piston seal groove, and the caliper bore with clean brake fluid.
- Use recommended greases in the front caliper set.
- After installing the caliper, check the brake hose and line for leaks, interference, and twisting.
- Refer to the Exploded View as needed during this procedure.
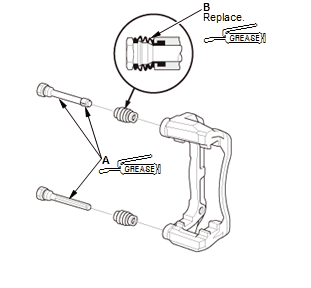
- 1. Caliper Pin and Pin Boot - Install
1. Apply a thin coat of Honda caliper grease (P/N 08C30- B0224M) to the caliper pins (A) and new pin boots (B)
2. Install the pin boots
3. Install the caliper pins.
NOTE:
- Make sure that the caliper pins are installed correctly. The upper caliper pin and the lower caliper pin are different. If these caliper pins are installed in the wrong location, it will cause vibration, uneven or rapid brake pad wear, and possibly uneven tire wear.
- Make sure that the pin boots are properly positioned into the grooves (C) of the caliper pin and the grooves (D) of the caliper body.
- Remove air from within of the pin boots.
- 2. Brake Caliper - Reassemble
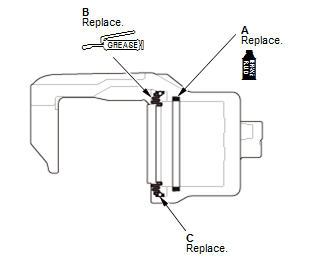
KA (2WD), KC (2WD)
1. Apply the brake fluid to the new piston seal (A)
2. Install the piston seal
3. Apply a thin coat of Honda silicone grease (P/N 08C30- B0234M) to new piston boot (B)
4. Install the piston boots
5. Install the new boot rings (C).
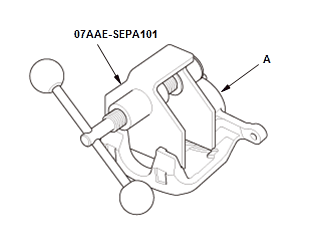
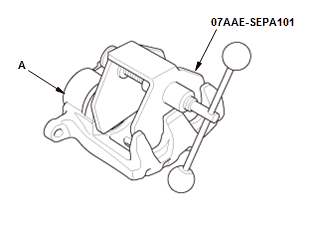
6. Apply the brake fluid to the outer surface of the pistons, then set the pistons in place on the caliper body (A) 7. Install the brake caliper piston compressor tool on the caliper body
8. Press in the pistons with the commercially available brake caliper piston compressor tool.
NOTE:
- Be careful not to damage the piston boot when pressing the piston.
- Make sure that the piston boots are properly positioned into the grooves of the pistons.
- Do not press the piston diagonally, and do not press it forcibly.
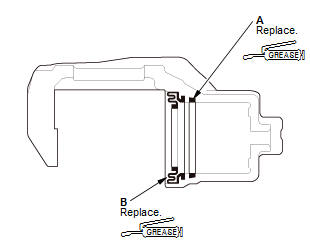
KA (AWD), KC (AWD), KX 1. Apply a thin coat of Honda silicone grease (P/N 08C30- B0234M) to the new piston seals (A)
2. Install the piston seal
3. Apply a thin coat of Honda silicone grease (P/N 08C30- B0234M) to the new piston boots (B)
4. Install the piston boot.
5. Apply the brake fluid to the outer surface of the pistons, then set the pistons in place on the caliper body (A) 6. Install the brake caliper piston compressor tool on the caliper body
7. Press in the pistons with the commercially available brake caliper piston compressor tool.
NOTE:
- Be careful not to damage the piston boot when pressing the piston.
- Make sure that the piston boots are properly positioned into the grooves of the pistons.
- Do not press the piston diagonally, and do not press it forcibly.