Shift Solenoid Valve O/P Test: Test
NOTE: Keep all foreign particles out of the transmission.
- 1. HDS DLC - Connect
- 2. Shift Solenoid Valve O/P - HDS Function Test
- 1. Select the Shift Solenoid Valve O/P in the Miscellaneous Test Menu with the HDS
- 2. Check that Shift Sol O/P is indicated to ON and OFF by three seconds.
- If indicated to ON and OFF, the solenoid valve O/P is OK. The test is complete, disconnect the HDS.
- If no indicated to ON and OFF, go to the next step, and test the shift solenoid valve O/P.
- 3. Turn the vehicle to the OFF (LOCK) mode.
- 3. Shift Solenoid Valve O/P - Internal Resistance Check
1. Remove the transmission fluid pan
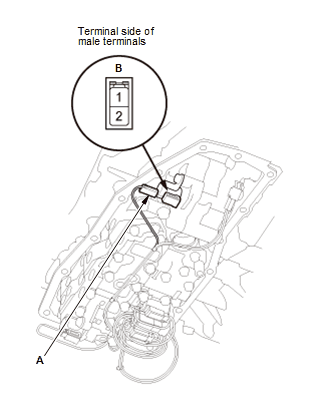
2. Disconnect the connector (A)
3. Measure the shift solenoid valve O/P resistance between the connector (B) terminal No. 1 and body ground.
Standard: 10.6-13.5 Ω
- If the resistance is within the standard, go to the next step and check the shift solenoid valve O/P operation.
- If the resistance is out of the standard, replace the shift solenoid valve O/P .
- 4. Shift Solenoid Valve O/P - Operation Check
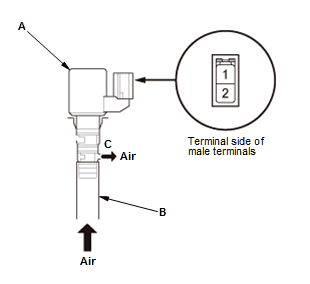
1. Remove the shift solenoid valve O/P (A) .
2. Connect a tube (B) to the shift solenoid valve O/P.
3. Blow air into the tube.
- If the air goes out of the port (C), go to step 4.
- If the air does not go out of the port (C), replace the shift solenoid valve O/P .
4. Connect a jumper wire from the positive battery terminal to the shift solenoid valve O/P (B) connector terminal No. 1, and connect another jumper wire from the negative battery terminal to the shift solenoid valve O/P body. Blow air into the tube (A).
- If the air goes out of the port (C), replace the shift solenoid valve O/P .
- If the air does not go out of the port (C), repair the wire between the shift solenoid valve O/P and the PCM.
- 5. All Removed Parts - Install the parts in the reverse order of removal.