Body Electrical Troubleshooting - B-CAN System Diagnosis Test Mode 1 and Test Mode 2 (without the HDS)
Shift to Test Mode 1
1. Check the No. A29 (10 A) fuses in the under-hood fuse/relay box and the No. B5 (10 A) fuse in the under-dash fuse/relay box. If a fuse is blown, find and correct the cause, then replace the fuse
2. Move the interior light switch to the DOOR position, and close all doors
NOTE: Do steps 3-7 within 10 seconds
3. Turn the vehicle to the ON mode
4. Pull and hold the combination light switch in its PASSING position.
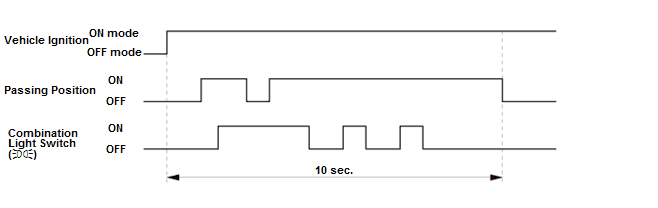
5. While holding the combination light switch is in PASSING position, turn to the PARKING position, then release, pull, and hold the combination light switch in its PASSING position
6. Turn the combination light switch to AUTO, then turn to the PARKING position, and turn to AUTO two more times
7. Release the combination light switch
8. Wait 5 seconds, and watch the front individual map lights and ceiling light. When the lights flash quickly once, the system enters in Test Mode 1
9. If front individual map lights keeps blinking after entering Test Mode 1. Check for B-CAN unit communication error.
| Error | Display code (blinking pattern) |
|---|---|
| Error in the bus (bus off status) | 1 |
| Gauge control module communication error (AT frames cannot be received) | 5 |
10.Check for B-CAN DTCs indicated by the multi-information display (MID) while still in Test Mode 1. Press the SEL/RESET button to display the next code. After you get to the last code, the display shows END. If no DTCs are stored, the display reads NO.
NOTE: If the test times out, turn the vehicle to the OFF (LOCK) mode, and repeat steps 3-7.
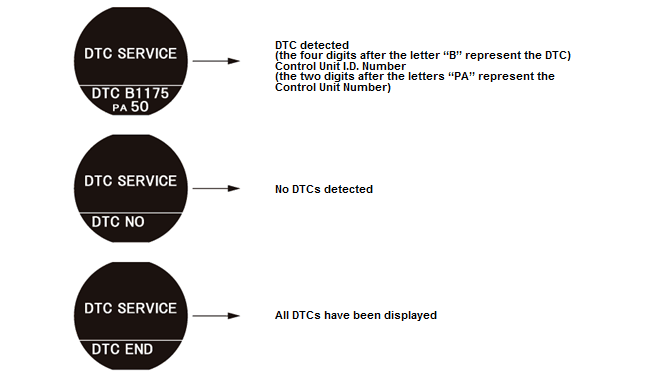
The control unit that has stored the code can be identified by the number shown after the letter "PA" on the multi-information display (MID).
| Control Unit | Control Unit I.D. Number |
|---|---|
| MICU | 10 |
| Power window master switch | 30 |
| Power tailgate control unit | 31 |
| Gauge control module | 50 |
| Climate control unit | 51 |
| Automatic lighting control unit/sensor | 72 |
| Automatic lighting/rain sensor | 74 |
| Keyless access control unit | 90 |
| Power seat control unit | 95 |
| Immobilizer-keyless control unit | 96 |
NOTE: You can also check B-CAN communication status by the following methods:
- The MICU self-diagnostic function Test Mode 1 and Test Mode 2 can check some communication statuses and some switch circuits.
- The gauge control module self-diagnostic function can check communication status .
11.Record all DTCs and sort them by DTC type, then troubleshoot them in this order:
- Battery voltage DTCs
- Internal error DTCs
- Loss of communication DTCs
- Signal error DTCs
12.Clear the DTCs by pressing and holding the SEL/RESET button for about 10 seconds
13. You will hear a beep to confirm the codes have been cleared. Operate the devices that failed, and recheck for codes.
Shift to Test Mode 2
NOTE: Do steps 14-17 within 10 seconds.
14.Pull and hold the combination light switch in its PASSING position.
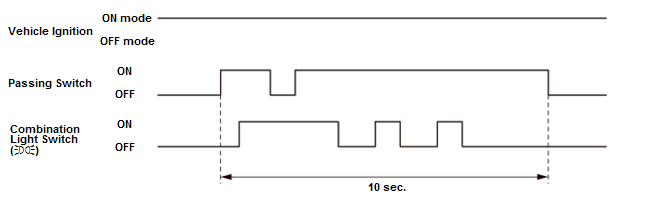
15.While holding the combination light switch is in PASSING position, turn to the PARKING position, then release, pull, and hold the combination light switch in its PASSING position
16. Turn the combination light switch to AUTO, then turn to the PARKING position, and turn to AUTO two more times
17. Release the combination light switch
18. Watch the front individual map lights. When the lights flash two times quickly and then go off, the system is in Test Mode 2.
NOTE: If you repeat this procedure, the system automatically returns to Test Mode 1
19. The following tables list the circuits that can be checked in Test Mode 2. Operate the switch that is most closely related to the problem. If the circuit is OK, the front individual map lights and ceiling light blink once. If the circuit is faulty, there is no such indication.
- If the front individual map lights and ceiling light do not blink even when a switch is operated, check two or three other circuits listed in the table. If the front individual map lights and ceiling light blink for each circuit, the additional circuits are OK; repair the short or open circuit that failed the test in step 18.
- If the front individual map lights and ceiling light do not blink again, this means that the control unit has failed without triggering a DTC. Test a few more circuits. If they also fail, check the related control units using their input tests.
MICU
| Item | |
|---|---|
| Driver's door switch | Windshield wiper motor park position (Auto stop) |
| Front passenger's door switch | Rear window wiper ON switch |
| Left rear door switch | Rear window wiper LO switch |
| Right rear door switch | Rear window washer switch |
| Tailgate latch switch | Rear window wiper motor park position (Auto stop) |
| Driver's door lock knob switch (LOCK) | Turn signal switch (LEFT) |
| Driver's door lock knob switch (UNLOCK) | Turn signal switch (RIGHT) |
| Front passenger's door lock knob switch (UNLOCK) | Hazard warning switch |
| Left rear door lock knob switch (UNLOCK) | Headlight switch (ON) |
| Right rear door lock knob switch (UNLOCK) | Headlight switch (OFF) |
| Tailgate outer handle switch | Lighting switch |
| Driver's door lock switch (LOCK) | Dimmer switch |
| Item | |
|---|---|
| Driver's door lock switch (UNLOCK) | Passing switch |
| Driver's door key cylinder switch (LOCK) | Fog light switch |
| Driver's door key cylinder switch (UNLOCK) | Ignition key switch |
| Front passenger's door lock switch (LOCK) | Heated windshield wiper area switch |
| Front passenger's door lock switch (UNLOCK) | Audio switch |
| Windshield wiper HI/LO switch | Security hood switch |
| Windshield wiper INT/LO switch | Brake pedal position switch |
| Windshield wiper MIST switch | Transmission range switch |
| Windshield wiper intermittent dwell time controller | A/C switch |
| Windshield washer switch | |
Door Multiplex Control Unit
| Item | |
|---|---|
| Driver's door lock switch (UNLOCK) | Power window master switch (Front passenger's window UP, DOWN, AUTO) |
| Driver's door lock switch (LOCK) | |
| Driver's door lock knob switch (UNLOCK) | Power window master switch (Left rear window UP, DOWN) |
| Driver's door lock knob switch (LOCK) | |
| Driver's door key cylinder switch (LOCK)* | Power window master switch (Right rear window UP, DOWN) |
| Driver's door key cylinder switch (UNLOCK)* | Driving position memory switch (POSITION 1, POSITION 2, SET) |
| Power window master switch (Driver's window UP, DOWN, AUTO) | |
*: A second key is necessary to check the key cylinder inputs. Be sure to rotate the key cylinder switch two times to each position (lock and lock, unlock and unlock) to ensure the door lock knob switch is in the appropriate position.
Gauge Control Module
| Item | |
|---|---|
| Cruise control MAIN switch | SEL/RESET switch |
| Cruise control SET/DECEL switch | PREVIOUS switch |
| Cruise control RES/ACCEL switch | NEXT switch |
| Cruise control CANCEL switch | Information display switch |
| TPMS switch | Parking brake switch |
| ECON switch | CMBS OFF switch |
| Distance switch | LKAS switch |
| VSA OFF switch | Heated windshield wiper area switch |
Power Seat Control Unit
| Item | |
|---|---|
| Transmission range switch (P) | Front UP-DOWN switch (Up) |
| Slide switch (Forward) | Front UP-DOWN switch (Down) |
| Slide switch (Backward) | Rear UP-DOWN switch (Up) |
| Recline switch (Forward) | Rear UP-DOWN switch (Down) |
| Recline switch (Backward) | |