A/C System Test: Test

- Air conditioning refrigerant or lubricant vapor can irritate your eyes, nose, or throat.
- Be careful when connecting service equipment.
- Do not breathe refrigerant or vapor.
The performance test will help determine if the A/C system is operating within specifications.
NOTE:
- If accidental system discharge occurs, ventilate the work area before resuming service.
- Additional health and safety information may be obtained from the refrigerant and lubricant manufacturers.
Performance Test
- 1. A/C System - Inspect
1. Do the A/C system inspection - Refer to: A/C System Inspection A/C System Contamination Inspection , and correct any problems found.
- 2. R134a A/C Automatic Recovery, Recycle, Recharge Machine - Connect
1. Connect an R134a A/C automatic recovery, recycle, recharge machine to the high-pressure service port and the low-pressure service port, following the equipment manufacturer's instructions.
- 3. Humidity and Air Temperature - Check
1. Determine the relative humidity and air temperature.
- 4. Glove Box - Move
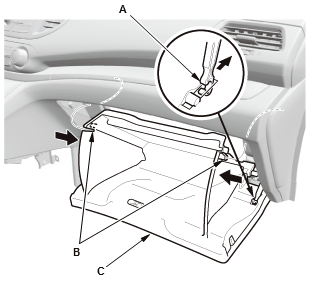
1. Detach the glove box damper (A), and release both glove box stops (B) by pushing them in, then let glove box (C) hang down.
- 5. A/C System - Test
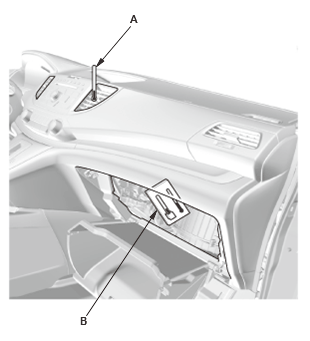
1. Insert a thermometer (A) in the center vent
2. Place a hygro-thermometer (B) near the blower unit's recirculation inlet duct
3. Test conditions:
- Move the vehicle out of direct sunlight and let it cool down to the surrounding (ambient) temperature. If necessary, wash the vehicle to cool it down more quickly.
- Open the hood.
- Open the front doors.
- Start the engine.
- Set the temperature control dial to MAX COOL, the mode control button to VENT, and the recirculation button to RECIRCULATE.
- Turn the A/C button on and the fan control button to Max.
- Using the throttle pedal depressor tool to run the engine at a steady 1, 500 rpm as indicated on the HDS.
- No driver or passengers in vehicle.
4. Inspect the A/C components for the following conditions:
- A/C compressor clutch not engaged.
- Abnormal frost areas.
- Unusual noises.
If you observe any of these conditions, refer to the Symptom Troubleshooting Index
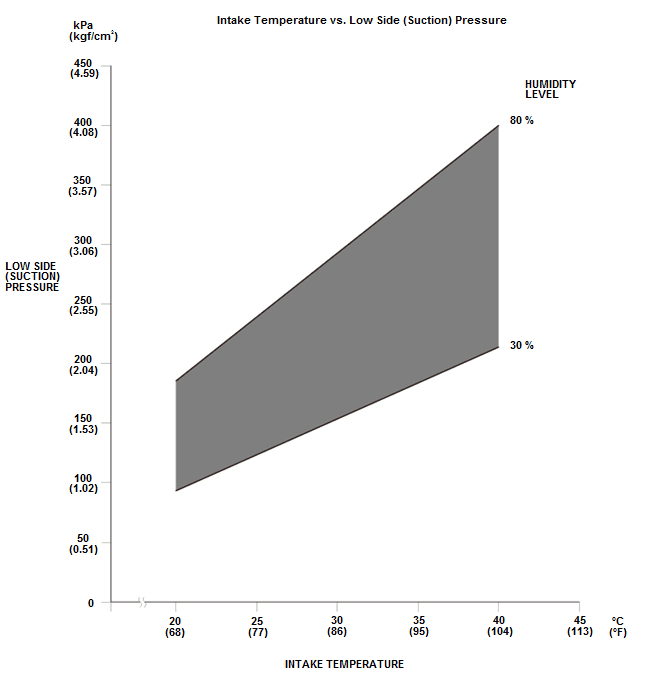
2. After running the air conditioning for 10 minutes under the above test conditions, read the delivery temperature from the thermometer in the center vent, the intake temperature near the blower unit, and the discharge (high) and suction (low) pressures on the A/C gauges
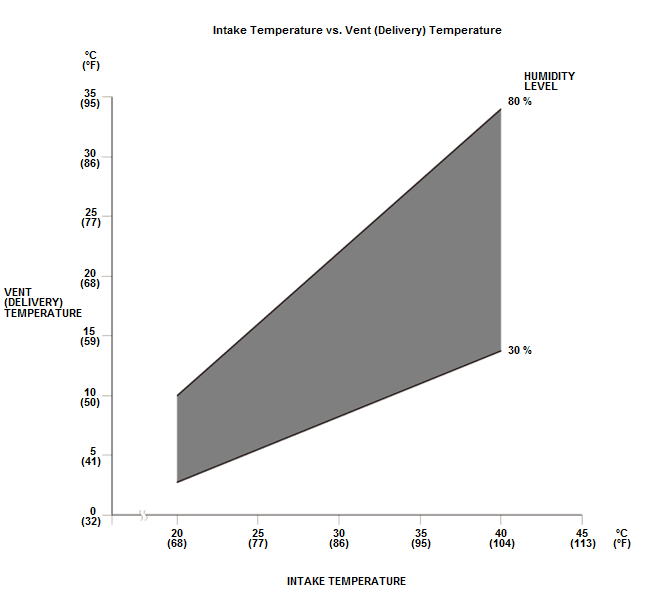
3. To complete the vent (delivery)/intake temperature chart:
- Mark the vent (delivery) temperature on the vertical line.
- Mark the intake temperature on the bottom line.
- Draw a vertical line from the intake temperature mark.
- Draw a horizontal line from the vent (delivery) temperature mark until it intersects the vertical line.
NOTE: The vent (delivery) temperature and intake temperature should intersect in the shaded area. Any measurements outside the line may indicate the need for further inspection.
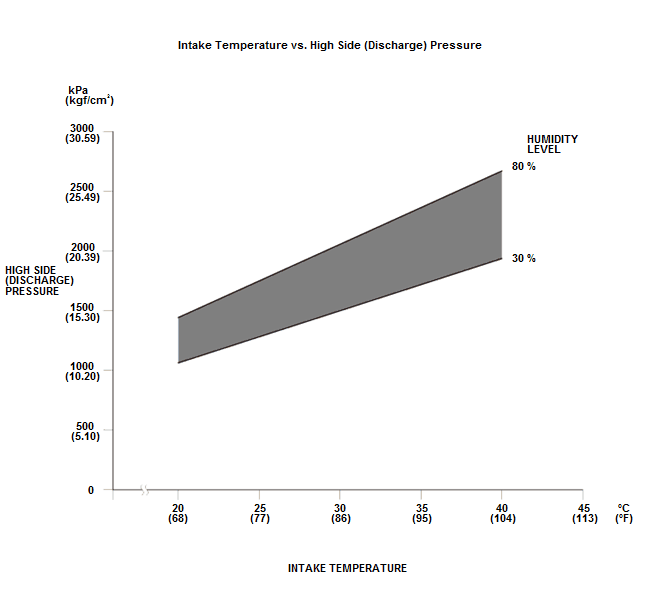
7. To complete the high side (discharge) pressure/intake temperature chart:
- Mark the high side (discharge) pressure on the vertical line.
- Mark the intake temperature on the bottom line.
- Draw a vertical line from the intake temperature mark.
- Draw a horizontal line from the high side (discharge) pressure mark until it intersects the vertical line.
NOTE: The high side (discharge) pressure and intake temperature should intersect in the shaded area. Any measurements outside the line may indicate the need for further inspection.
8. To complete the low side (suction) pressure/intake temperature chart:
- Mark the low side (suction) pressure along the vertical line.
- Mark the intake temperature along the bottom line.
- Draw a vertical line from the intake temperature mark.
- Draw a horizontal line from the low side (suction) pressure mark until it intersects the vertical line.
NOTE: The low side (suction) pressure and intake temperature should intersect in the shaded area. Any measurements outside the line may indicate the need for further inspection.
Pressure Test
- 6. Pressure Test
Test results Related symptoms Probable cause Driver and passenger's side A/C vent temperatures may vary by approximately 11°C (20°F) or more Suction pressure may be low - Low refrigerant charge
- Expansion valve not opening sufficiently
Air mix door DTCs present One air mix door stuck or inoperative Test results Related symptoms Probable cause Discharge pressure abnormally High Discharge pressure reduced when A/C condenser cooled with water spray Significant refrigerant overcharge - Restricted/weak airflow through A/C condenser
- With doors open, fresh air selected and radiator and A/C condenser fan run on high speed, temperature drop across A/C condenser inlet to outlet is less than about 5°C (41°F)
- Dirty A/C condenser or damaged fins
- Debris between A/C condenser and radiator
- One or more cooling fans malfunctioning
Discharge pressure abnormally Low - Suction and discharge pressures equalize rapidly after stopping A/C compressor
- Suction pressure higher than normal
Faulty A/C compressor Suction pressure abnormally Low Weak or insufficient airflow across evaporator Restricted blower intake or dust and pollen filter Suction pressure varies from near normal to a vacuum, as moisture freezes in expansion valve orifice - Moisture in the system
- Faulty expansion valve
- Reduced airflow from vents
- Vent temperature is very low
- Evaporator freezing
- Faulty evaporator temperature sensor (check DTC)
- Faulty expansion valve or A/C compressor clutch relay stuck in the on position
Suction pressure abnormally High - Lack of slight suction pressure variation at 1, 500 min-1 (rpm) when "Recirculated" airflow is switched to "Fresh Air"
- Discharge pressure near normal
Expansion valve stuck open or open too long Suction and Discharge pressures abnormally High - Sheet of paper does not stick to front of A/C condenser surface with cooling fans on
- With doors open, fresh air selected and radiator and A/C condenser fan run on high speed, temperature drop across A/C condenser inlet to outlet is less than about 5°C (41°F)
Radiator and/or A/C condenser fan motor(s) inoperative or wires reversed - A/C compressor clutch remains engaged during off cycle
- Pressure relief valve may open
- Insufficient A/C compressor clutch clearance
- A/C compressor clutch relay stuck in the on position or circuit problem
- Excessive air in system
Test results Related symptoms Probable cause Suction and Discharge pressures abnormally Low Suction line from expansion valve to A/C compressor is not cold Excessively low refrigerant charge Lack of slight suction pressure variation at 1, 500 min-1 (rpm) when "Recirculated" airflow is switched to "Fresh Air" Expansion valve clogged with debris/desiccant, stuck closed, or not opening sufficiently More than 10-16°C (50-60°F) temperature drop across A/C condenser inlet to outlet pipes Blocked or restricted A/C condenser internal passages or lines/components restricting refrigerant flow Significant temperature difference along high or low side A/C lines or components NOTE: Some restrictions may not show up until 3, 000 min-1 (rpm)
Restriction in A/C suction or discharge lines or components (check temperatures to isolate) Suction pressure High and Discharge pressure Low - Excessive A/C compressor noise
- Pressures equalize quickly and noise after A/C compressor turns off
A/C compressor internal damage (Check for A/C system debris contamination) Suction and discharge pressures slightly low Vent temperature too high - Slightly low refrigerant charge
- Air mix door sticking, misadjusted or inoperative
- Excessive refrigerant oil in system
Static pressures high with A/C system equalized. (After engine is off 4-12 hours) - Air/Non-condensable gasses in system
- Contaminated or incorrect refrigerant