Removal & Installation
SRS components are located in this area. Review the SRS component locations and the precautions and procedures before doing repairs or service.
NOTE: Do not turn the vehicle to the ON mode, while removing or installing the driver's seat position sensor.
- 1. Front Seat Recline Cover (Driver's side) - Remove
- 2. Driver's Seat Position Sensor - Remove
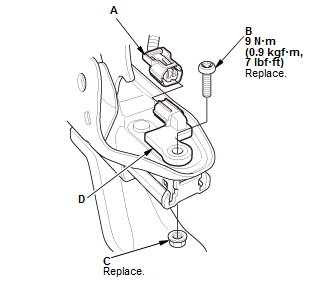
Power seat
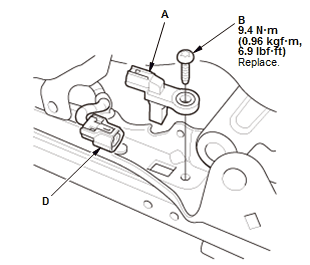
Manual seat
1. Disconnect the driver's seat position sensor connector (A) on the driver's seat wire harness
2. Power seat: Remove the bolt (B) while holding the nut (C), then remove the driver's seat position sensor (D)
3. Manual seat: Remove the bolt (B), then remove the driver's seat position sensor (D).
- 3. All Removed Parts - Install the all removed parts in the reverse order of removal.
NOTE:
- During installation, install the new bolt to the specified torque.
- Be sure to install the harness so it is not pinched or interferes with other parts.
- 4. Driver's Seat Position Sensor - Operation Check
- 5. SRS Operation - Confirm
1. Turn the vehicle to the ON mode, and check that the SRS indicator comes on for about 6 seconds and then goes off.