DTC B280A-87: No Signal From the Rear Safing Sensor
Special Tools Required
SRS Inflator Simulator 07SAZ-TB4011A
SRS Simulator Lead L 070AZ-SNAA300
NOTE:
- Before doing this troubleshooting procedure, find out if the vehicle was in a collision. If so, verify that all the required components were replaced with new components of the correct part number, and that they were properly installed .
- Before doing this troubleshooting procedure, review SRS Precautions and Procedures , General Troubleshooting Information , and 12 Volt Battery Terminal Disconnection and Reconnection .
- Before replacing the SRS unit, check the SRS unit software version with the HDS. If the software version is not the latest, update the SRS unit software , and retest.
| DTC Description | DTC |
|---|---|
| B280A-87 No signal from the rear safing sensor |
DTC (SRS)
- 1. Problem verification:
1. Clear the DTCs with the HDS .
2. Turn the vehicle to the ON mode, then wait for 10 seconds.
3. Check for DTCs with the HDS .
DTC Description DTC B280A-87 No signal from the rear safing sensor Is DTC B280A-87 indicated?
YES
The failure is duplicated. Go to step 2.
NO
Intermittent failure, the system is OK at this time. Go to Troubleshooting Intermittent Failures . If another DTC is indicated, troubleshoot the DTC.
- 2. Connector connection check:
1. Turn the vehicle to the OFF (LOCK) mode.
2. Check the following connector connections.
SRS unit connector B (39P) Rear safing sensor 2P connector (on the floor wire harness) Are the connectors OK?
YES
Go to step 4.
NO
Go to step 3.
- 3. System check:
1. Repair the poor connector connections whichever was the cause of the problem in step 2.
2. Clear the DTCs with the HDS .
3. Turn the vehicle to the ON mode, then wait for 10 seconds.
4. Check for DTCs with the HDS .
DTC Description DTC B280A-87 No signal from the rear safing sensor Is DTC B280A-87 indicated?
YES
Turn the vehicle to the OFF (LOCK) mode, then go to step 4.
NO
The system is OK at this time.
- 4. Shorted wire check (SSS+ line to SSS- line):
1. Disconnect the negative cable from the 12 volt battery, then wait at least 3 minutes.
2. Disconnect the following connectors.
SRS unit connector B (39P) Rear safing sensor 2P connector (on the floor wire harness) 3. Measure the resistance between test points 1 and 2.
Test condition Vehicle OFF (LOCK) mode SRS unit connector B (39P): disconnected Rear safing sensor 2P connector (on the floor wire harness): disconnected Test point 1 SRS unit connector B (39P) No. 38 Test point 2 SRS unit connector B (39P) No. 39 Is there an open circuit, or at least 1 MΩ?
YES
The SSS+ and SSS- wires are not shorted. Go to step 5.
NO
Short to another wire in the floor wire harness; replace the floor wire harness, then clear the DTC.
- 5. Shorted wire check (SSS+, SSS- lines):
1. Measure the resistance between test points 1 and 2.
Test condition Vehicle OFF (LOCK) mode SRS unit connector B (39P): disconnected Rear safing sensor 2P connector (on the floor wire harness): disconnected Test point 1 SRS unit connector B (39P) No. 38 Test point 2 Body ground Test point 1 SRS unit connector B (39P) No. 39 Test point 2 Body ground Is there an open circuit, or at least 1 MΩ?
YES
The SSS+ and SSS- wires are not shorted. Go to step 6.
NO
Short to ground in the floor wire harness; replace the floor wire harness, then clear the DTC.
- 6. Shorted wire check (SSS+, SSS- lines to power):
1. Reconnect the negative cable to the 12 volt battery.
2. Turn the vehicle to the ON mode.
3. Measure the voltage between test points 1 and 2.
Test condition Vehicle ON mode SRS unit connector B (39P): disconnected Rear safing sensor 2P connector (on the floor wire harness): disconnected Test point 1 SRS unit connector B (39P) No. 38 Test point 2 Body ground Test point 1 SRS unit connector B (39P) No. 39 Test point 2 Body ground Is there 0.2 V or less?
YES
The SSS+ and SSS- wires are not shorted to power. Go to step 7.
NO
Short to power in the floor wire harness; replace the floor wire harness, then clear the DTC.
- 7. Open wire check (SSS+, SSS- lines):
1. Turn the vehicle to the OFF (LOCK) mode.
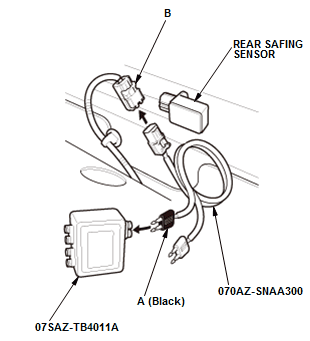
2. Connect the black terminal (A) of SRS simulator lead L to the SRS inflator simulator (jumper connector), then connect SRS simulator lead L to the rear safing sensor 2P connector (B) on the floor wire harness.
3. Measure the resistance between test points 1 and 2.
Test condition Vehicle OFF (LOCK) mode SRS unit connector B (39P): disconnected Rear safing sensor 2P connector (on the floor wire harness): disconnected Rear safing sensor 2P connector (on the floor wire harness): connected to SRS simulator lead L Test point 1 SRS unit connector B (39P) No. 38 Test point 2 SRS unit connector B (39P) No. 39 Is there 1.0 Ω or less?
YES
The SSS+ and SSS- wires are OK. Replace the rear safing sensor , then clear the DTC, and retest. If the DTC is still present, replace the SRS unit .
NO
Open in the floor wire harness; replace the floor wire harness, then clear the DTC.