Removal And Installation
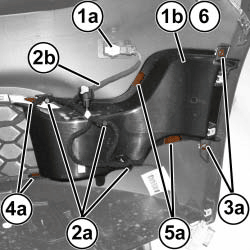
REMOVAL
- Remove the front fascia. Refer to FASCIA, FRONT, REMOVAL AND INSTALLATION .
- Remove the front park assist sensor (1a) near the air duct (1b) to be removed. Refer to SENSOR, PARK ASSIST, REMOVAL AND INSTALLATION .
- Release the various retainers (2a) and position the wiring harness (2b) away from the park assist sensor.
- Remove the screws (3a) from the side air duct (1b) to be removed.NOTE:
If reusing the side air duct (1b) and fascia, take care not to damage them.
- With the use of a suitable tool, remove the rivets (4a) from the fascia tabs and the air duct (1b).
- Remove the welds (5a) that join the side air duct (1b) to the fascia.
- Remove the side air duct (1b).
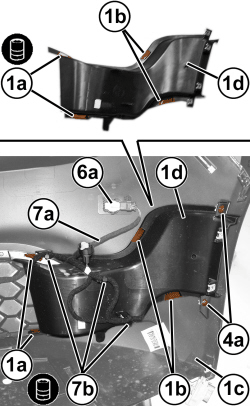
INSTALLATION
- Thoroughly clean the riveted areas (1a) and the welded areas (1b) on the air duct (1d) and the fascia (1c). Remove any traces of riveting and welding residues.
- Clean the a riveted areas (1a) and the welded areas (1b) with wax and grease remover on both the fascia (1c) and the side air duct (1d).
- Apply Ancoral primer 04343 or equivalent, to the areas (1a) and (1b) in preparation for the adhering and allow to dry per manufacture recommendations.
- Position the side air duct (1d) and tighten the screws (4a) securely.
- With the use of a silicone free adhesive such as Simson ISR 70-05 or equivalent, position and glue the areas (1a) and (1b) of the side air duct onto the front fascia.
- Remove any excess adhesive residue.
- Let the adhesive dry per manufacturer recommendations.
- Install the front park assist sensor (6a). Refer to SENSOR, PARK ASSIST, REMOVAL AND INSTALLATION .
- Position the front park assist sensor wiring harness (7a) and fasten the various retainers (7b).
- Install the front fascia. Refer to FASCIA, FRONT, REMOVAL AND INSTALLATION .
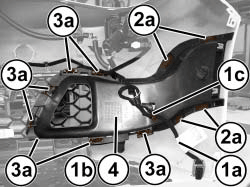
REMOVAL
- Remove the front fascia. Refer to FASCIA, FRONT, REMOVAL AND INSTALLATION .
- Release the various wiring retainers (1c) and detach the wiring harness (1a) from the side air duct (1b).NOTE:
If reusing the side air duct and fascia, take care not to damage them.
- Detach the welds (2a) that join the air duct (1b) to the front fascia.
- Release the retainers (3a).
- Remove the side air duct (1b).NOTE:
Position the fascia so the paint finish will not be damage during the following cleaning and gluing steps.
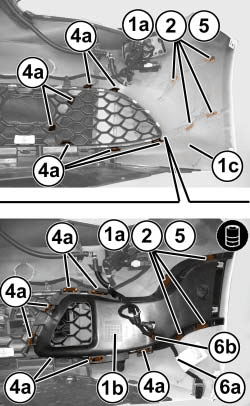
INSTALLATION
- Thoroughly clean the welded areas (1a) on the air duct (1c) and the fascia (1b). Remove any traces of riveting and welding residues.
- Clean the areas (1a) with wax and grease remover on both the fascia (1b) and the side air duct (1c).
- Apply Ancoral primer 04343 or equivalent, to the areas (1a) in preparation for the gluing and allow to dry per manufacture recommendations.
- Position the side air duct (1d) and engage the fascia retainers (4a) on the side air duct.
- With the use of a silicone free adhesive such as Simson ISR 70-05 or equivalent, position and glue the areas (1a) of the side air duct onto the front fascia.
- Remove any excess glue residue.
- Let the adhesive dry per manufacturer recommendations.
- Position the front park assist sensor wiring harness (6a) and fasten the various retainers (6b).
- Install the front fascia
Refer to FASCIA, FRONT, REMOVAL AND INSTALLATION .