2.0L Removal And Installation: Removal
- Raise and support the vehicle. Refer to HOISTING, STANDARD PROCEDURE .
- Remove the front wheels. Refer to REMOVAL AND INSTALLATION .
- Remove the wheelhouse splash shields. Refer to SHIELD, SPLASH, FRONT WHEELHOUSE, REMOVAL AND INSTALLATION .
- Remove the front fascia. Refer to FASCIA, FRONT, REMOVAL AND INSTALLATION .
- Remove the adaptive cruise control module and bracket. Refer to MODULE, ADAPTIVE CRUISE CONTROL (ACC), REMOVAL AND INSTALLATION .
- Remove the horns. Refer to HORN, REMOVAL AND INSTALLATION
.
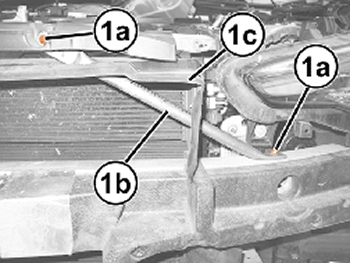
- From both sides of the vehicle, remove the bolts (1a) from the headlamp mounting crossmember to front bumper reinforcement bracket (1b).
- Remove the headlamp mounting crossmember to front bumper reinforcement brackets (1b) from the air duct (1c).
- Remove the two fasteners (1) from the left side bumper reinforcement to frame bracket (2). Remove the bracket.
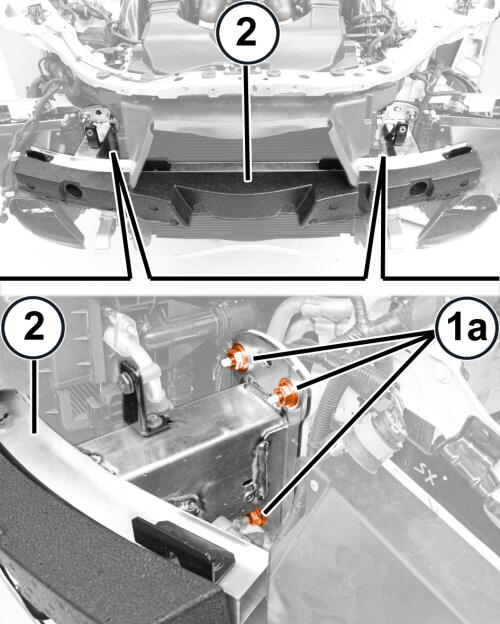
- Remove the retaining nuts (1a).
- Remove the front bumper reinforcement (2).
INSTALLATION
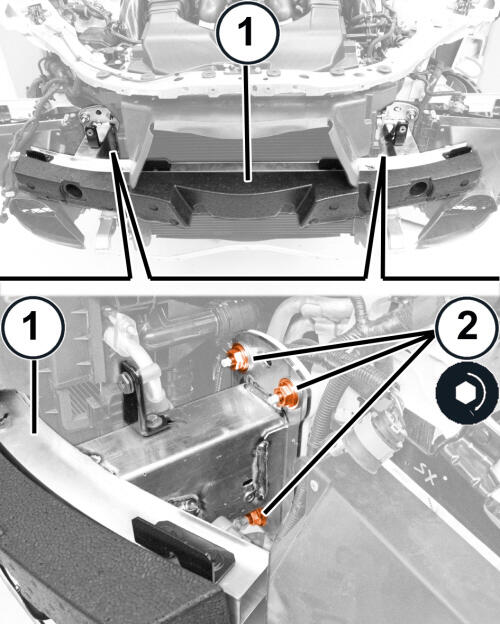
- Position the front bumper reinforcement (1) on vehicle.
- Install the retaining nuts (2) and tighten them to the proper specification. Refer to TECHNICAL SPECIFICATIONS .
- Install the bumper reinforcement to frame bracket and install the two fasteners. Tighten the fasteners securely.
- Position the headlamp mounting crossmember to front bumper reinforcement brackets (1b).
- Install the bolts (1a) and tighten them to proper specification. Refer to TECHNICAL SPECIFICATIONS .
- Install the horns. Refer to HORN, REMOVAL AND INSTALLATION .
- Install the radar sensors and bracket. Refer to MODULE, ADAPTIVE CRUISE CONTROL (ACC), REMOVAL AND INSTALLATION .
- Install the air dam. Refer to AIR DAM, FRONT, REMOVAL AND INSTALLATION or AIR DAM, FRONT CROSSMEMBER, REMOVAL AND INSTALLATION .
- Install the front fascia. Refer to FASCIA, FRONT, REMOVAL AND INSTALLATION .
- Install the wheelhouse splash shields. Refer to SHIELD, SPLASH, FRONT WHEELHOUSE, REMOVAL AND INSTALLATION .
- Install the front wheels. Refer to REMOVAL AND INSTALLATION .
- Connect the negative battery cable.