Diagnostic Test
- CHECK THE A/C SYSTEM FOR PROPER CHARGE
- Turn the ignition off.
- Using an approved A/C Recharging station, check for the presence of freon in the A/C System.
Is freon present in the system?
Yes
- Go To 2
No
- Recharge the A/C System and retest.
- CHECK THE (A901) FUSED B+ CIRCUIT FOR HIGH RESISTANCE BY LOAD TESTING THE CIRCUIT
- Disconnect the Radiator Fan Assembly harness connector to isolate the (A901) Fused B+ circuit.
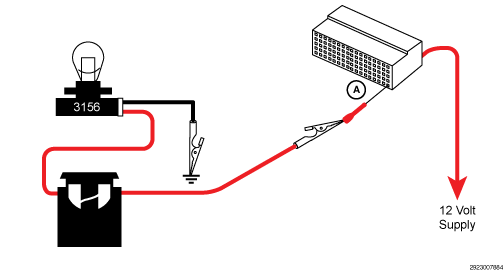
- Connect the positive lead of the load test tool to the (A901) Fused B+ circuit at the Radiator Fan Assembly harness connector (A). Note: refer to the diagram below.
- Connect the negative lead of the load test tool to the ground circuit of the Battery or a good chassis ground.
- The bulb on the load test tool should be illuminated and bright if there is no resistance in the circuitry.NOTE:
Note: Why load test a circuit? A load test is used to determine if a circuit is capable of carrying the amperage needed to perform properly. The 3156 bulb in the load tool illustrated, is a simple but effective method of testing circuit functionality. A 3156 Bulb has approximately 6.0 Ohms of resistance when the bulb is powered and draws approximately 2.0 amps of current. Read the CIRCUIT LOAD TESTING PROCEDURE for information on building a simple load test tool and for additional load testing information and alternative methods of load testing or voltage drop testing a circuit. Refer to CIRCUIT LOAD TESTING PROCEDURES .
NOTE:Note: A 12-volt test light can be substituted for the load test tool, but only if the test light draws enough current to effectively load test the circuit. Many high impedance test lights draw very little amperage (less than 0.1 amps) and are not reliable to load test a circuit. To perform a proper load test of a circuit, the tool being used should draw more than approximately 0.75 amps.
NOTE:Note: Why perform a Voltage Drop Test? To verify with certainty there is not any resistance in the circuit being tested, perform a simple voltage drop test across the 3156 bulb of the load test tool. To do so perform the following:
- Connect the leads of a DVOM to the alligator clips on the load test tool while the load test tool is connected in series with the circuit.
- Compare the voltage drop across the bulb to the voltage reading across the Battery terminals.
- The voltage dropped across the bulb should be equal to the voltage reading across the Battery terminals if there is no resistance in the circuit being tested.
Example: 2.0 Ohms of resistance in the circuit being tested will cause the voltage measurement across the bulb to be 25% less than when compared to Battery voltage. The reason for this is that the 2.0 Ohms in the circuit makes up 25% of the total circuit resistance of 8.0 Ohms. Read the CIRCUIT LOAD TESTING PROCEDURE for information on building a simple load test tool and for additional load testing information and alternative methods of load testing or voltage drop testing a circuit. Refer to CIRCUIT LOAD TESTING PROCEDURES .
NOTE:Compare the brightness of the bulb in the load test tool to that of a direct connection to Battery.
Is the load test bulb illuminated and bright?
Yes
- Go To 3
No
- Repair the (A901) Fused B+ circuit for an open or high resistance. If the fuse is found to be open, check the circuit for a short to ground.
- Perform the POWERTRAIN VERIFICATION TEST. Refer to POWERTRAIN VERIFICATION TEST, 2.0L or POWERTRAIN VERIFICATION TEST, 2.8L .
- CHECK THE (Z109) GROUND CIRCUIT FOR HIGH RESISTANCE BY LOAD TESTING THE CIRCUIT
- Disconnect the Radiator Fan Assembly harness connector to isolate the ground circuit.
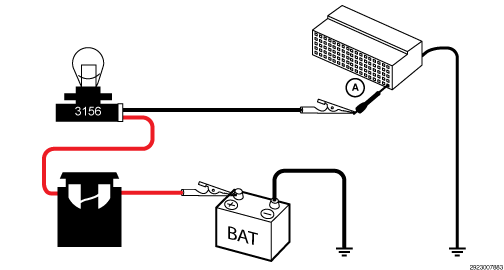
- Connect the positive lead of the load test tool to the positive side of the Battery.
- Connect the negative lead of the load test tool to the ground circuit at the Radiator Fan Assembly harness connector (A). Note: refer to the diagram below.
- The bulb on the load test tool should be illuminated and bright if there is no resistance in the circuitry.NOTE:
Why load test a circuit? A load test is used to determine if a circuit is capable of carrying the amperage needed to perform properly. The 3156 bulb in the load tool illustrated, is a simple but effective method of testing circuit functionality. A 3156 Bulb has approximately 6.0 Ohms of resistance when the bulb is powered and draws approximately 2.0 amps of current. Read the CIRCUIT LOAD TESTING PROCEDURE for information on building a simple load test tool and for additional load testing information and alternative methods of load testing or voltage drop testing a circuit. Refer to CIRCUIT LOAD TESTING PROCEDURES .
NOTE:A 12-volt test light can be substituted for the load test tool, but only if the test light draws enough current to effectively load test the circuit. Many high impedance test lights draw very little amperage (less than 0.1 amps) and are not reliable to load test a circuit. To perform a proper load test of a circuit, the tool being used should draw more than approximately 0.75 amps.
NOTE:Why perform a Voltage Drop Test? To verify with certainty there is not any resistance in the circuit being tested, perform a simple voltage drop test across the 3156 bulb of the load test tool. To do so perform the following:
- Connect the leads of a DVOM to the alligator clips on the load test tool while the load test tool is connected in series with the circuit.
- Compare the voltage drop across the bulb to the voltage reading across the Battery terminals.
- The voltage dropped across the bulb should be equal to the voltage reading across the Battery terminals if there is no resistance in the circuit being tested.
Example: 2.0 Ohms of resistance in the circuit being tested will cause the voltage measurement across the bulb to be 25% less than when compared to Battery voltage. The reason for this is that the 2.0 Ohms in the circuit makes up 25% of the total circuit resistance of 8.0 Ohms. Read the CIRCUIT LOAD TESTING PROCEDURE for information on building a simple load test tool and for additional load testing information and alternative methods of load testing or voltage drop testing a circuit. Refer to CIRCUIT LOAD TESTING PROCEDURES .
NOTE:Compare the brightness of the bulb in the load test tool to that of a direct connection to Battery.
Is the load test bulb illuminated and bright?
Yes
- Go To 4
No
- Repair the (Z109) Ground circuit for an open or high resistance.
- Perform the POWERTRAIN VERIFICATION TEST. Refer to POWERTRAIN VERIFICATION TEST, 2.0L or POWERTRAIN VERIFICATION TEST, 2.8L .
- CHECK THE RADIATOR FAN CONTROL CIRCUIT VOLTAGE
- Reconnect the Radiator Fan Module harness connector.
- Reconnect the PCM C1 harness connector.
- Start the engine.
- Using a voltmeter, back probe and measure the voltage on the (K175) PWM Radiator Fan Signal circuit at the Radiator Fan harness connector.
- Turn on the A/C to cause the Radiator Fan to be commanded on by the PCM while measuring the voltage on the (K175) PWM Radiator Fan Signal circuit.NOTE:
The voltage on the PWM Control circuit will be approximately 1.4 volts with the Radiator Fan commanded off by the PCM. As the Radiator Fan speed is being commanded higher the voltage will increase up to approximately 8.0 volts with the Radiator Fan commanded at high speed.
Is the voltage reading as described above?
Yes
- Replace the Radiator Fan Assembly in accordance with the Service Information.
- Perform the POWERTRAIN VERIFICATION TEST. Refer to POWERTRAIN VERIFICATION TEST, 2.0L or POWERTRAIN VERIFICATION TEST, 2.8L .
No
- Go To 5
- CHECK RELATED PCM AND COMPONENT CONNECTIONS
- Perform any Service Bulletins that apply.
- Disconnect all PCM harness connectors.
- Disconnect all related in-line harness connections (if equipped).
- Disconnect the related component harness connectors.
- Inspect harness connectors, component connectors, and all male and female terminals for the following conditions:
- Proper connector installation.
- Damaged connector locks.
- Corrosion.
- Other signs of water intrusion.
- Weather seal damage (if equipped).
- Bent terminals.
- Overheating due to a poor connection (terminal may be discolored due to excessive current draw).
- Terminals that have been pushed back into the connector cavity.
- Check for spread terminals and verify proper terminal tension.
Repair any conditions that are found.
- Reconnect all PCM harness connectors. Be certain that all harness connectors are fully seated and the connector locks are fully engaged.
- Reconnect all in-line harness connectors (if equipped). Be certain that all connectors are fully seated and the connector locks are fully engaged.
- Reconnect all related component harness connectors. Be certain that all connectors are fully seated and the connector locks are fully engaged.
- With the scan tool, erase DTCs.
- Test drive or operate the vehicle in accordance with the when monitored and set conditions.
- With the scan tool, read DTCs.
Did the DTC return?
Yes
- Replace and program the Powertrain Control Module (PCM) in accordance with the Service Information. Refer to MODULE, POWERTRAIN CONTROL (PCM), REMOVAL AND INSTALLATION .
- Perform the POWERTRAIN VERIFICATION TEST. Refer to POWERTRAIN VERIFICATION TEST, 2.0L or POWERTRAIN VERIFICATION TEST, 2.8L .
No
- The wiring or poor connection problem has been repaired.
- Perform the POWERTRAIN VERIFICATION TEST. Refer to POWERTRAIN VERIFICATION TEST, 2.0L or POWERTRAIN VERIFICATION TEST, 2.8L .