Removal And Installation
WARNING: This page is about a different variant/trim than selected.
REMOVAL
- Disconnect and isolate the negative battery cable.
- Remove the left side evaporative emission purge solenoid. Refer to SOLENOID, EVAPORATIVE EMISSIONS PURGE, REMOVAL AND INSTALLATION .
- Remove the left air cleaner outlet tube. Refer to BODY, AIR CLEANER, REMOVAL AND INSTALLATION .
- Remove the air cleaner inlet tube. Refer to BODY, AIR CLEANER, REMOVAL AND INSTALLATION
.
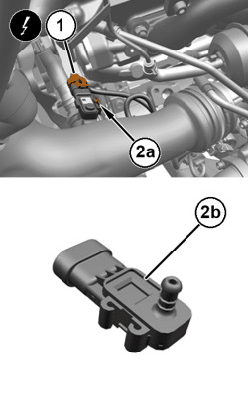
- Disconnect the crankcase pressure sensor wire harness connector (1).
- Loosen the clamp (2a) and disconnect oil vapor intake hose from the turbocharger air supply hose.
- Remove the crankcase pressure sensor (2b)
INSTALLATION
- Install the crankcase pressure sensor and secure the hose clamp.
- Connect the crankcase pressure sensor wire harness connector.
- Install the air cleaner inlet tube. Refer to BODY, AIR CLEANER, REMOVAL AND INSTALLATION .
- Install the left air cleaner outlet tube. Refer to BODY, AIR CLEANER, REMOVAL AND INSTALLATION .
- Install the left side Evaporative emission purge solenoid. Refer to SOLENOID, EVAPORATIVE EMISSIONS PURGE, REMOVAL AND INSTALLATION .
- Connect the negative battery cable.