Main Bearing Replacement
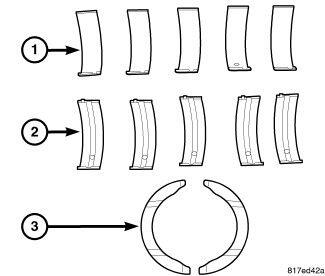
The main bearings must be replaced one-at-a-time in order to properly support the crankshaft. The upper (2) and lower (1) main bearing shells are NOT interchangeable. All upper bearing shells (2) have oil grooves and holes. All lower bearing shells (1) are smooth. Crankshaft end play is controlled by a two piece thrust bearing (3) on the second main bearing journal. The upper and lower main bearings are "select fit" to achieve proper oil clearances. Refer to BEARING(S), CRANKSHAFT, MAIN, STANDARD PROCEDURE .
- Remove the engine from the vehicle and mount the engine on the maintenance stand. Refer to REMOVAL AND INSTALLATION .
- Remove the spark plugs. Refer to SPARK PLUG, REMOVAL AND INSTALLATION .
- Remove the right and left engine mount brackets. Refer to BRACKET, ENGINE MOUNT, LEFT, REMOVAL AND INSTALLATION BRACKET, ENGINE MOUNT, RIGHT, REMOVAL AND INSTALLATION BRACKET, ENGINE MOUNT, REAR, REMOVAL AND INSTALLATION .
- Remove the oil pan, oil pump pick-up and windage tray. Refer to PAN, OIL, REMOVAL AND INSTALLATION .CAUTION:
DO NOT use a number stamp or a punch to mark main bearing caps, as damage to main bearings could occur.
NOTE:Main bearing caps are not interchangeable and are marked to insure correct assembly.
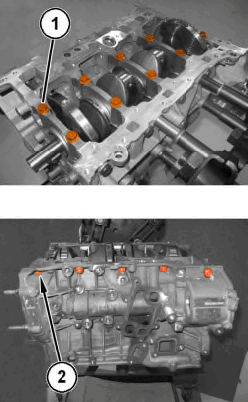
- Loosen the ten main bearing cap bolts (1).
- Remove the ten main bearing tie bolts (2).
- Mark the main bearing cap positions using a permanent ink marker or a scribe tool. Replace only one main bearing at a time while all other main bearing caps remain properly tightened.NOTE:
Replace the main bearings in the following order; 3, 2, 4, 1, 5:
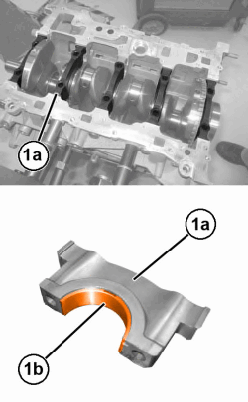
- Remove the two cap bolts and remove the main bearing cap (1a).
- When removing the second bearing cap, also remove the thrust bearings.
- Slide the upper main bearing half out from between the crankshaft and the engine block.
- If required, select fit new main bearings to the engine block. Refer to BEARING(S), CRANKSHAFT, MAIN, STANDARD PROCEDURE .
- Lubricate the upper main bearing half with clean engine oil and slide the bearing into position.
- When installing thrust bearings at the second main bearing location, use the following procedure:
- Move the crankshaft forward to the limit of travel. Lubricate and install the front thrust bearing by rolling the bearing onto the machined shelf between the second upper main bulk head and crankshaft thrust surface.
- Move the crankshaft rearward to the limit of travel. Lubricate and install the rear thrust bearing by rolling the bearing onto the machined shelf between the second upper main bulk head and crankshaft thrust surface.
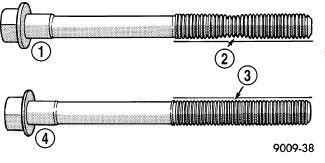
- Check the main bearing cap bolts for necking by holding a scale or straight edge against the threads. If all the threads do not contact the scale (2) the bolt must be replaced.
- Lubricate and install the lower bearing half onto the main cap.
- Install the main bearing cap with the main bearing cap bolts only hand tight at this time.
- Repeat the previous steps for main bearings 2, 4, 1 and 5.
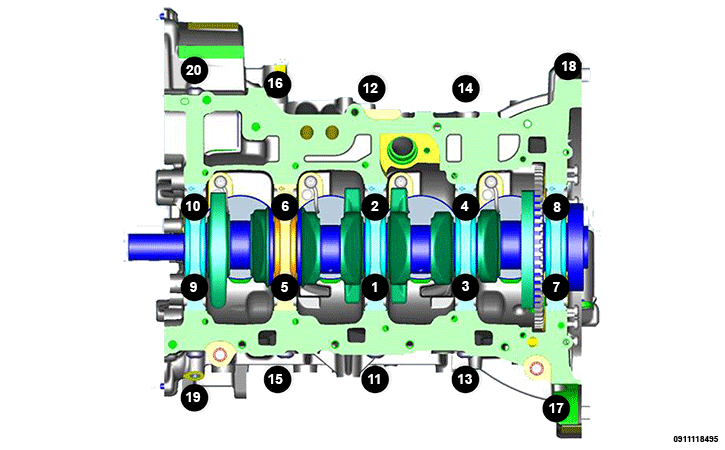
- Tighten the ten main bearing cap bolts (1 - 10) in the sequence shown, following this 3 step torque plus angle method. Tighten according to the following torque values:
- Step 1: All to 14 N.m (10 ft. lbs.)
- Step 2: All to 45 N.m (33 ft. lbs.)
- Step 3: All an additional 90° Turn Do not use a torque wrench for this step.
- Tighten the ten main bearing tie bolts (11 - 20) in the sequence shown to 23 N.m (17 ft. lbs.).
- Check the crankshaft end play. Refer to CRANKSHAFT, STANDARD PROCEDURE .
- Install the windage tray, oil pump pick-up and oil pan. Refer to PAN, OIL, REMOVAL AND INSTALLATION .
- Install the right and left engine mount brackets. Refer to BRACKET, ENGINE MOUNT, LEFT, REMOVAL AND INSTALLATION BRACKET, ENGINE MOUNT, RIGHT, REMOVAL AND INSTALLATION BRACKET, ENGINE MOUNT, REAR, REMOVAL AND INSTALLATION .
- Install the spark plugs and ignition coils. Refer to SPARK PLUG, REMOVAL AND INSTALLATION .
- Install the engine in the vehicle. Refer to REMOVAL AND INSTALLATION .
- If removed, install the oil filter and fill the engine crankcase with the proper oil to the correct level. Refer to OIL, STANDARD PROCEDURE .
- Start engine and check for leaks.
The thrust bearings must be installed with the notches facing the crankshaft.
The main bearing cap bolts are tightened using a torque plus angle procedure. The bolts must be examined BEFORE reuse. If the threads are necked down the bolts must be replaced.