Removal And Installation: Front: Installation
To avoid serious or fatal injury on vehicles equipped with airbags, disable the Supplemental Restraint System (SRS) before attempting any steering wheel, steering column, airbags, airbag curtains, knee blocker, seat belt tensioner, impact sensor or instrument panel component diagnosis or service. Disconnect the Intelligent Battery Sensor (IBS)/negative battery cable assembly from the negative battery post, then wait two minutes for the system capacitor to discharge before performing further diagnosis or service. This is the only sure way to disable the SRS. Failure to take the proper precautions could result in accidental airbag deployment.
To avoid serious or fatal injury during and following any seat belt or child restraint anchor service, carefully inspect all seat belts, buckles, mounting hardware, retractors, tether straps, and anchors for proper installation, operation, or damage. Replace any belt that is cut, frayed, or torn. Straighten any belt that is twisted. Tighten any loose fasteners. Replace any belt that has a damaged or ineffective buckle or retractor. Replace any belt that has a bent or damaged latch plate or anchor plate. Replace any child restraint anchor or the unit to which the anchor is integral that has been bent or damaged. Never attempt to repair a seat belt or child restraint component. Always replace damaged or ineffective seat belt and child restraint components with the correct, new and unused replacement parts listed in the Mopar® Parts Catalog. Failure to follow these instructions may result in possible serious or fatal injury.
The following procedure is for replacement of an ineffective or damaged seat belt and retractor unit. The front retractor also includes a seat belt tensioner. If the front seat belt or retractor is ineffective or damaged, but the seat belt tensioner is not deployed, review the recommended procedures for Handling Non-Deployed Supplemental Restraints. Refer to STANDARD PROCEDURE . If the seat belt tensioner has been deployed, review the recommended procedures for Service After A Supplemental Restraint Deployment before removing the unit from the vehicle. Refer to STANDARD PROCEDURE .
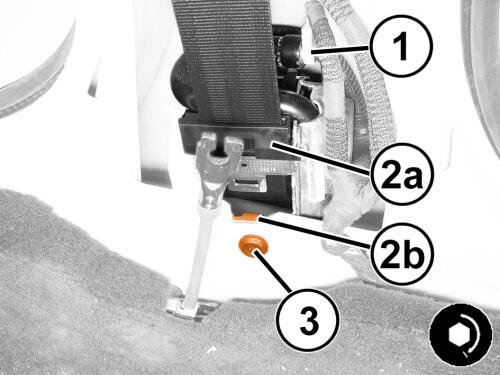
- Position the front seat belt, retractor and tensioner into the vehicle as a unit.
- Engage the locating tab (2b) of the anchor tensioner (2a) with the inner sill.
- Install and tighten the screw (3) that secures the retractor to the inner sill. Tighten the screw to the proper specification. Refer to TECHNICAL SPECIFICATIONS .
- Connect the body wire harness connector (1) to the retractor tensioner.
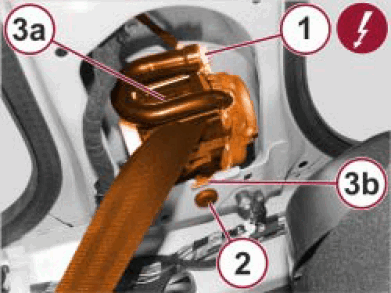
- Position the seat belt retractor unit (3a) to the B-pillar by engaging the T-tab (3b) on the retractor bracket into the notch in the inner B-pillar.
- Install and tighten the screw (2) that secures the retractor bracket to the base of the inner B-pillar. Tighten the screw to the proper specification. Refer to TECHNICAL SPECIFICATIONS .
- Connect the body wire harness connector (1) to the initiator for the retractor tensioner.
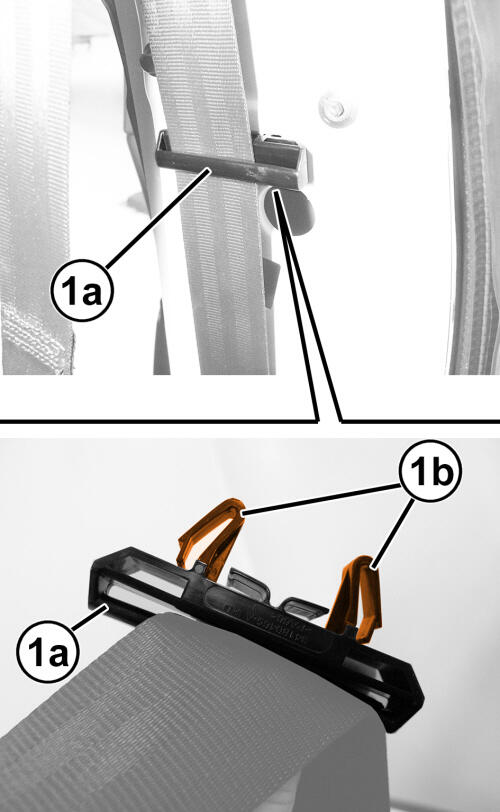
- Engage the retainers (1b) that secure the seat belt web guide (1a) to the inner B-pillar. Be certain that the seat belt webbing between the retractor and the web guide is not twisted.
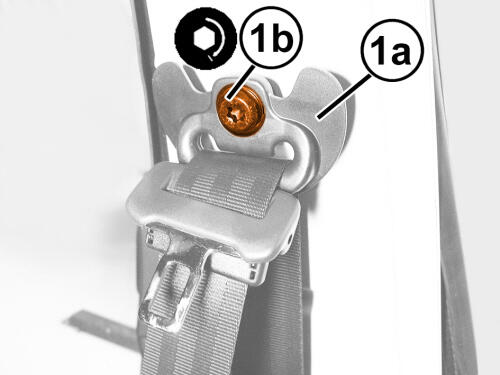
- Position the front seat belt turning loop onto the height adjuster. Be certain that the seat belt webbing between the web guide and the turning loop is not twisted.
- Install and tighten the screw (1b) that secures the turning loop to the height adjuster. Tighten the screw to the proper specification. Refer to TECHNICAL SPECIFICATIONS .
- Install the B-pillar trim panels onto the inside of the B-pillar. Refer to PANEL, B-PILLAR TRIM, LOWER, REMOVAL AND INSTALLATION or PANEL, B-PILLAR TRIM, UPPER, REMOVAL AND INSTALLATION .
- Do not connect the negative battery cable at this time. The Supplemental Restraint System (SRS) Verification Test procedure should be performed following service of any SRS component. Refer to STANDARD PROCEDURE .