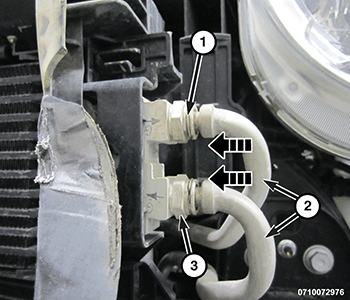
Standard Procedure - Transmission Cooler Line Quick Connect Fitting
DISCONNECT
TRANSMISSION END
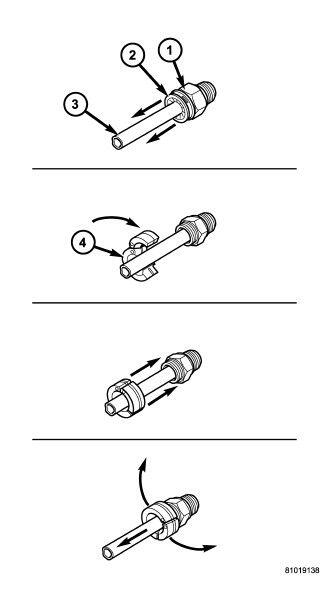
| 1 - QUICK CONNECT FITTING |
| 2 - DUST CAP |
| 3 - OIL COOLER LINE |
| 4 - SPECIAL TOOL 8875A for 3/8"Line or 9546 for 1/2 " Line. |
- Remove dust cap by pulling it straight back off of quick connect fitting
- Place disconnect Special Tool (special tool #8875A, Disconnect, Transmission Cooler Line) onto a 3/8 inch transmission cooler lines or Special Tool (special tool #9546, Disconnect Tool) onto a 1/2 inch transmission cooler lines with the fingers of the tool facing the quick connect fitting.
- Slide disconnect tool down the transmission line and attach the fingers of the tool into the retaining clip. When properly attached in the clip, the tool will fit flush against the quick connect fitting.
- Rotate the disconnect tool 60° to expand the retaining clip.
- While holding the disconnect tool against the quick connect fitting, pull back on the transmission cooler line and remove the line.
TRANSMISSION OIL COOLER END
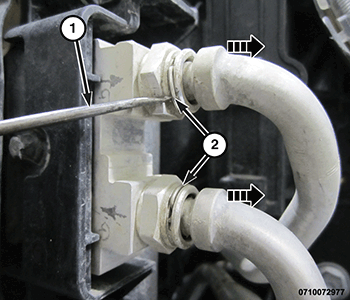
- Using a suitable tool (1), remove the spring clips (2) from the connectors.
- Pull the transmission oil cooler lines out from the transmission oil cooler.
CONNECT
TRANSMISSION END
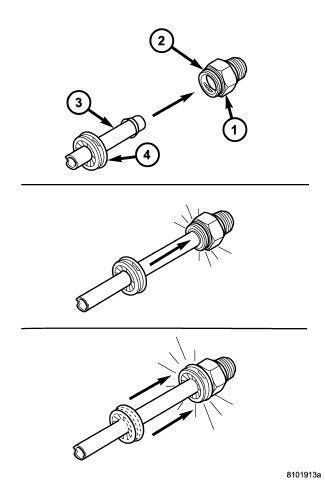
| 1 - QUICK CONNECT FITTING |
| 2 - CLIP |
| 3 - OIL COOLER LINE |
| 4 - DUST CAP |
- Align transmission cooler line (3) with quick connect fitting while pushing straight into the fitting.
- Push in on transmission cooler line until a "click" is heard or felt.
- Slide dust cap (4) down the transmission cooler line and snap it over the quick connect fitting until it is fully seated and rotates freely. Dust cap will only snap over quick connect fitting when the transmission cooler line is properly installed.
NOTE:
If dust cap will not snap into place, repeat assembly step #2.
TRANSMISSION OIL COOLER END
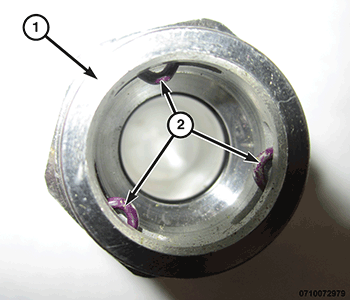
- Position the spring clip in the quick connect fitting (1) so that the three locking tabs (2) appear as pictured.NOTE:
Lubricate the end of the transmission cooler oil line with the appropriate fluid to ease installation.
- Push the transmission oil cooler lines (2) into the fittings (3) until a "click" is heard or felt.
- Check that the transmission oil cooler line is locked into the fitting by attempting to pull the line out. If the line comes out, inspect the spring clip for correct installation and repeat steps 2 and 3.