Door, Rear: Adjustments: Removal
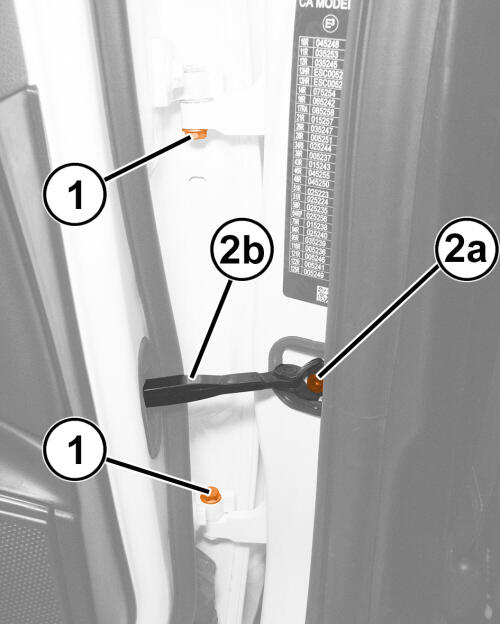
- If the adjustment is carried out after having removed the door, tighten the hinge bolts to the proper specification. Refer to TECHNICAL SPECIFICATIONS .
- Remove the striker. Refer to STRIKER, DOOR LATCH, REMOVAL AND INSTALLATION .
- If necessary, hand tighten the bolts (1) securing the hinges to the door and body.
- Remove check strap bolt (2a) and close the door temporarily to return link (2b).
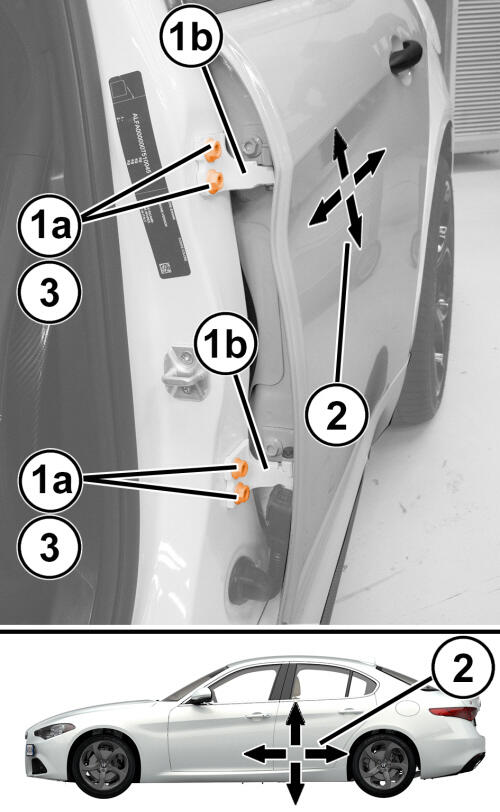
- Initially adjust the door within the door housing. To do this, the bolts securing the hinges to the body must be loosened.
- Loosen bolts (1a) securing hinges (1b) to body.
- Adjust the door position by means of the slotted bolt holes until it is correctly aligned in the door housing.NOTE:
It is recommended to work on one hinge at a time. The arrows (2) indicate the possible movements for the adjustment.
- After adjustment, tighten the bolts to the proper specification. Refer to TECHNICAL SPECIFICATIONS .
- If necessary, align the door with the wing and front door as follows.
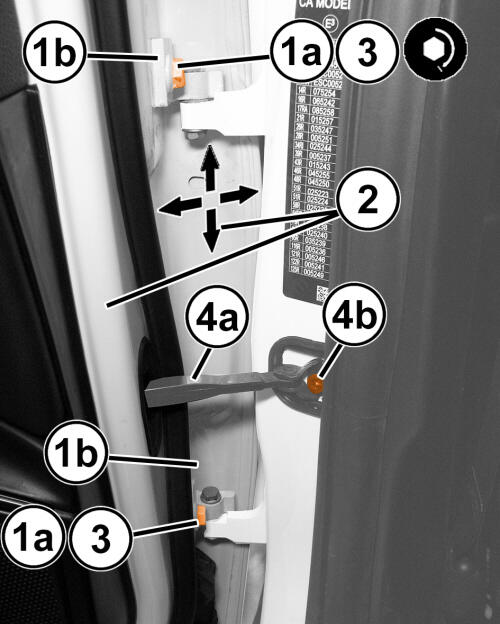
- Loosen the bolts (1a) securing the hinges (1b) to the door.
- Adjust the door position by means of the slotted bolt holes until it is correctly aligned with the quarter panel and front door.NOTE:
It is recommended to work on one hinge at a time. The arrows (2) indicate the possible movements for the adjustment.
- After adjustment, tighten the bolts to the proper specification. Refer to TECHNICAL SPECIFICATIONS .
- Extract the link (4a) and tighten the bolt (4b) to the proper specification. Refer to TECHNICAL SPECIFICATIONS .
- Install and adjust the striker. Refer to STRIKER, DOOR LATCH, REMOVAL AND INSTALLATION .
- Touch up the paint in the half hinge area.
- Check that the striker and the door lock are correctly matched and that the alignment is correct with the door closed.
Exposed Metal Treatment
- Apply an epoxy or anti-corrosion primer to any bare metal exposed during hinge service procedures.
- Allow the primer to dry in accordance with the manufacturer recommendations.
- Apply touch-up paint over the primed area.
- Allow the touch-up paint to dry in accordance to the manufacturer recommendations.