Removal And Installation: Installation
Considerable care must be used to prepare the sunroof frame and glass before installing the rear glass panel. Follow the prep steps carefully.
The glass that was removed can only be reused if it has not been damaged during removal.
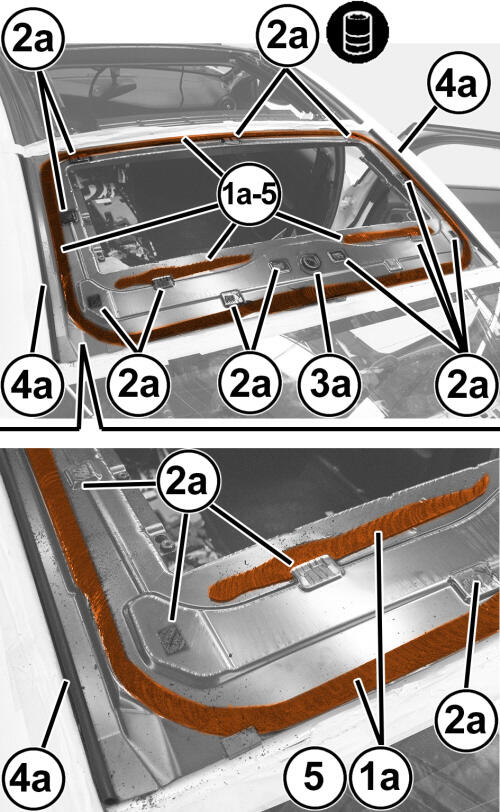
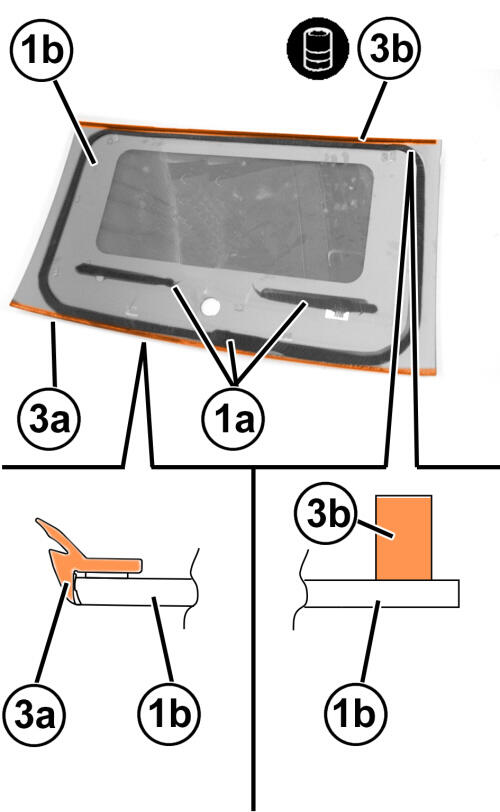
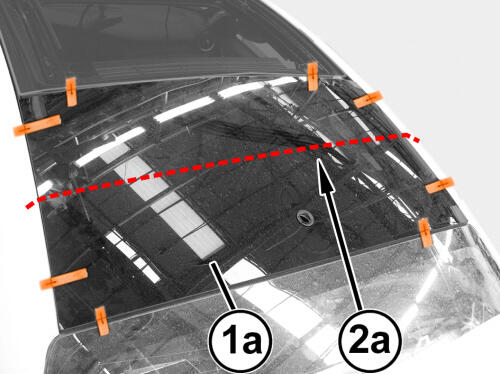
- Use a suitable tool, cut and level the bead of sealant (1a) on the sun roof frame, leaving a thickness of between 0.25 and 1 mm. The thickness of the sealant remaining on the frame will act as a support for the new sealant. Take care not to scratch the paint of the roof panel.
- Remove the protective tape from the sunroof opening.
- Reposition or replace the spacers (2a).
- Replace the adhesive seal (3a) positioned around the antenna hole.
- Inspect the side seals (4a) and replace if any damage or wear is observed.
- If necessary, touch up the paint around the sunroof opening.
- Clean the sunroof housing thoroughly with high pressure air. Clean all bonding surface with heptane. When bonding the glass panel more than 60 minutes after the sealant bead has been cut and levelled, the surface of the sealant must be treated with a special activation product and then must wait 15 minutes before bonding the rear glass panel.
- When reusing the rear glass that was previously removed, perform the following steps.
- Using a suitable tool, cut and level the bead of sealant (1a) on the sunroof glass (1b) so that it is as thin as possible. The remaining sealant does not have to be completely removed. Take care not to damage the black screen-printing on the glass perimeter.
- Carefully clean the bonding area of the glass with high pressure air and degrease it with heptane. Check that the glass is not damaged.
When bonding more than 60 minutes after the bead of sealant (1a) has been cut and levelled, it is necessary to treat the surface of the sealant with a special activating product and wait for 15 minutes before bonding the rear sunroof glass panel. On the sunroof frame use activator for PUR before bonding.
- Remove the rear weatherstrip (3a) and front weatherstrip (3b) by detaching their adhesive strips from the sun roof glass. Thoroughly degrease the bonding area of the weatherstrip with heptane. Position the new weatherstrips (3a) and (3b) after gradually removing the protective films from the adhesive strips.
- When installing a NEW rear glass, perform the following steps.
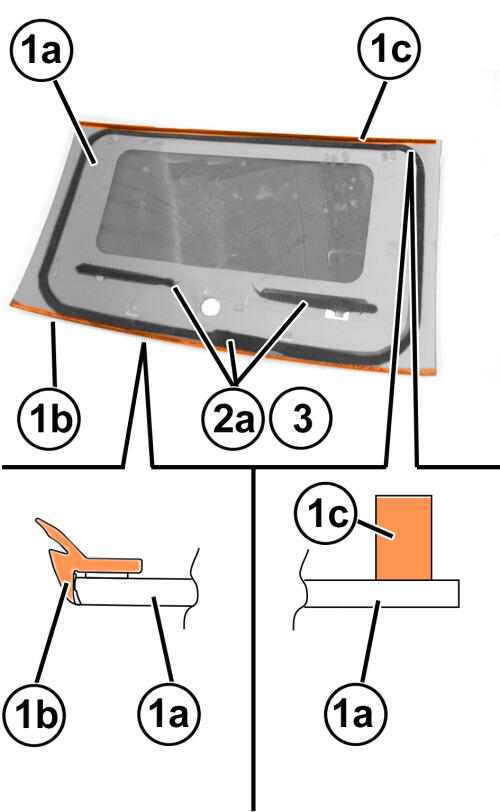
- If necessary, install a new weatherstrips (1b and 1c) on the glass (1a). Thoroughly degrease the bonding area of the weatherstrip with heptane. Position the new weatherstrips and after gradually removing the protective films from the adhesive strips
- Carefully clean the bonding area of the glass (1a) with high pressure air and degrease it with heptane. Check that the glass is not damaged.
- Apply the glass adhesion promoter (primer) to the bonding surfaces using the wick applicator supplied in the kit.NOTE:
Wait 15 minutes before continuing, to allow the adhesion promoter thinner to evaporate.
- For installation of reused or new rear sunroof glass perform the following.
- Install the front sunroof glass, and close it fully. This will aid in positioning the rear glass panel. Refer to GLASS, SUNROOF, FRONT, REMOVAL AND INSTALLATION Refer to, GLASS, SUNROOF, REAR, REMOVAL AND INSTALLATION .
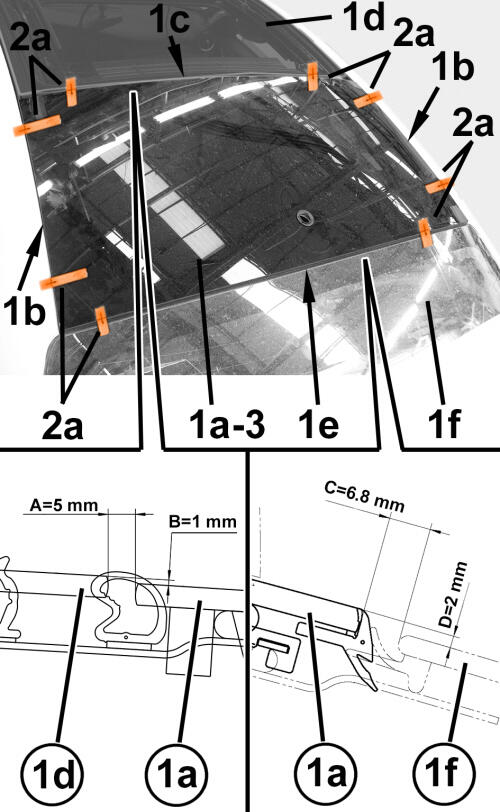
- Test fit the rear glass (1a) onto the sunroof frame.
- Center the sides (1b) in the roof opening.
- Position the front (1c) to the dimension (A and B) with respect to the front sunroof glass (1d). The height (B) must take into account the addition of sealant.
- Position the rear (1e) to the dimension (C and D) with respect to the rear window glass (1f). The height (D) must take into account the addition of sealant.
- Once the glass is into position, mark this position of the glass using adhesive tape (2a). Using a knife, cut the strips of tape along the glass panel. Then remove the rear sunroof glass panel.NOTE:
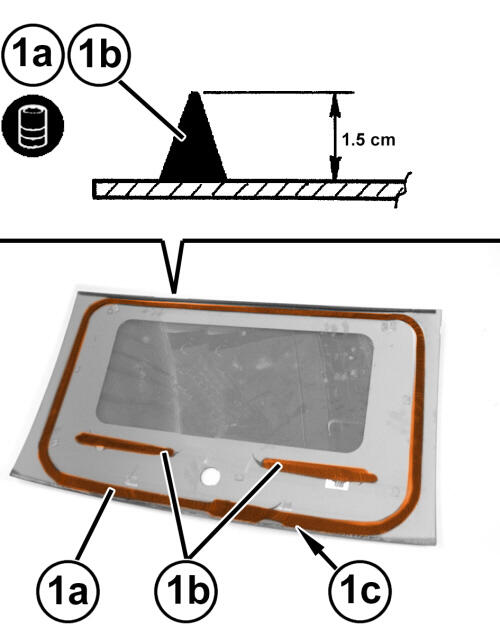
When applying the bead (1a), start from the rear center (1c) and proceed along the perimeter of the glass without interruption. On reaching the start of the bead, overlay the it by a few cm.
- Use glass sealant product no. 71711976.
- Use an air gun to extrude a bead of sealant (1a) along the entire perimeter of the glass and two internal beads (1b), as evenly as possible.
- With the help of as assistant, position the glass (1a) immediately after applying the sealant. carefully position it using the tape as installed previously. Set the glass and press it to meet the dimensions used in the test fitting stage.
- If necessary, position a belt (2a) as shown in illustration, and tension it so that even pressure is exerted over the entire glass to ensure that the glass (1a), the sealant and the housing are mated correctly.
- Before installing the vehicle interior and exterior components, check that there are no water leaks by performing a water leakage test.
- Install the satellite audio antenna. Refer to ANTENNA, SATELLITE, AMPLIFIER, REMOVAL AND INSTALLATION Refer to, ANTENNA, SATELLITE, AUDIO, REMOVAL AND INSTALLATION .
- Install the sunshade guide. Refer to GUIDE, SUNSHADE, REMOVAL AND INSTALLATION .
- Install the sunshade. Refer to SUNSHADE, SUNROOF, REMOVAL AND INSTALLATION .
- Install the headliner. Refer to HEADLINER, REMOVAL AND INSTALLATION .