Sunroof Assembly: Installation
NOTE:
Install or transfer any parts necessary before installing the new sunroof assembly.
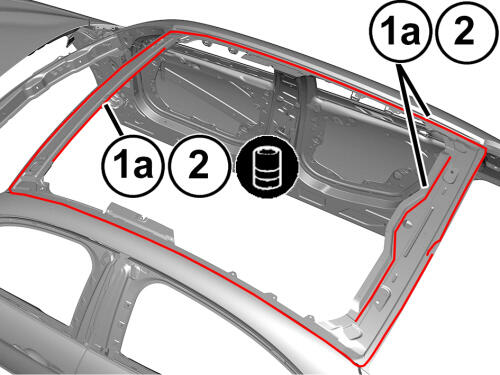
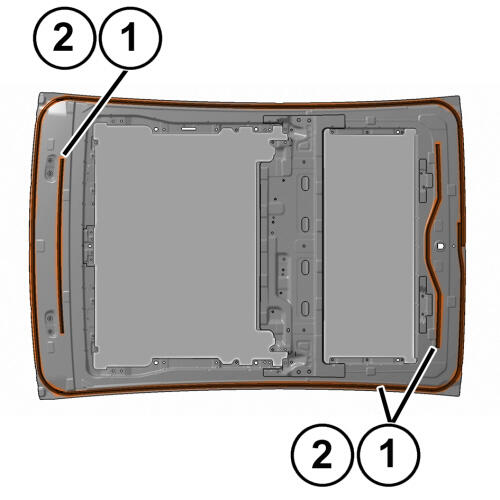
- Using suitable equipment, cut and level the bead of sealant (1a) in the sun roof frame housing leaving a thickness of between 0.25 and 1 mm (0.010-0.040 inch), taking care not to scratch the paint work. The thickness of the sealant remaining in the housing will act as a support for the new bonding.
- Clean the frame housing and remove any grease with hepthane.
- Remove the double layer of tape from the body around the sunroof housing.NOTE:
When bonding more than 60 minutes after the sealant bead has been cut and leveled, the surface of the sealant itself must be treated using the special activating product and it is necessary to wait for 15 minutes before installing the sunroof.
- Clean and degrease the sunroof bonding surfaces (1) with hepthane.
- Apply the glass adhesion primer to the adhesive surface (1) using the wick supplied in the kit.NOTE:
Wait about 15 minutes before continuing with the next step to allow the adhesion primer to evaporate.
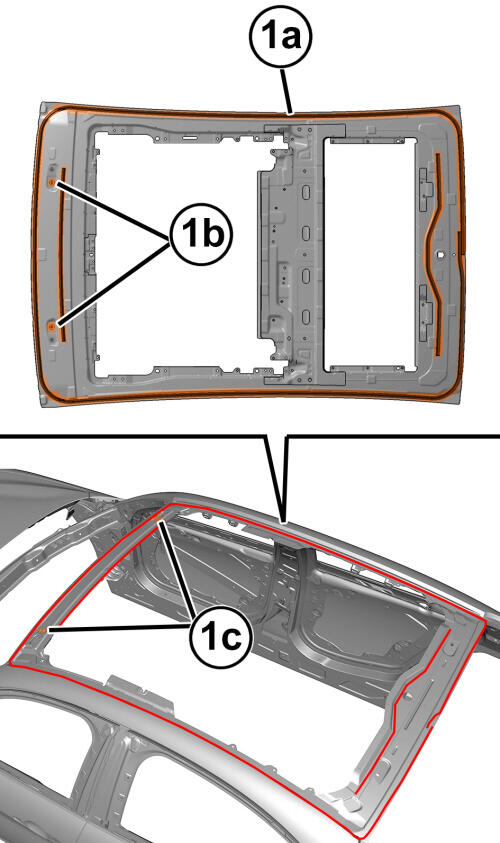
- With the help of three assistants, plus another assistant inside the vehicle, test fit the sunroof (1a). Center the studs (1b) into the holes (1c), if necessary restore or replace the various spacers.NOTE:
The position dimensions must take into account the addition of sealant.
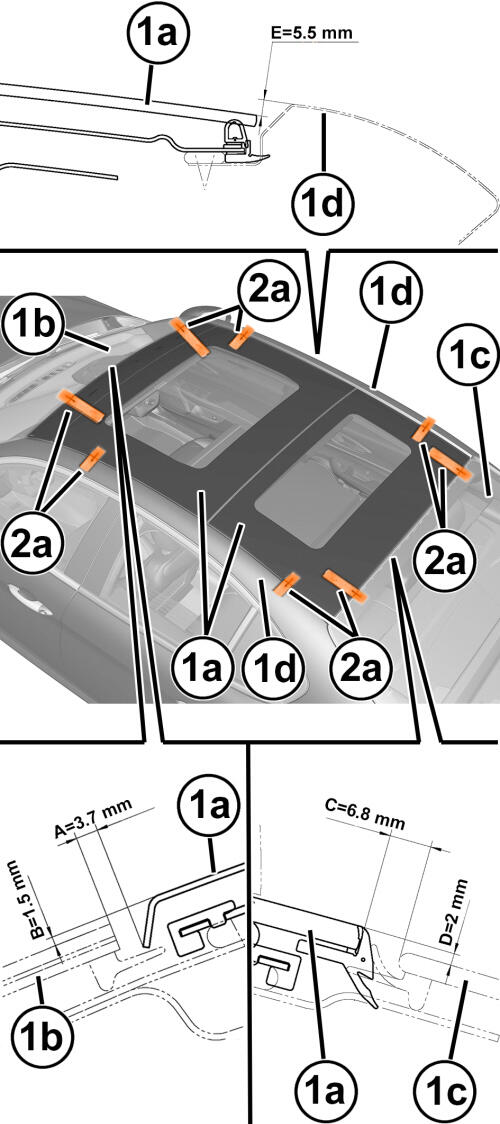
- Position the sunroof (1a) as described.
- Position to dimension (A) and (B) in relation to the front glass (1b).
- Position to dimension (C) and (D) in relation to the rear glass (1c).
- Position to dimension (E) in relation to the body sides (1d). The dimension (E) must be measured from the back of the sunroof glass (not on the fixed glass).
- Center the sunroof (1a) with respect to the side structure.
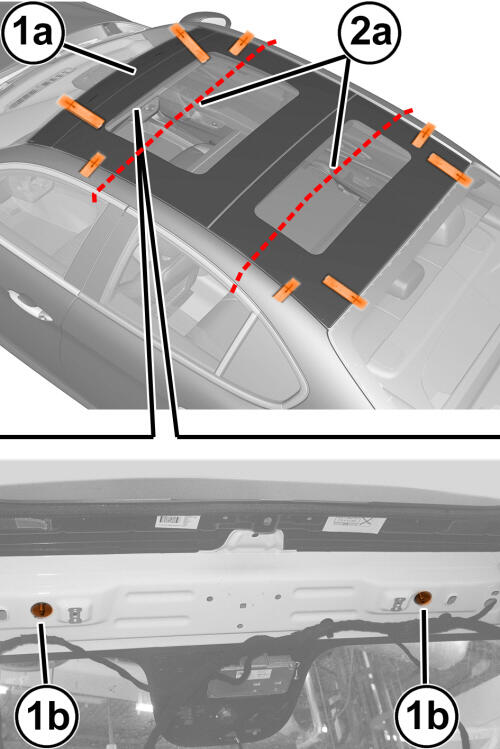
- When the sunroof has been positioned, use strips of adhesive tape (2a) to mark the position of the sunroof with respect to the roof panel. Cut the strips of adhesive tape along the perimeter of the sunroof, then remove the sunroof.
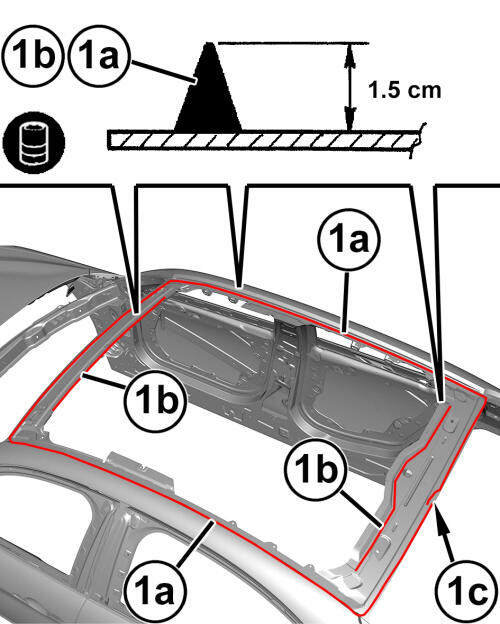
- Apply a bead of sealant (1a) along the perimeter of the frame as evenly as possible.NOTE:
When applying the bead, start at the rear center (1c) and proceed along the perimeter of the sunroof without interruption. When you reach the start bead, overlap the bead by a few centimeters.
- Apply the inner beads (1b) of sealant.
- With the help of three assistants and another inside the vehicle, position the sunroof (1a) in the vehicle housing and align with the previously cut tape marks and dimensions.
- If necessary, use retaining straps (2a) to hold the sunroof into position.
- Install the nuts (1b) at the front of the sunroof frame and tighten securely.
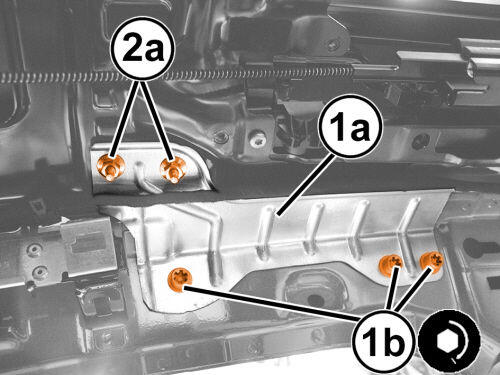
- Install the brackets (1a). Tighten the sunroof bracket bolts (1b) securely.
- Only tighten the nut (2a) as necessary to obtain the install dimensions as specified during test fitting.
- Do not move the sunroof for the time as recommended by the sealant manufacturer.
- Before installing any interior parts, check that there are no infiltration by performing a water leakage test.
- Install the sunroof guide. Refer to GUIDE, SUNROOF, GLASS, REMOVAL AND INSTALLATION .
- Install the sunroof drain channel. Refer to CHANNEL, SUNROOF DRAIN, REMOVAL AND INSTALLATION .
- Install the wind deflector. Refer to DEFLECTOR, WIND, REMOVAL AND INSTALLATION .
- Install the rear sunroof glass. Refer to GLASS, SUNROOF, FRONT, REMOVAL AND INSTALLATION Refer to, GLASS, SUNROOF, REAR, REMOVAL AND INSTALLATION .
- Install the front sunroof panel. Refer to SUNROOF, DUAL PANE, REMOVAL AND INSTALLATION .
- Install the headliner in the vehicle. Refer to HEADLINER, REMOVAL AND INSTALLATION .