Removal And Installation: Removal
- Disconnect and isolate the negative battery cable.
- Remove the cowl cover panel. Refer to COVER, COWL PANEL, REMOVAL AND INSTALLATION .
- Remove the interior mirror. Refer to MIRROR, REARVIEW, REMOVAL AND INSTALLATION .
- Remove the grab handles. Refer to HANDLE, GRAB, REMOVAL AND INSTALLATION .
- Remove the visors and supports. Refer to VISOR, REMOVAL AND INSTALLATION .
- Remove the A-pillar trim panels. Refer to PANEL, A-PILLAR TRIM, REMOVAL AND INSTALLATION .
- Remove the forward facing camera heater. Refer to MODULE, FORWARD FACING CAMERA (FFCM), REMOVAL AND INSTALLATION .
- Remove the light rain sensor. Refer to MODULE, LIGHT RAIN SENSOR, REMOVAL AND INSTALLATION .
- Remove the humidity sensor. Refer to SENSOR, HUMIDITY, REMOVAL AND INSTALLATION .
- Remove the overhead console. Refer to CONSOLE, OVERHEAD, REMOVAL AND INSTALLATION .
- Slightly lower the front side of the head lining and insert shims to keep it slightly lowered.
- Protect the dashboard and fenders using suitable covers.
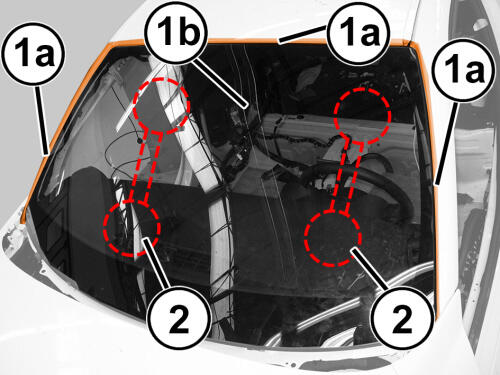
- Apply a double layer of adhesive tape (1a) to the body along the upper profile and side profiles of the windshield glass (1b).
- Apply suction pads (4) to the windshield glass.
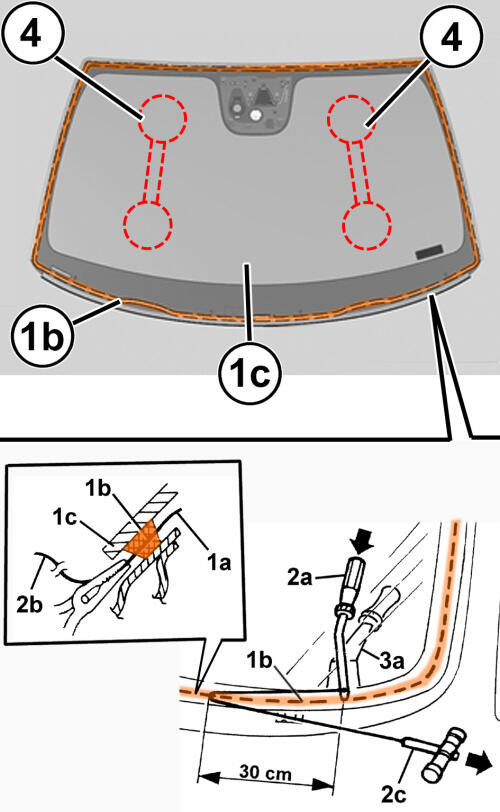
The windshield glass bead of sealant can be cut using piano wire. To cut with a vibrating cutter, an adequate cutter usage capacity is required, as well as an appropriate choice of blades in accordance with the cutting areas and any obstructions present.
The procedure than can be carried out with standard equipment is described below.
To cut using piano wire, proceed as described below.
- Cut a length of piano wire of about 80 cm then, using pliers, introduce one end (1a) of the piano wire through the strip of sealant (1b) fixing the windshield (1c).
- Fasten one end (1a) of the wire to the special retaining tool (2a) located inside the vehicle. Fasten one end (2b) of the wire to the traction handle (2c) located outside the vehicle.
- The operator inside the vehicle should keep the end of the tool (2a) on the bead of sealant (1b) about 30 cm from the point where the wire passes through. The other operator, outside the vehicle, should pull the handle (2c) following the perimeter of the windshield and then cut the bead of sealant (1b). When necessary, place a spatula (3a) of suitable size by the tool (2a) to protect the inner parts of the vehicle. Repeat the operation in sections of about 30 cm until the bead of sealant (1b) is completely cut.NOTE:
While cutting, be careful to the various parts present in the area; in particular:
pay attention to the points where the retainers and the shims for preventing sinking are present.
do not touch the edge of the backlite glass and the body with the piano wire.
- After cutting round the entire bead of sealant, remove the windshield glass (1c) using suction cups and, with the help of another operator, rest it on a support stand.
Preparing The Glass Opening
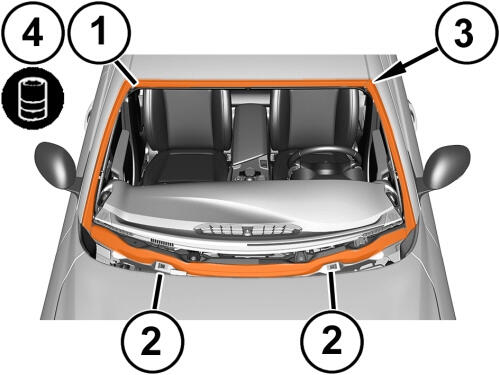
- Using a suitable tool, cut and level the bead of sealant in the windshield glass housing (1) leaving a thickness of between 0.25 and 1 mm, taking care not to scratch the paint. The thickness of the sealant remaining in the housing will act as a support for the new bonding.
- Lift the windshield needle retainers (2); if necessary, replace the corresponding blocks.
- Remove the applied adhesive tape (3) along the upper profile and side profiles of the windshield glass.
- Remove the lowering shims for the head lining.WARNING:
Do not use solvent based glass cleaners to clean the windshield before applying glass prep and primer or poor glass adhesion may result.
- Thoroughly clean the windshield housing using compressed air and degrease fully using heptane. When bonding more than 60 minutes after the sealant bead has been cut and levelled, the surface of the sealant itself must be treated using the special activating product and it is necessary to wait for 15 minutes before fixing the windshield.
- If necessary, touch up the paint.
Preparing The Removed Window
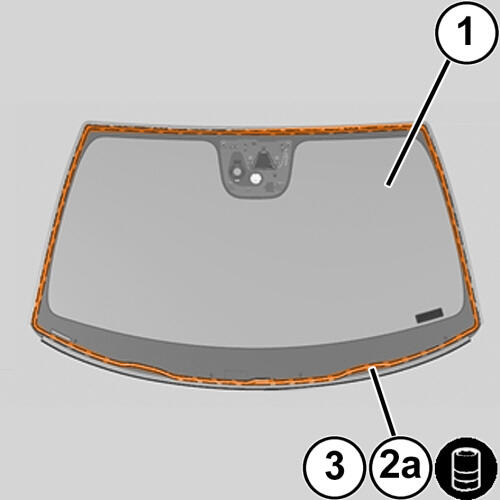
- The glass (1) can only be reused if it has not been damaged during the removal.
- Use a suitable tool to cut and level the bead of sealant (2a) on the window so that it is as thin as possible. The remaining sealant does not have to be completely removed; take care not to damage the glass parts, the black screen-printing on the glass perimeter and the peripheral seals.
- Use compressed air to carefully clean the silk-screened perimeter area of the window to be bonded, and then degrease it thoroughly with heptane. - Check that the window is not damaged. When bonding more than 60 minutes after the sealant bead has been cut and levelled, the surface of the sealant itself must be treated using the special activating product and it is necessary to wait for 15 minutes before fixing the windshield.
Preparing The New Glass
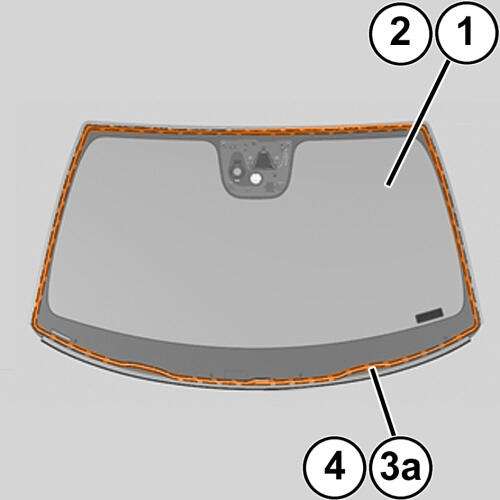
- Check that the glass (1) is not damaged.
- Check that the perimeter seals are intact.
- Using heptane, degrease the silk-screened perimeter (3a) of the new window involved in the bonding.
- Apply the glass adhesion promoter (primer) to the silk-screened perimeter using the wick supplied in the kit.NOTE:
Wait for about 15 minutes before continuing with the next operation to allow the adhesion promoter (primer) thinner to evaporate.
Do not operate the vehicle within 24 hours of windshield installation. It takes at least 24 hours for urethane adhesive to cure. If it is not cured, the windshield may not perform properly if the vehicle is in an accident.
To help prevent water leaks, partially roll down the left and right door glass before installing the windshield. This avoids pressurizing the passenger compartment if a door is slammed before the urethane is cured.
Protect all painted and trimmed surfaces from coming in contact with urethane or primers.
INSTALLATION
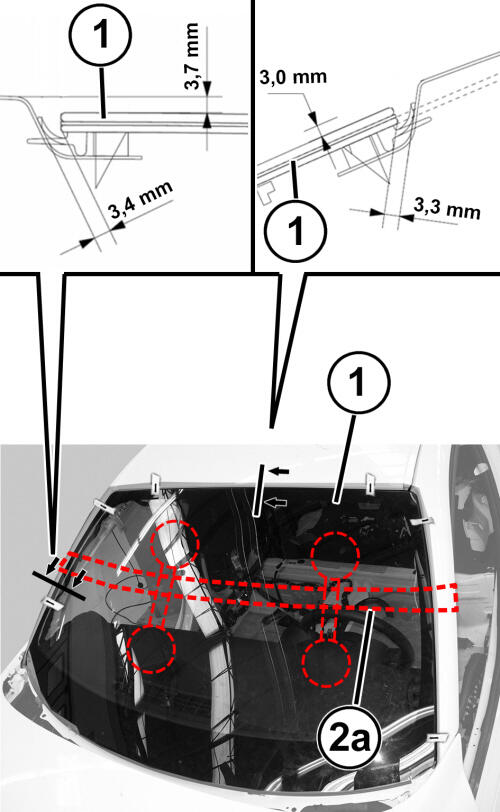
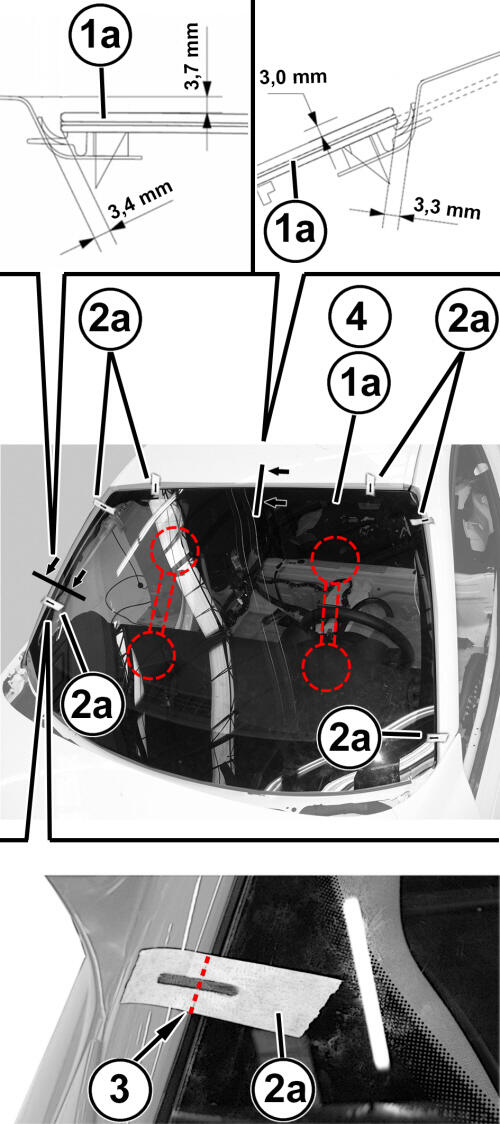
- Carry out a test assembly and position the windshield glass (1a) in its housing respecting the measurements shown in illustration. The windshield glass must be centered on the side pillars and therefore the distance of 3.4 mm is indicative.
- After having positioned the windshield glass, mark the relative positions of the windshield and seat using strips of adhesive tape (2a).
- Cut the strips of adhesive tape (3) along the profile of the windshield glass.
- Remove the windshield.CAUTION:
Always apply the bead of adhesive to the windshield. Always install the windshield within 5 minutes after applying the adhesive.
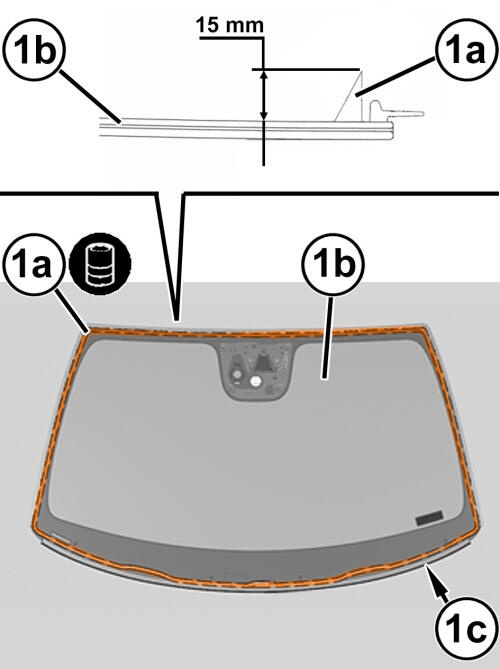
- Using an air gun, apply a bead of sealant (1a) along the perimeter of the windshield glass (1b) as evenly as possible.NOTE:
Start the operation from the middle of the lower side and proceed without interruptions around the whole perimeter of the glass, also making an overlap (1c) of approximately 30 mm, as illustrated.
- Place the windshield glass in the housing with the assistance of a second operator immediately after applying the sealant and let it bed in.
- Position the belt (2a) as illustrated and tension it to exert even pressure on the entire windshield glass in order to guarantee that the glass, sealant and windshield housing are correctly matched, resting the seal to prevent sinking on the body.CAUTION:
It is not possible to move the windshield after installation. The windshield should never be pressed into place by more than one person, because the windshield can break if pressed simultaneously on both sides.
- Before refitting the interior elements of the vehicle, check that there are no infiltration points by carrying out a water leakage test.
- Remove the strips of adhesive tape used to center the windshield.
- Remove the overhead console. Refer to CONSOLE, OVERHEAD, REMOVAL AND INSTALLATION .
- Install the humidity sensor. Refer to SENSOR, HUMIDITY, REMOVAL AND INSTALLATION .
- Install the light rain sensor. Refer to MODULE, LIGHT RAIN SENSOR, REMOVAL AND INSTALLATION .
- Install the forward facing camera heater. Refer to MODULE, FORWARD FACING CAMERA (FFCM), REMOVAL AND INSTALLATION .
- Install the A-pillar trim panels. Refer to PANEL, A-PILLAR TRIM, REMOVAL AND INSTALLATION .
- Install the visors and supports. Refer to VISOR, REMOVAL AND INSTALLATION .
- Install the grab handles. Refer to HANDLE, GRAB, REMOVAL AND INSTALLATION .
- Install the interior mirror. Refer to MIRROR, REARVIEW, REMOVAL AND INSTALLATION .
- Install the cowl cover panel. Refer to COVER, COWL PANEL, REMOVAL AND INSTALLATION .
- Connect the negative battery cable.