Aluminum Body Panel Corrosion Repair (31-002-22)
Publication date: 2024-07-24Reference number: 31-002-22
Supersedes refnos: 31-001-18 REV. A, 31-001-18 REV. B, 31-001-19, 31-001-23, 31-001-23 REV. A, 31-001-24, 31-002-20
ALUMINUM BODY PANEL CORROSION REPAIR
TECHNICAL SERVICE BULLETIN
| CHRYSLER: | 2020 - **2024** (JT) Jeep Gladiator; 2019 - **2024** (BV) Jeep Renegade; 2015 - 2020 (4C) Alfa Romeo 4C; 2017 - 2020 (BA) FIAT 124 Spider (Convertible); 2013 - 2019 (FF) FIAT 500; 2017 - **2024** (GA) Alfa Romeo Giulia; 2018 - **2025** (GU) Alfa Romeo Stelvio; 2014 - 2023 (KL) Jeep Cherokee; 2013 - **2018** (PF) Dodge Dart; 2013 - **2018** (ZD) Dodge Viper; 2013 - **2022** (DS) RAM 1500 Pickup; 2013 - 2022 (WK) Jeep Grand Cherokee; 2013 - **2022** (WD) Dodge Durango; 2017 - **2024** (RU) Chrysler Pacifica; 2015 - 2018 (BU) Jeep Renegade; 2018 - **2024** (JL) Jeep Wrangler; 2015 - **2021** (LA) Dodge Challenger; 2013 - 2014 (LC) Dodge Challenger; 2013 - 2023 (LX) Chrysler 300; 2017 - **2024** (MP) Jeep Compass; 2015 - 2017 (UF) Chrysler 200; 2019 - **2024** (D2, DD, DF, DJ and DP) RAM Heavy Duty Trucks |
| GROUP: | 31 - Collision Bulletins |
VEHICLES AFFECTED
2020 - **2024** (JT) Jeep Gladiator
2019 - **2024** (BV) Jeep Renegade
2015 - 2020 (4C) Alfa Romeo 4C
2017 - 2020 (BA) FIAT 124 Spider (Convertible)
2013 - 2019 (FF) FIAT 500
2017 - **2024** (GA) Alfa Romeo Giulia
2018 - **2025** (GU) Alfa Romeo Stelvio
2014 - 2023 (KL) Jeep Cherokee
2013 - **2018** (PF) Dodge Dart
2013 - **2018** (ZD) Dodge Viper
2013 - **2022** (DS) RAM 1500 Pickup
2013 - 2022 (WK) Jeep Grand Cherokee
2013 - **2022** (WD) Dodge Durango
2017 - **2024** (RU) Chrysler Pacifica
2015 - 2018 (BU) Jeep Renegade
2018 - **2024** (JL) Jeep Wrangler
2015 - **2021** (LA) Dodge Challenger
2013 - 2014 (LC) Dodge Challenger
2013 - 2023 (LX) Chrysler 300
2017 - **2024** (MP) Jeep Compass
2015 - 2017 (UF) Chrysler 200
2019 - **2024** (D2, DD, DF, DJ and DP) RAM Heavy Duty Trucks
CUSTOMER SYMPTOM
Aluminum corrosion or bubbling along the leading edge of hood, hinges or other exterior surface areas of the hinges, doors, fenders, swing gates or liftgates.
CAUSE
**Corrosion conditions**
REPAIR SUMMARY
This bulletin involves inspecting and if necessary removing corrosion and refinishing the suspect aluminum panels on the vehicle, hood, door, fenders, hinges, swing gates or liftgate panels.
SPARE PARTS
| Qty | Part No. | Description | Notes |
|---|---|---|---|
| 3 (AR) | NPN | 500 grit Sandpaper Sheet | |
| 1 (AR) | NPN | 800 grit Sandpaper Sheet | |
| 1 (AR) | NPN | 80 grit Sandpaper Sheet | |
| 1 (AR) | NPN | 180 grit Sandpaper Sheet | |
| 1 (AR) | NPN | 3M® 3" Clean and Strip Disc 3M® p/n 07470 or equivalent | |
| 1(AR) | NPN | 3M® Scotch-Brite Scuffing Disc 07467 Maroon or equivalent | |
| 1 | 06103087AA | Anti-Corrosion Pen |
DISCUSSION
Aluminum corrosion or bubbling along the leading edge of hood, hinges or other exterior surface areas of the hinges, doors, fenders, swing gates or liftgates.
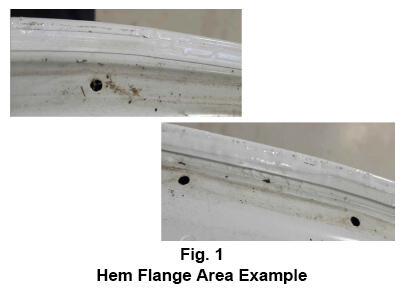
DIAGNOSIS
Aluminum corrosion or bubbling on the doors and/or hinges Fig. 2 .
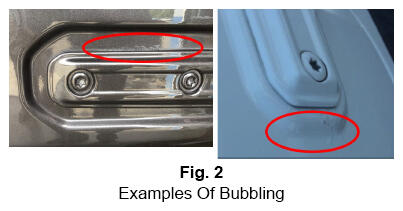
Aluminum corrosion along the leading edge of hood or other exterior surface areas of the doors, fenders or liftgates Fig. 2 or Fig. 3 .
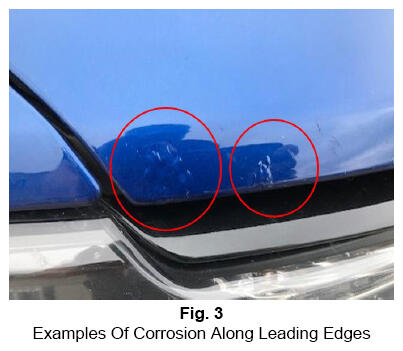
Is corrosion evident on the aluminum panel surface Fig. 2 or Fig. 3 ?
- YES>>> Consult current warranty policy to determine if digital imaging and/or Regional Office Approval is required before proceeding with repair, Proceed to Step 1 of the diagnosis procedure.
- NO>>> The repair does not apply.
- Remove blistered paint from the panel surface with 80 grit grinding disc.
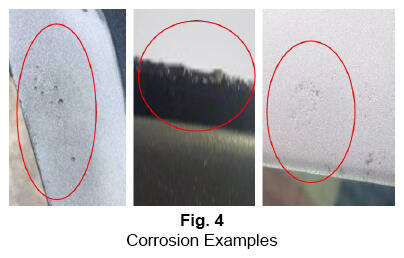
- After digital imaging or Regional Office approval and removing the initial blistered paint from the panel surface with 80 grit grinding disc, is severe pitting exhibited that cannot be removed with sandpaper, 3M Clean and Strip Disc or equivalent Fig. 4
?
- YES>>> Replace the panel.
- NO>>> Proceed to Step 1 of the repair procedure.
REPAIR PROCEDURE
- Remove affected panel. Refer to the detailed service procedures available in DealerCONNECT/Service Library under: Service Info> 23 - Body/Doors - Front/Panel, Door Trim/Removal.CAUTION: Exterior mounted hinges should not be removed unless repair procedures, such as filiform corrosion repair underneath and around the hinge area, are required. Unnecessary removal of the hinges will risk further corrosion damage by breaking the paint around the perimeter of the hinge.
- Remove all trim necessary for repairing and refinishing of the affected panel.
- Wash the panel with soap and water to remove waterborne contaminants followed by wax and grease remover to remove solvent base contaminants.
- Remove corrosion using an angle grinder equipped with grinding discs that are 80 grit or less. Do not use grinding discs courser that 80 grit.NOTE: Roloc® 3" grinding discs and/or Clean 'N Strip discs may be used for removing aluminum corrosion in difficult to access areas. Avoid using tools or abrasive materials interchangeably with steel and aluminum components to avoid galvanic corrosion that may lead to a sub-standard finish.
- Sand bare metal with 180 grit.
- Feather edge the old finish/repair area using 320-400 grit sandpaper.
- Mask the prepared area for primer application.
- Re-clean the repaired area with wax and grease remover.NOTE: BASF® will be referenced as the primary product. Other approved FCA refinish paint manufacturer brands are acceptable if equivalents are available. Refer to the list of FCA approved refinish paint manufacturers:
Paint Supplier Approved Paint Systems Akzo Nobel® Lesonal, Sikkens Axalta® Cromax, Spies Hecker, Standox BASF® Glasurit, R-M PPG® Deltron, Envirobase, Global, One Choice Sherwin Williams® DeBeer, Martin Senour, Sherwin-Williams Automotive Finishes, Valspar NOTE: Refer to paint manufacturers' preparation and application recommendations.NOTE: Refer to paint manufacturers' mixing and application recommendations.NOTE: Refer to adhesive manufacturers' mixing and application recommendations. - Clean sanded bare aluminum areas using a metal cleaner such as Glasurit's 360-4 or equivalent followed by BASF 2000 Advanced Prep Wipes or equivalent prior to applying primer.
- Apply two coats of BASF's Glasurit 151-170 UV Primer to the repair area.
- Using a UV cure lamp and the appropriate PPE, cure the product for sanding and refinish preparation.
- After curing, block sand with 500 grit or finer sandpaper to prepare the repair area for sealer application.
- If the backside of the panels require repair and seam sealer removal was necessary, it must be restored. Apply Fusor 129 or 3M 08308 seam sealer or equivalent.
- Prepare panel for refinishing, remove all remaining dust, clean with Pre-Kleano 700 wax and grease remover or equivalent and use a tack cloth to remove any remaining dust particles.
- Apply sealer, basecoat and clearcoat per chosen paint manufacturer's procedures.
- Install the repaired panel. Refer to the detailed service procedures available in DealerCONNECT/Service Library under: Service Info> 23 - Body/Doors - Front/Panel, Door Trim/Installation.
- Install the removed trim components, including adhesive backed components (i.e. nameplates). **
POLICY
Information Only